


Print Profile(2)


Bill of Materials


Description
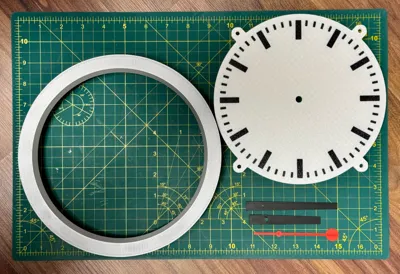
Swiss railway style wall clock
A classy looking wall clock in the style of the iconic Swiss Railway clock, made famous to non-watch (or rail) enthusiasts, by Apple using a similar clock within a previous version of iOS.
Two colour print profiles here, one for the white clock face and one for the black clock face. The secondhand stays red in both, but the hands and markers change from black/white as appropriate.
Boost Me (for free)
If you like this model, please consider giving it a boost, it's a great way of thanking creators on here.
What you will need:
Makerworld Clock Components Kit-MH011 (I recommend going legit here, as I got burned buying what should have been the correct spec and the spindle size being too big)
4x M5x8 (8-10mm length) screws / bolts.
4x Filament colours; White, Black, Silver, Red (works for both print profiles)
Printing:
It's recommended to use two different build plates (as set out in the print profile);
Textured PEI: Clock face
Smooth / Supertack: Case, hands and second hand cap

Build instructions:
First, please attach the clock face, to the case, this only fits two ways, my suggestion is that the clock case seem is at the bottom (6 o'clock). The face is attached using the 4x M5 screws / bolts

Next, you need to install the body of the clock kit, please note the battery compartment should be at the bottom when fitting, closer to 6 o'clock.
Once in (it's a tight fit!) fix in place with the supplied nut / washer.
Now it's time to fit the hands.
Start with the hour hand, the holes have been printed with a slight tolerance for printing, if it's too tight to go on, the inside of the hole edge might need cleaning out (I use one of the 3D printing burr removal tools).
Fit the hand pointing to 12, it's important to do this to ensure it tells the correct time.

Now move on to the Minute hand, again cleaning the hole out if needed, align to 12 again.

For the second hand, we need to disassemble the secondhand supplied with the kit, I've found bending the hand around it is the best way to get it out cleanly

Push the newly removed pin through the hole on the second hand, this is right on purpose.

Now fit the printed red cap (on the same plate as the second hand.

Now attach the hand to the clock movement, taking care not to damage the pin

You're done!
Insert the battery in the back and set the time, you now have your own Swiss railway style clock :)

License
You shall not share, sub-license, sell, rent, host, transfer, or distribute in any way the digital or 3D printed versions of this object, nor any other derivative work of this object in its digital or physical format (including - but not limited to - remixes of this object, and hosting on other digital platforms). The objects may not be used without permission in any way whatsoever in which you charge money, or collect fees.
Comment & Rating (23)