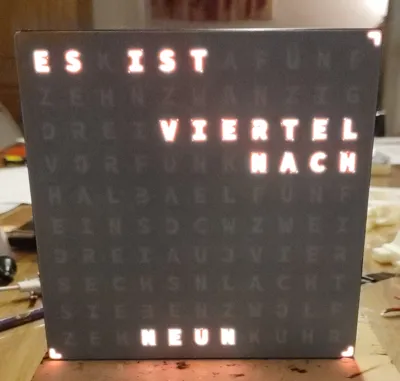
Wordclock - Wortuhr - A1 Mini optimized!


Print Profile(1)

Description
I bought a Bambu A1 Mini for Christmas and wanted a great 3D printing project to start with. I came across several “word clocks” and thought they’d be perfect. However, I couldn’t find a single design in a 10x11 format that fit the A1 Mini’s 18x18 cm print bed.
After some experimenting with THIS MODEL, I realized that slightly scaling down the model would make it fit while still allowing space for an LED strip — if it would be inserted rotated 90 degrees.
So, I opened Bambu Studio and gave it my best shot. Keep in mind, this was my very first attempt at 3D modeling! The file might not be perfect (to be honest it's a little bit crazy lol), but I can guarantee it will work in the end.
What I have modified
Inlay
- scaled x and y axis to 87,6 %
- rotated the LED guide rails inside by 90 degrees
- added one additional LED guide rails and resized them to fit the letters
- I traced over the grid on the front side again to make it 1 mm thick; otherwise, it would have been too unstable
Back
- adjusted the holder knobs for ESP
- rotated the spacer
- adjusted the cable relief
- added hangers
- added cutouts to provide some ventilation.
You will need
- basic soldering know how
- LED stripe WS2812b (60 LEDs / m) (you will need 114 LEDs)
- ESP8266
- 3-core wire
- duct tape
- 4x 3,0 x 20 wood screws
Print the 3D parts
Front
In the print profile there is a pause after layer 2. So you are able to manually change the filament if wanted. I used white PLA for the first two layers and black PLA for the rest
Inlay
- Slicer Settings: enable support, don't support bridgets
Removing the supports afterward is a bit annoying, but it works. I really wanted to print the model on this side due to the significantly shorter print time. I haven’t tried a print without supports.
Back
- Slicer Settings: enable support, type: tree(auto)
I had to use tree supports; otherwise (with normal support), the supports would have extended beyond the print bed. Due to my lack of experience, I couldn’t find another solution.
Software
I used this project here: https://github.com/ESPWortuhr/Multilayout-ESP-Wordclock
It is perfectly described how to program the ESP.
I have used Release V4.0.2
Assembly
Solder together 11 strips of 10 LEDs each, using 6–7 cm of wire between them—this length worked perfectly for my setup. Next, solder the 4 individual LEDs for the minute display. Once that's done, you can insert the LED strip, starting from the bottom left. Fix in place with some duct tape. At this point, it should look something like this:

Now you can close the enclosure and screw it together with 3,0 x 20 wood screws.

Comment & Rating (16)