Search models, users, collections, and posts

Soprano Guitalele

Print Profile(7)

All
P1S
P1P
X1
X1 Carbon
X1E
A1
H2D
H2D Pro
H2S
P2S
H2C
X2D
A2L

Guitalele parts
Guitalele parts
Designer
24.5 h
14 plates
5.0(5)

Super Soprano Guitalele Fretboard
Designer
3.6 h
2 plates
5.0(4)

Super soprano guitalele neck and headstock
Designer
25.4 h
3 plates
4.8(4)

Super soprano fretboard with replaceable frets
Designer
11.1 h
5 plates
4.8(4)
Click to see more

Open in Bambu Studio
Boost
209
484
84
62
373
103
Released 

Description

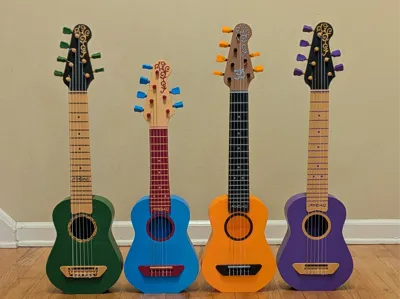
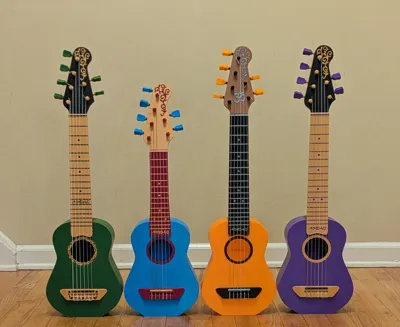
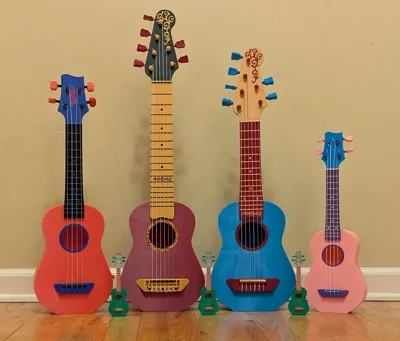
Introducing the soprano guitalele - the newest instrument in my family of 3D printed ukes .  A guitalele (or guitarlele, or ukitar) is a cross between ukulele and guitar, with six strings tuned like a guitar but the small size of a ukulele.    You can choose between two models, a soprano guitalele, with 13.625 inch scale length, or a super soprano guitalele with a longer neck and 17 inch scale length.  It's small size makes it an ideal travel instrument.


Update - 4/4/25:  Turns out, the 3 metal plated bass strings wear the 3D printed frets much faster than I expected.  So, I have added fretboards with replaceable frets.  Just slide out the old worn fret and slide in a new freshly printed one!


The soprano guitalele is tuned to C, with the string tunings CFA#D#GC from lowest to highest.


The super soprano guitalele is tuned lower than the soprano, on A, with string tunings ADGCEA from lowest to highest.


Sound demo of the super soprano and build instructions are available in the video below:


Sound demo for the soprano guitalele and instructions on installing the tuners are available in this video :


Click here for Model 3 tuners I designed to go with ukes and guitaleles.


I also designed a mount to hang the guitalele from the wall.


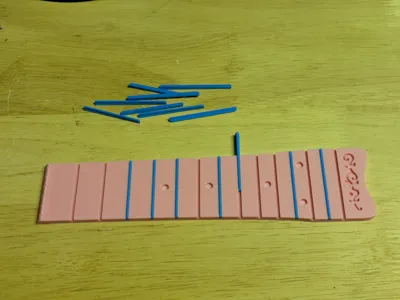
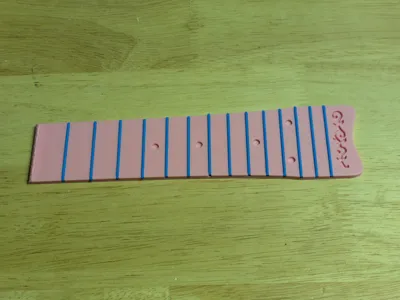
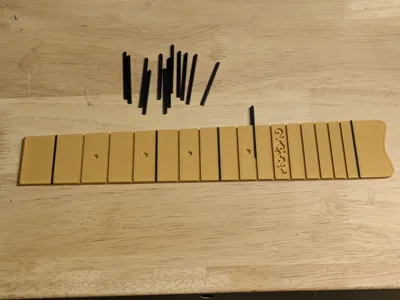
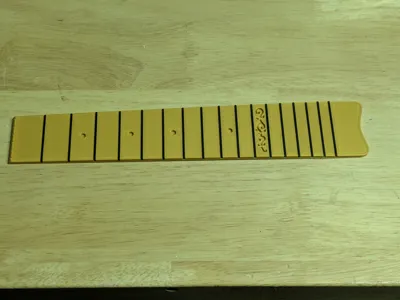
The 3 metal plated bass strings wear the 3D printed frets fairly quickly.  To deal with this, I have designed a new fretboard with replaceable frets.  This way, when a fret gets worn, you only need reprint a single new fret.  Slide out the old fret, and replace it with a brand new one!

  • There are fretboards for replaceable frets for both the soprano (13.6 inch scale) and super-soprano (17 inch) guitaleles, both with and without inlay
  • The frets are tapered.  They only go in one way.  They should slide in easily, and then catch at the end for a snug fit due to the taper.
  • There is a number on the bottom to help with identification after printing.
  • 3D printing tolerances aren't that tight.  So for both the soprano and super-soprano, I have designed three sets of frets - narrow, medium, and wide.  I suggest starting with the medium frets.  See how they fit.  If they are too loose or too tight, you can switch an individual fret to either the narrow or wide as appropriate.
  • Thanks to needing frets for both soprano and super soprano, with narrow, medium, and wide width, there are a LOT of stl files :)  The file naming convention is SG for soprano, SSG for supersoprano, and  -n, -m, -w for narrow, medium, and wide, respectively.
  • On the soprano one of the guides for aligning the fretboard needed to be moved because it conflicted with a fret groove. I've updated the neck design and you'll need to re-download it if printing the soprano.
  • I've left the original fretboard designs with frets printed directly on the fretboard for download if you want them, but I recommend against using them since they do wear quickly.


In addition to the printed parts, you'll need 

  • Strings for a guitalele. I like Aquila AQ-96.
  • A carbon fiber rod in the neck for strength.   For the soprano guitalele, I use a 200 mm long, 5 mm diameter carbon fiber rod.  For the super-soprano guiltalele I use a 300 mm long, 8 mm diameter rod.  Given the six strings in the guitalele the carbon fiber rod is essential to prevent excessive bending in the neck.
  • For the soprano guitalele, one #4, 1'' wood screw to screw the headstock to the neck,  For the super soprano guitalele, you'll need two #4, 1'' wood screws.
  • 17, #2 3/8'' screws.  12 for the Model 3 tuners, and 5 to screw the bridge to the body, for additional strength.


Print Settings

  • Printer : Bambu Lab P1S
  • No Supports Rafts, or Brims
  • Resolution: 0.12 mm
  • Infill: 50 %
  • Filament material: I've printed primarily with PLA as silk and wood PLAs are not as strong as regular PLA.  For example, I use Bambu Lab PLA Basic. The Bambu Lab store give materials properties for different filaments and bending strength, bending modulus, and tensile strength of PLA Basic are all considerably higher than others like silk.

Notes:

All parts were printed with 5 shell layers and 50% infill for strength. No supports, rafts, required for any part.  I use a brim for the headstock.


Various parts were glued together. I like Gorilla brand superglue gel. See the video for pictures of the build.


If the bridge isn't glued properly, it can pull off. I found lightly sanding the bottom of the bridge really helps. I also apply pressure using clamps for 10 or 15 minutes to make sure it is strongly attached.  Then screw the bridge to the body using 5 #2, 3/8 inch wood screws for additional strength.


Most parts were printed with 0.12 mm resolution. However, the fretboard was printed with 0.08 mm resolution. For the fretboard, I paused the print at the top of the fretboard to change filament colors, so that the frets print in a different color than the fretboard.


The headstock, fretboard, bridge, and center ring are designed with decorative inlays.  If you don't want to bother with them then you can print version without the inlays.   For the center ring, I add a pause to switch color for the decorative part since they are too small to print separately.


You'll need 

  • Body
  • Bridge
  • Saddle
  • Center ring
  • fret markers
  • Headstock, bridge, and fretboard inlays (if using)
  • For the super soprano guitalele, print the neck, headstock and fretboard for the 17 inch scale
  • For the soprano, print the neck, headstock, headstock screw cover and fretboard for the 13.6 inch scale
  • Saddle - I added saddles with different heights to adjust the action.  I typically use the 5 mm or 6 mm saddle for a lower action
  • Strap pin (if you want to use a strap)

The fretboard for the 17 inch scale is long and only fits on the build plate at 45 degrees.  I had to add some custom G-code to shorten the purge line so that it did not overlap with the fretboard.


The saddle is a compensated saddle. On the edges of the saddle are the numbers ‘1’ and ‘6’ indicating which string should be on that side of the saddle, 1 being the highest pitch, and 6 being the lowest.

Comment & Rating (84)

(0/1000)

Fiof... was very challenging but pretty happy with how it came out. I like this design so much I'm going to create a companion ukulele with the same colors and face plate. 1. The headstock fell over at 90%+ twice before I got a clean print, and this was even on a Supertack plate and slowing the speed the last hour. How I finally got the headstock to print on my 3rd attempt (threw everything at it, not sure what worked): - Rotated part 90 degrees, since I noticed it seemed to want to fall over backwards. No idea if this helped. - 15mm brim with a 0.05 mm gap. - Bumped up my plate temp 5 degrees. - Last hour (about 200 layers left) I switched from Standard to Silent, slowing down the print. - Held my breath for almost the entire last 50 layers. 2. The face is 7 layers and base of white, so the super glue dots can be seen in the white parts of the face. Next time I'll use a cheap paintbrush and try to brush out the super glue gel, perhaps it won't be quite as noticeable. I wish I could boost again but I'm maxed. Will be sure to boost you companion pieces to the max if I haven't already. Thanks for all the work you put in.
The designer has replied
designer
1
Reply
I love what you are doing with these designs. Thanks for the details on how you do it. On my to-do list has been to redesign the body to print flat, rather than standing up, to make designs like this easier. You are motivating me to do that sooner rather than later. About the headstock falling over. In the past, I would have similar problems, especially with the neck and headstock on my mini uke design. It would get close to the top and nearly done and then get knocked down which was extremely frustrating. I always assumed it had to do with my build plate and I would clean with soap and water as I had read about that in various places. That sort of helped but not really. Then I printed this build plate cleaner : https://makerworld.com/en/models/786671-build-plate-cleaner-tool#profileId-724463 I got a microfiber cloth, put it in the cleaner, and started spraying it with IPA and cleaning the build plate before EVERY print. I can't emphasize enough what a HUGE difference this has made in eliminating those kind of failures. I almost never see any of the adhesion issues I used to have. I don't know if it will fix your issues but it can't hurt and hopefully it will help.
(Edited)
0
Reply
Replying to @jwnicholson :
you are probably right... getting lazy with the supertack plate i think... wow, if you can figure out how to print the body flat, that would be great... my goal was to not introduce anything that might change the sound quality, the plate is just enough to be solid without putting any holes or anything in the remaining body... and when assembled has the exact same dimensions as an unmodified body... i couldn't think of any way to print directly on the face of the uke but that would be amazing!
0
Reply
Boosted
Yeah, I had the same problem
0
Reply
Boosted
I haven't got a full setup yet. Getting there! But can't wait! Printed the Super in PETG gray and I am going to sand and paint that one. Currently printing your regular Soprano v5.5 in Purple PLA. Strings and rods arrive today. I know you've made your own Tuners and replaceable frets. But are there any metal tuners i can purchase? And have you thought about making a fret board to install metal frets to cut to size? Just curious because of visual and durability of metal. Really like your design and can't wait to start playing on one. Cheers!
The designer has replied
0
Reply
Looks great so far! For the ukulele, if you use the headstock designed for my Model 2 tuners, the hole pattern is the same as for the Grover 9NB commercial tuners, so you can use those on the ukulele rather than 3D printed ones. I have used them and they work great. If you look on the main picture of the family of ukes photo on the Soprano v5.5 page, you can see the middle uke has the Grover tuners on it. I assume you could use those on the guitalele too, but they come in packs of 4, not six :( I'm sure other commercial tuners would work too, but it would be best to redesign the headstock so the hole pattern was correct for the screws. I actually bought fret wire with the intent of using metal frets for the guitalele. But then I started watching some videos of installing fret wire. It seemed a little more involved than I wanted to get into at the time, so I switched gears and designed the replaceable frets. I've been meaning to get back to the metal frets, at some point...
0
Reply
Boosted
Replying to @jwnicholson :
Thank you for the reply and great info. I will get the Grover tuners and print out the Model 2 tuner headstock for the ukelele. I will stay with your tuners for the guitalele. I've never really played on a Ukelele. My 11 year old son has taken some ukelele lessons and got me interested. I dabble a little in electric guitars but haven't really picked them up in quite a while. These will be fun to play around with, without having to plug into anything. Maybe it will spark some creativity. Thanks again for your great work. I'll print a couple more ukeleles and keep one reaady if you ever work out the metal frets. I'm slowly learning 3d design and getting a little more confident with things. Retirement is not far away anymore, and I see this filling in for work. Maybe I will try to remix the fret board and test it out. But I like what you did to repalce the worn frets. Still amazed at what can be done with a 3d printer. Cheers!
0
Reply
Great build boosted twice.
designer
2
Reply
This is absolutely incredible. This is the coolest thing I’ve ever printed. I keep saying I printed this for my two year old, but I’m not fooling anyone with that, I really wanted to try it out myself. Figured a printed guitar will stand up great against my toddler and if something breaks, I can always print replacement parts. Went with the Super Soprano neck. The preset settings worked great for me. The only thing I did differently from the instructions was use a knife to score the surfaces of the material that glued together. I figured that would create a better bond than sanding. My only piece of feedback, and it is very minor, is the flat bottom of the body becomes uncomfortable when resting my right arm while playing. That corner feels a little sharp. I bought the 3 pack of tension rods, so I plan on making two more in different color ways. Next time I’m going to try to sand, polish and finish the body. I might try modifying the body to create an outer edge inlay - to look like wooden acoustic guitars.
The designer has replied
designer
1
Reply
Looks great! I have the same problem with the bottom part being slightly pointy and irritating because it rubs against my right arm. I have never been able to find a way to eliminate that completely. So I've taken to lightly sanding the edge/corner with x-fine P320 sandpaper. If you sand just the corner it's not really noticeable, and it makes it much more comfortable to paly.
0
Reply
I took a risk and printed the whole thing in matte PLA, tuners in PETG. Sounds absolutely great, better than it has any right to. Tuning was a bit scary, a lot of tension on the tuning posts. Printed on an A1.
(Edited)
The designer has replied
designer
1
Reply
Looks great! Love the colors. Thanks for posting your make. I know what you mean. The first time I tuned it up, it felt a bit dicey, but so far, they have all survived nicely!
0
Reply
Boosted
This model is nothing short of amazing. It took a little trial and error with materials and understanding the tuning but once you get it figured out it is so satisfying to have printed your own custom guitar. Perfect for little camping trips or backyard hangouts. Every guitar-playing person in my family wants me to print them one. Seriously, great work. It’s wild that this is just free to download and print.
The designer has replied
designer
1
Reply
That's awesome! Looks like you are going to be busy printing for a while :) Love the colors, especially the pink. Thanks for the boost!
0
Reply
it would be great if you could include how to string the guitars....for those of us who have never done it before...this is a test in frustration trying to build, and I have already broken the body twice and several strings trying to figure it out...wasting a lot of time and filament on these... update: forget it...these do no stay together...tightening the strings just pulls the whole thing apart...not sure how it's strong enough...what a waste of days of trying to get one to work for a birthday present to a little girl
(Edited)
The designer has replied
designer
1
Reply
Sorry you are having difficulties. There are many tutorials and instructions available on how to put nylon strings on a guitar. Searching for how to string a classical guitar on youtube will give lots of hits. I like the guide on Taylor Guitar website : https://www.taylorguitars.com/support/strings/changing-nylon-strings
0
Reply
Replying to @jwnicholson :
yeah thanks..I figured it out..but the guitar keeps cracking or snapping when tightening the strings...I'm unsure of what to do...try stronger filament maybe...slow it down and make it stronger...not sure...it's just a lot of time being put in waiting for one print to get a good one
0
Reply
Replying to @martin.sibertig :
I'm curious what filament you are using and what parts are snapping? I've printed several using Bambu PLA basic and had no issues. In the past, I have had problems with things like wood or silk filament. Those tend to be weaker.
0
Reply
@jwnicholson , Thanks for creating such a fun build. I think a document with the instructions would be a great addition but your YouTube video had a lot of views just from me to follow instructions. Probably a genius move on your part but frustrating to those of use that want instructions. I also added a Guitar Sound Hole Cover at located at found at https://makerworld.com/en/models/947456-guitar-decoration-mandala#profileId-914542 Same size as the hole of the ring (59.22mm) with a height of 1.4mm.  Before putting the ring on the instrument, put a little glue on the ring and snap it in place.  Then glue the ring to the instrument.
(Edited)
The designer has replied
0
Reply
Thanks for sharing your make and the boosts!!! I love the colors you picked. They look great. And the sound hole cover is awesome. Very nice! Also, thanks for the feedback on the instructions. When I started this project, it was as much about writing and recording a song made with ukulele and guitalele as it was designing the instruments. That's one of the main reasons for the video. I figured that people who wanted instructions could pause the video one the part that they were working on and fast forward or rewind as necessary. If I get some spare time, I'll try and put together instructions. Thanks again!
0
Reply
Preemptively boosting as I begin to print... have a couple boosts about to expire, so I want to make sure they get used. Given my experience with the Soprano Ukulele, I have no doubt this print will come off with exactly the same quality. Photos will be coming when I complete!
The designer has replied
designer
1
Reply
Thanks for the preemptive boost :) I look forward to seeing your make when it's finished.
0
Reply
Replying to @jwnicholson :
little sneak peak
designer
1
Reply
Replying to @go140point6 :
Super cool!
0
Reply
If using the BambuLab A1 to print, is it still recommended to use no supports? Whenever I slice it says some prints like the headstock have "floating regions" and say to add supports.
The designer has replied
designer
1
Reply
I don't have an A1, but I get that warning on the headstock and body too on the P1S. I ignore it and print without supports and it's fine.
0
Reply
Replying to @jwnicholson :
So the body has now failed twice on me. using Bambu lab a1. overature matte pla. I used no support at first, failed and spaghetti'd once it got tot the top shoulders. then I tried reprinting with tree support, and failed again in same spot. any idea why this would happen? any recommendations? iv almost used a whole roll of filament now on two failed bodies.
0
Reply
Replying to @Shninguldorf :
I'm sorry to hear that. Does the body come loose from the build plate and then start spaghettiing? If so, it good be an adhesion problem. To fix that I used to wash the build plate in warm water with dish soap. That helped. But more recently I started wiping the build plate before every print with a micro fiber cloth sprayed with isopropyl alcohol. That has almost completely eliminated adhesion problems for me.
0
Reply