Search models, users, collections, and posts

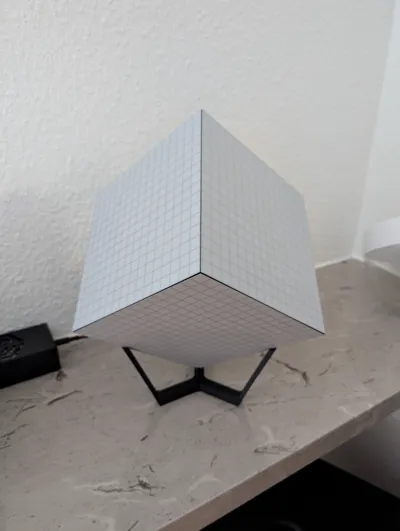
16x16 WS2812 WLED Cube

Print Profile(1)

All
P1S
P1P
X1
X1 Carbon
X1E
H2D
H2D Pro
H2S
P2S
H2C
X2D
A2L

0.16mm layer, 2 walls, 15% infill
Designer
8.9 h
4 plates
4.9(8)

Open in Bambu Studio
Boost
85
246
28
6
128
49
Released 

Description

Same as

https://makerworld.com/de/models/1012787#profileId-992433

but 8 times bigger :-)


With six of the 16x16 WS2812 Matrix with flexible PCB, I needed to design it a little bit differently.


You Need:

  • 72x 3x1mm magnets
  • 6x WLED Matrix flexible 16x16 (available on different platforms)
  • 1x ESP32 with WLED installed
  • 1x Power Supply 5V (I use 5A)


Prepare:

2x Magnet press tool in 2 different colors and a glued on magnet with different polarity on top


Steps:

  1. print all Parts
  2. press the magnets in the Parts
  3. clip the three bottom Parts and the three top parts to half a cube together 

    (maybe you need some needle nose pliers)

  4. insert the led panel (on the bottom side, you need to cut an edge to fit)
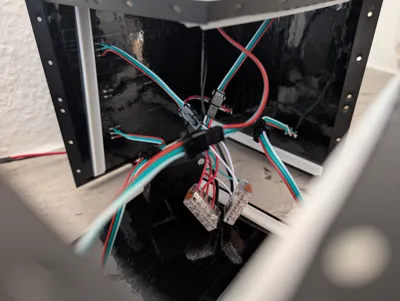
  5. insert the led clamps behind the panels (the red parts in the picture)
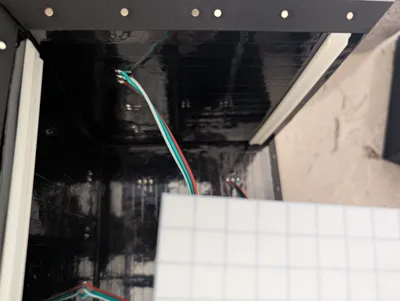
  6. insert the cable through the stand and into the cube
  7. put all cables together 
  8. Have fun with WLED :-)

You can use a DC thing, like this to screw it into the cube Stand:

https://www.amazon.de/dp/B0CNBZ65SF?ref=ppx_yo2ov_dt_b_fed_asin_title


Hope you enjoy it!

Comment & Rating (28)

(0/1000)

16x16 led = 256led per side. 6 sides is 6x256=1536led. 1 LED draws 60mA 1536x60mA = 90A @ 5v That's at FULL brightness though and many affects in Wled will use less. Let's just say you run half brightness all the time with some affect going, you're still going need far more than 5a power supply. You're going to melt that power supply. don't forget you only run at 80% duty cycle. So let's say you'll run a random affect at 50% brightness, maybe 30% total of that 90A, 30a...you'd still want something like a 35a-40a power supply. I made a 32x32 matrix running on a 5v 30a power supply and the power wire still gets very warm with matrix affect and few other srunning.
(Edited)
The designer has replied
3
Reply
WLED has a Current limiter to prevent hot wires and prevent brownout of the WLED controller. My intention is, to use the cube as atmospheric light. So I use a 5A / 5V power supply and it's perfect. The pictures on the post are made with this power supply.
(Edited)
2
Reply
I don't know where you got your information, but I have a WS2812B LED strip with 60 LEDs per meter. The strip is 5 meters long, totaling 300 LEDs. This strip consumes approximately 1.6A at 5V with full brightness (measured with an ampere meter!). This would mean that 1500 LEDs would consume about 8A. Adding the 36, we are at approximately 8.2A. With a safety margin, a 10A, or at most a 15A power supply, should be entirely sufficient. Don't rely on the absurd specifications from the Chinese; instead, measure things yourself before making such incredible claims of 90A!!
Show original
0
Reply
i would be hesitent to leave this on while not home. running 1300 ws2812 at 5V with 5A is pretty dangerous, not to mention they will look dim and probably have other issues. 1 year in, i would be super interested in hearing about how this has worked out for ya.
0
Reply
Print Profile
0.16mm layer, 2 walls, 15% infill
Great design, although I prefer a different base. I do wish the enclosure joining method was a bit more robust than the current method. As a side note, if you are having trouble getting them to stick closely together under weight I use a 3d pen to seal the inside edge to help keep them tighter together and have less gaps. Switching to a rectangle and receiving hole may work better for those side joins, allowing a drop of glue into each connection.
profile
1
Reply
This model is very interesting I was looking for something to do with my LED matrices and this cube is perfect Currently printing all the parts I prototyped with WLED I set up a 16x96 matrix and you can configure the segments for the faces I will adapt my configuration after assembly
Show original
designer
1
Reply
Well.........I take it back. I abandoned the project for about three weeks. Then I went back to it, printed another batch and this time I was able to clip them together. It's not easy. There is a certain knack to it and your hands have to learn how to hold the pieces in the right orientation and then press them together hard. I printed two more and I can snap them together. Printed on my H2D with the profile that comes from the designer. I think it's a brilliant design. My body just had to learn how to assemble it. Actually....then the fun begins because there is no way to configure WLED to run a cube. It wants the six units connected in a flat matrix. I have had the best luck with a 2 x 3 matrix and using an effect like SOAP. Anyway...........don't give up.......it"s worth the effort. When I figure out how to supply enough power, I hope to have it hanging from the ceiling.
(Edited)
designer
1
Reply
I can not clip the panels together. I have printed many panels on my A1with AMS and my new H2D with AMS. Maybe 20 panels or more.....some with flow control calibration enabled and some without it enabled. The designer calls his profile ( 0.16mm layer, 2 walls, 15% infill)... but when Bambu Studio loads the model the profile is called ( *0.16mm Balanced Quality @BBLH2d). I can get some of the smaller 8 x 8 panels to clip together but none of the 16 x16 panels will clip together. I have tried everything I can think of. Any help would be much appreciated. Please see second post.
(Edited)
The designer has replied
2
Reply
Same here, P1S. Can only get one or two 'clips' in but they all wont clip together. Cool design but i have no clue how the creator got his together....
1
Reply
Same here, Prusa MK4S. Sliced with 0.16mm layer, but no luck on those clips. Am thinking to remove the clips and join with either contact adhesive or solvent weld. Curious if there's a better way.
(Edited)
0
Reply
It is a little bit hard to put them together, you can use needle nose pliers to push them together from the inside. Be careful to don't damage the front screen with the pliers. Maybe it helped.
0
Reply
So bad profiles, no connection pictures.
The designer has replied
0
Reply
Prints several time perfect on my p1s with this profiles. It is a little bit hard to put them together, you can use needle nose pliers to push them together from the inside. Be careful to don't damage the front screen with the pliers. Maybe it helped.
0
Reply
Can I print this project with A1
The designer has replied
Show original
0
Reply
The size of the printing bed should be the same. Try to load it into bambu studio and slice it for A1.
0
Reply
May I ask what WLED controller you bought I would like to replicate the project for home thanks
The designer has replied
Show original
0
Reply
For example, an esp32 D1. I connected 3 panels to each data line. With this website, you can flash WLED onto the ESP: https://install.wled.me/
Show original
1
Reply
Could you share the Wled configuration Thanks
Show original
0
Reply
cool
0
Reply