X1C Chamber Heater 110V 500W with Auto Shutoff


Print Profile(2)


Description
If you decide to build this heater for ABS or ASA for your X1C, please boost me. I have too many hours into this project!!
Watch the last 5 minutes of the poorly edited assembly video if you want to check out the heater functionality.
I set out to create the best and most cost effective chamber heater for the X1C that met a few requirements:
1) Simple build list using parts readily available on amazon in USA.
2) Aesthetically pleasing design that is easy to print and assemble
3) Simple to use with easy auto shutoff.
4) Easily removable from the machine.
5) 110v with enough power to get the machine hot quickly
Build Part Needed (All from Amazon)
1) Amazon Basics Heater ($20): https://www.amazon.com/dp/B074MX8VN5?ref=ppx_yo2ov_dt_b_fed_asin_title&th=1
2) Wathai Fan ($17): https://www.amazon.com/dp/B07WT275SC?ref=ppx_yo2ov_dt_b_fed_asin_title&th=1
3) Thermal Controller ($12 for two): https://www.amazon.com/dp/B08W2BYG2L?ref=ppx_yo2ov_dt_b_fed_asin_title&th=1
4) Bojack Thermal Fuse 142C SF139E ($6 for 10): https://www.amazon.com/BOJACK-Thermal-Degrees-Celsius-Cutoffs/dp/B07Y62XXZX
Total Cost (not including print) $55!
Build parts that are outside the scope of this build, but you will need.
1) A sheet-metal screw to hold the heater to the top rail. There is a hole ready, but no screws in the Amazon heater work. I found something in my shop.
2) Wiring from the heater to a power source. This part is up to you. You can put a hole in the bottom and run a cord out, or I put a 2-pole molex connector in line and ran the wire to the terminal block on the power supply. Your choice here, but the fan has wire you can use.
3) Optional: Insulate your chamber like the X1E. The outside of the printer can get hot to the touch with the heater running. This insulation is what you need to line the inside of the right and left panel with neoprene. Easy to install, but no guidance provided as part of this heater, but this is what I used. Works great and there is enough space behind the heater to fit. One sheet this size will do. 1/8x12"x59": https://www.amazon.com/dp/B0774DKKXV?ref=ppx_yo2ov_dt_b_fed_asin_title&th=1
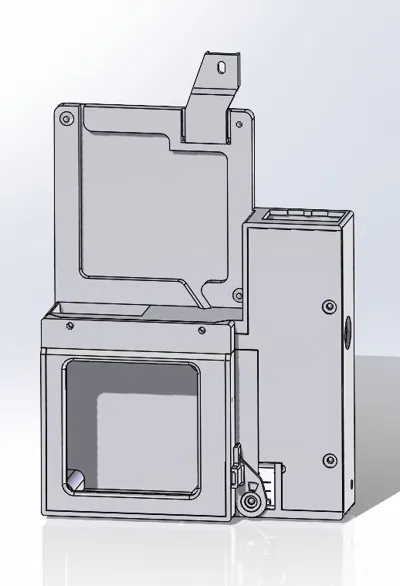
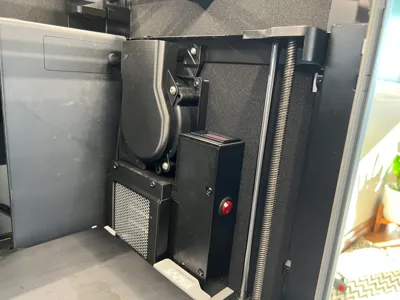
All the hardware that you need to assembly the unit is included in the amazon basics heater. The heater is disassembled and using the hardware and electronics is assembled into the new heater. The tip switch is used for the heater shutoff function. This works by forcing the printer in the gcode to move the build plate all the way to the bottom at the end of the job. Same as it does with tall parts, but instead doing it every time. When it reaches the bottom, it released the microswitch and the heater turns off. Works really well. Instruction for the temp controller are attached, as you can see in the video, it may not be really intuitive. But it works well once setup.
The inlet cover shown in the photos is a separate model. If you want to print this, and I recommend you do for temperature consistency, the link is: https://makerworld.com/en/models/1108512#profileId-1104663
Revision History:
Update 2-19-2025: I have updated the Auto-shutoff lever with a new Beta version. The STL file has been saved and is available as “X1C Printer Heater Shutdown Lever R5”. I have only printed one so far, so It may change, I'm still testing. Currently all the .3mf build files have not been updated until I can test more. Reason for change - the plunger on the safety shutoff switch varies in protrusion length, Its sticking out too far to work smoothly on some versions.
Assembly Video: Yeah, its long and boring, but it was a lot easier than making a PDF with tons of pics.
Watch the last 5 minutes if you want to see the heater function.
The G-code modification is in the Machine End G-Code. The section removed is commented out with “;” before the lines. Just need to leave the two uncommented lines.
;***************************************************************************
;REMOVED IF/THEN/ELSE STATEMENT BELOW, REPLACED WITH Z TO BOTTOM
;MOTION TURNS OFF HEATER SWITCH
G1 Z250 F600
G1 Z248
;***************************************************************************
;{if (max_layer_z + 100.0) < 250}
; G1 Z{max_layer_z + 100.0} F600
; G1 Z{max_layer_z +98.0}
;{else}
; G1 Z250 F600
; G1 Z248
;{endif}
;***************************************************************************
Safety Disclamer:
(Thank you ChatGPT for the legal disclamer, but seriously, I've done the best I can to make this heater safe for use and have put many free hours into the design.)
But like all modifications:
WARNING: USE AT YOUR OWN RISK
By printing, assembling, or using this 3D printer heater, you acknowledge and accept full responsibility for any and all risks associated with its use. This heater involves high temperatures and electrical components, which may increase the risk of fire, injury, or damage to property.
The creator of this design assumes no liability for:
• Any damage to your 3D printer or other property.
• Personal injury, fire, or electrical hazards resulting from the use or misuse of this heater.
• Any modifications or assembly errors made during the construction or installation of the heater.
It is your responsibility to ensure proper safety precautions are taken, including but not limited to:
• Using appropriate fire safety measures.
• Monitoring the printer while in operation.
• Ensuring proper electrical connections and insulation.
• Complying with all relevant safety regulations.
By using this heater, you agree to hold the creator harmless from any claims, damages, or liabilities that may arise. If you do not agree to these terms, do not print, assemble, or use this heater.
Documentation (1)
License
You shall not share, sub-license, sell, rent, host, transfer, or distribute in any way the digital or 3D printed versions of this object, nor any other derivative work of this object in its digital or physical format (including - but not limited to - remixes of this object, and hosting on other digital platforms). The objects may not be used without permission in any way whatsoever in which you charge money, or collect fees.
Comment & Rating (51)