P1S Set of Soundproofing Panels - Magnetic mount


Print Profile(4)


Description
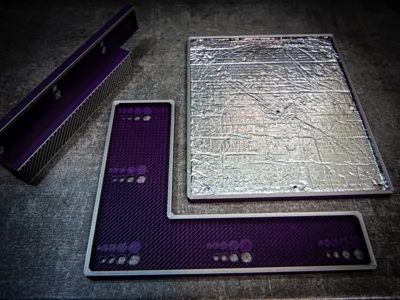
P1S Set of Soundproofing Panels

Boost Me (for free)
to support future, better projects
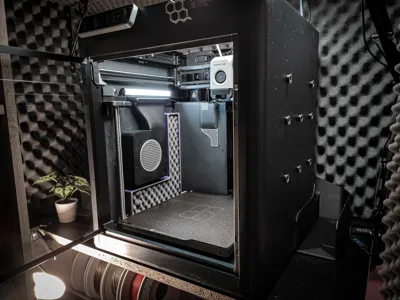
I wanted to soundproof the interior of my 3D printer but didn’t want to use adhesive-backed soundproofing mats or foams because the glue is nearly impossible to remove later. So, I came up with these panels that can be mounted without any invasive modifications to the printer. They can be easily removed at any time without leaving any marks

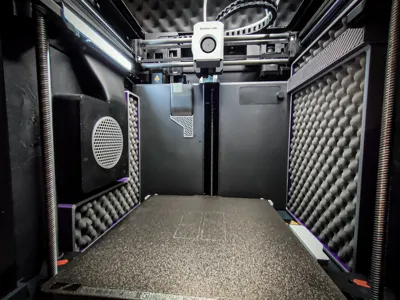
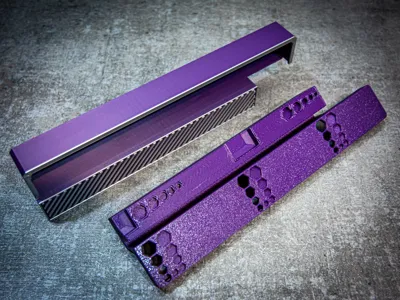
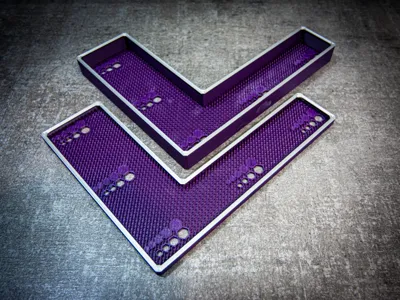
The mounting system is based on magnets. Since the side panels of the printer are plastic, magnets are installed in the panels, and on the outside of the printer, clips with embedded magnets are attached. This way, the magnets attract each other and securely hold the panels in place. Additionally, I designed universal slots compatible with 9 different magnet sizes, making the panels as versatile as possible. The magnet sizes that fit this set are: 4x2, 5x2, 5x3, 6x2, 6x3, 8x2, 8x3, 10x2, and 10x3.

The panels come in two sizes: one for mats ranging from 0 to 5mm in thickness and another for mats ranging from 5 to 20mm in thickness. I leave the choice up to you!
Testing and Conclusions
For those who don’t want to read the entire explanation, here’s a one-sentence summary at the very beginning:
I can say that the panels have a noticeable impact, especially in reducing resonance and low frequencies, but this effect is difficult to measure accurately under my conditions.
On my example, I’ll share the measurement results, conclusions, and the entire process:
First of all, I want to note that I don’t have professional equipment for accurate measurements, so the results are approximate. I used a mobile app for this test and placed my phone on a tripod about 50 cm away from the printer.
Printer and testing conditions:
My printer is located in a soundproofed enclosure inside a cabinet, which already significantly reduces noise levels. Under these conditions, the impact of additional internal panels is less noticeable, but I decided to test them anyway.

Testing process:
- I set all the fans on the printer to 100% to maximize noise output.
- Measurements were taken over the course of one minute to calculate an average.
- The readings turned out slightly inaccurate, as the phone also picked up ambient sounds like my cat walking on the floor (around 40 dB).
Results:
- The noise level was reduced by about 1 dB, which isn’t a dramatic change.
- However, a noticeable effect was the reduction of resonances and sound frequencies in the range of 100-2000 Hz.
- The panels stiffen the printer's sides, resulting in fewer resonances, and the acoustic foam absorbs medium and high frequencies in this range.
Conclusions:
- While the decrease in noise intensity (dB) is small, the reduction in resonances and suppression of unpleasant frequencies significantly improves the overall experience.
- Using thicker or more advanced foam could further enhance the panels’ effectiveness.
Now the test during printing:
This test presented another challenge because even when printing similar layers, the printer’s behavior changes, and it produces different sounds.
GIF Details:
- Length: 20 seconds
- Left: Version with panels
- Right: Version without panels

- Test duration:
The test with panels lasted longer, and the average value was skewed by other ambient noises. The test without panels was shorter, and the average noise level gradually increased over time, which is visible in the results. - Observations:
- Without the panels, the printer frequently exceeded 50 dB. With the panels, such spikes were very rare.
- As with the fan-only test, the panels significantly dampen low-frequency sounds, making the overall noise less intrusive.
Conclusion:
The current noise-dampening setup of my printer is so effective that the equipment I have doesn’t allow for reliable testing. Environmental noise and background hum are significant enough to interfere with measurements, and my phone struggles to distinguish these factors.
Mounting the panels significantly reduces the printer's resonance.
Tapping on the side panel no longer produces drum-like sounds. Instead, the sound is now muted and dense, giving an impression of added mass and stability. The panels noticeably dampen vibrations and resonance, improving the acoustic profile of the printer.
This video showcases the noise generated by my printer with internal panels installed and the cabinet interior soundproofed
Assembly


License
You shall not share, sub-license, sell, rent, host, transfer, or distribute in any way the digital or 3D printed versions of this object, nor any other derivative work of this object in its digital or physical format (including - but not limited to - remixes of this object, and hosting on other digital platforms). The objects may not be used without permission in any way whatsoever in which you charge money, or collect fees.
Comment & Rating (432)