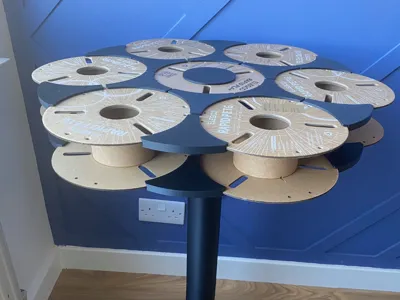
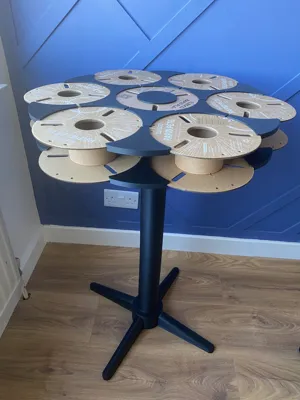
Decorative Spool Table


Print Profile(6)


Description
3D Printed Filament Spool Table Assembly Instructions
This guide will walk you through printing and assembling a sturdy table using 7 filament spools and various 3D printed components. To ensure optimal strength and durability, it's recommended to glue the parts together during assembly. All necessary files have been provided.
Parts List & Instructions
1. Spool Inner Edge
- File Contents: 4 identical parts per file.
- Quantity Needed: 12 parts total (for a table using 7 spools).
- Assembly:
- Place an Inner Edge part at the top and bottom of the centre spool.
- Slot the outer spools into the Inner Edge parts, working your way around as you add parts and spools.
- The fit is snug but should be manageable with slight pressure.
2. Spool Outer Edge
- File Contents: 4 identical parts per file.
- Quantity Needed: 12 parts total (for a table using 7 spools).
- Assembly:
- Place an Outer Edge part at the top and bottom of the centre spool.
- Slot the outer spools into the Outer Edge parts as you continue assembly.
- Similar to the Inner Edge parts, the fit is snug but secure.
3. Spool Table Feet
- File Contents: 4 identical parts per file.
- Quantity Needed: 4 feet total.
- Assembly Tips:
- Variable layer heights are recommended for a smoother finish but can be adjusted to save print time.
- Attach the feet securely to the connector (see below).
4. Spool Table Shaft
- File Contents: 3 identical parts per file.
- Quantity Needed: As many as desired to achieve the preferred table height.
- Assembly:
- Parts slot into each other easily.
- Recommended: Glue parts together for added strength and stability.
5. Feet and Shaft Connector
- File Contents: 1 part.
- Assembly:
- Slot the feet into the connector.
- Recommended: Glue the feet to the connector for stability.
- Once the feet are connected, begin inserting the table shafts.
6. Table Top Connectors
- File Contents: 3 individual parts.
- Assembly:
- These parts connect to secure the table top to the shaft.
- Designed for a snug fit in a 53mm diameter spool.
Tips for Printing & Assembly
- Supports: Standard supports are recommended, but removing them can be challenging, especially for the Inner and Outer Edge parts.
- Using a hook edge Stanley knife blade is effective for support removal.
- Feedback is welcome if you find better support settings for this design.
- Gluing: While the parts may fit snugly, applying glue at key connection points will significantly improve the stability and durability of your table.
Happy to receive feedback or amend the design based on your requirements. Feel free to share your build process or provide feedback for improvements.
License
You shall not share, sub-license, sell, rent, host, transfer, or distribute in any way the digital or 3D printed versions of this object, nor any other derivative work of this object in its digital or physical format (including - but not limited to - remixes of this object, and hosting on other digital platforms). The objects may not be used without permission in any way whatsoever in which you charge money, or collect fees.
Comment & Rating (20)