Very Annoying 216 Screw Gift Box

Copyright Claim

Very Annoying 216 Screw Gift Box

Boost
274
543
58

Print Profile(1)

All
X1 Carbon
P1S
P1P
X1
X1E
A1

0.2mm layer, 2 walls, 10% infill
Designer
23 h
5 plates
4.9(29)

Open in Bambu Studio
Boost
274
543
58
68
861
355
Released

Description

EDIT: I now have a simpler and smaller version made to fit gift cards and money.

EDIT: I made a mistake on the screw count on the print profile. I have rectified that. I have also added a dot to the ends of the reverse screws to tell them apart from regular ones.


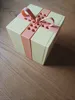
I wanted to make my own version of an annoying gift box, but make it much worse.


The box was designed to perfectly fit one of my other design, a MTG commander deck box, inside but can be used without it.

The internal dimensions of the box is 77mm x 77mm x 96mm.


There are a few factors that make this box more annoying than some others I've seen posted.

  1. There are 216 screws on the giftbox.
  2. The second layer to be removed has a special triangle bit needed to remove the screws compared to the rest that uses a flathead design. The screws can be randomized to make it even more annoying, but I decided to dedicate a layer of screws to it to simplify printing and assembly. The models for short variants of the triangle bit screws are given in the raw files.
  3. In addition to normal screws, there are many that are reverse thread (rightly loosey instead of lefty loosey) and there are 16 spots for a captive screw that will spin in place but will not be removed. This brings the total of screws needed to be removed down to 200 instead of 216.

The box is separated into 4 layers.

  1. Ribbon
    1. 4 ribbon pieces
    2. 20 long screws (on the bottom)
    3. 20 long screws with reverse threads (on the top)
    4. a flathead bow/screwdriver
    5. a triangle bow\screwdriver broken into 2 pieces to print better
    6. a bow stand
  2. Outer Box
    1. 2 outer box pieces
    2. 40 long triangle bit screws
      1. 6 of these will be captive screws (see attachment for placement)
    3. 8 long triangle bit screws with reversed threads (see attachment for placement)
  3. Inner Box
    1. 2 inner box pieces
    2. 90 short screws
      1. 10 of these will be captive screws (see attachment for placement)
    3. 38 short screws with reversed thread (see attachment for placement)
  4. Screw Frame
    1. a box frame
    2. a box base piece (all regular thread)
    3. a box lid (all reversed thread)
    4. 16 nuts to keep some screws captive

Documentation (1)

Assembly Guide (1)
Very Annoying Gift Box Assembly.pdf

Comment & Rating (58)

Please fill in your opinion
(0/5000)

The idea is fantastic, the only thing missing is a screwdriver that fits this shape
The designer has replied
Show original
0
Reply
There is a bow and a triangle shaped bit that assembles into a screwdriver for that type of screw.
0
Reply
Replying to @Treeson :
Ah, thank you for the tip, I hadn't noticed that 😃
Show original
0
Reply
Boosted
Print Profile
0.2mm layer, 2 walls, 10% infill
came out very nice. had a few issues with some of the screws but i think that was my mistake with the sorting of the reverese thread and regular threads. Mery Christmas to my nephew lol He shall work for his present.
The designer has replied
0
Reply
I saw those lines on the outer box when I printed mine. I thought it was caused by some of the screws popping off the build plate because of a dirty build plate. Do you have any idea what caused those lines on your print? I wonder if its something with my design or if I should just move the screws onto their own print plate.
0
Reply
Print Profile
0.2mm layer, 2 walls, 10% infill
thanks
0
Reply
This is a great idea! It requires a good amount of time to assemble (~1hr). I sparingly used a drill to assist in assembly, which lead to one or two broken screws, so if you intend to use a drill to reduce build time be very cautious. This box is much fun to give, printed well, instructions were well laid out overall. Excited to give this to my brother.
0
Reply
Boosted
Print Profile
0.2mm layer, 2 walls, 10% infill
first off, great print! gonna love watching my wife open her gift lmao. however 2 things 1. Too many reverse short screws not enough regular screws. (I loaded the 3mf to Bambu studio and printed what was in the package). I just left the ones I was missing. seems to have been the reverse thread screws that were left over should’ve been regular thread screws. 2. some of the instructions are wrong but didn’t hinder the install.
0
Reply
Print Profile
0.2mm layer, 2 walls, 10% infill
Brilliant ideas 😃👍
Show original
0
Reply
Boosted
Print Profile
0.2mm layer, 2 walls, 10% infill
Looks good (it’s a torture for both the giver and the receiver 😅)
0
Reply
Boosted
Found a slight error in the PDF diagrams: on side 3, row 1 column 2 is listed as reversed and row 2 column 2 is normal, but on the box it's row 2 column 2 that's reversed and row 2 column 1 that's normal. Otherwise assembly is proceeding nicely, this is a terrible and beautiful thing you've made; I love how it escalates, how removing each layer just reveals more and more screws with more and more problems. (Though I might have saved the captive screws solely for the innermost layer, just to make that a fun new surprise at that stage.)
The designer has replied
1
Reply
Boosted
Found one more issue on side 4 similar to the above, seems like the 5th and 6th columns are shifted up 1 row on the diagram compared to the box.
1
Reply
Replying to @narshero :
Good catch. I made the key at the end because the images I made looked a bit confusing. I probably just wasn't paying attention when I was marking it. I'm glad everything else went together well. I'll update the PDF.
4
Reply
Replying to @Treeson :
Thank you @Treeson for the PDF fix!! Thank you @narshero for pointing out the errors!!
2
Reply
This is an awesome project. Very excited to finish printing and put it together. I'm having issues with the screws though, and I'm not sure what I'm doing wrong. They print perfectly, however,r they break very easily right at the base. I tried printing them at 100% infill to see if that would make a difference, but it's the same. I could be cautious with them and get it all put together, but my concern is that if they are turned in the wrong direction they could just break off when trying to open the box. I'm fairly new to printing, so any advice would be greatly appreciated.
(Edited)
The designer has replied
0
Reply
That could be a layer adhesion issue. You could try printing in 5-10°C hotter. I've heard that could help layer adhesion. Another thing you could try is to print each screw with the print by object setting. It'll take a lot of plates to print everything because of how spaced out they need to be, but should end up with better quality. The only time I've snapped a screw was when I somehow cross threaded it on one of the captive nuts, so I haven't tried troubleshooting this issue yet.
0
Reply
Replying to @Treeson :
Awesome, thanks for the tips. I'll give them a try.
0
Reply
Replying to @Treeson :
That did the trick! Not sure which suggestion worked, because I did both, but the screws are much stronger. Thanks, I learned something new today.
0
Reply
I think the top threaded holes are too small, I can't a single screw in any of the holes. I printed it 2 times still no luck.
The designer has replied
0
Reply
Is the top panel the only one you're having issues with? The holes on the top panel are all reversed threaded but otherwise should be the same size as the bottom panel. I can upload some versions with looser tolerances.
0
Reply
omg lol
0
Reply

License

This user content is licensed under a Standard Digital File License.

You shall not share, sub-license, sell, rent, host, transfer, or distribute in any way the digital or 3D printed versions of this object, nor any other derivative work of this object in its digital or physical format (including - but not limited to - remixes of this object, and hosting on other digital platforms). The objects may not be used without permission in any way whatsoever in which you charge money, or collect fees.