Gear Rhombo JR by TNTBA (Free Version)

Gear Rhombo JR by TNTBA (Free Version)

Boost
222
323
53
GIF

Print Profile(2)

All
A1 mini
P1S
P1P
X1
X1 Carbon
X1E
A1

0.2mm layer, 2 walls, 7% infill
Designer
2.5 h
3 plates
4.9(23)

0.12mm layer, 2 walls, 15% infill
3.6 h
3 plates
4.8(6)

Boost
222
323
53
25
846
522
Released

Description

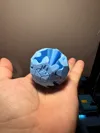
This is the Gear Rhombo Junior (Jr.) (the Spirit of Mini Gear Sphere). This is totally redesigned from the Gear Sphere by TNTBA. This Gear fidget toy is a lot of fun and is now portable.

Approximate size of this design is: 50mmx50mmx50mm.


This is the Free version of the Gear Rhombo JR which I've licensed for those who wish to sell and print.


The time to print and fully assemble is approximately 1 hour and 15-30 minutes.


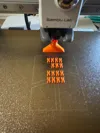
Gears and core may be printed in any material. Clips were designed to be printed in PETG. Tool can be printed in PLA.


Place the clip into the tool and use the tool to place the clips directly into the holes on the core. Make sure you go directly into the hole to avoid splitting, breaking, or over-bending the clips. I would recommend that you print out additional clips to ensure you have extras when you mess up.


Once the clips are installed, you can place the gears following the numbering located on each gear and core side.


The mechanism to move this toy fidget was inspired by RuvenBals' Gear Ball and Emmett's Gear Cube.


Enjoy!

Comment & Rating (53)

Please fill in your opinion
(0/5000)

Print Profile
0.2mm layer, 2 walls, 7% infill
Nice size, but no need for your design imo. Ruvenbal in the back for comparison. I found the clips fit your gear cylinder much better for the one I printed at 50% and I’m going to scale down the heart a bit to see if I can get the gears to mesh closer
The designer has replied
0
Reply
You were able to scale my gear cylinder to 50% and use the same clips without issue??? I haven't been able to do this! Please shoot me an e-mail to discuss! trynottobreakanything@gmail.com
0
Reply
Replying to @trynottobreakan :
I just got it working to where I feel comfortable. Going to let my son mess with it for awhile to see how it holds up. Sent you an email!
(Edited)
0
Reply
Replying to @Wayne_Jeramy :
That's the only concern I have. Let me know if it survives the kid test. lol
0
Reply
Boosted
Thanks so much for this design, it came out beautiful in eSun green/blue silk! Have been wanting to try the Ruvenbal, but wasn't keen on signing up to a subscription for just one print. This is a perfect alternative. Assembly was a little fiddly, but got there in the end ok. Some advice I would give others is to just ditch the tool thing and use a pair of pliers to push the clips into the core. Using pliers I had them all inserted in literally seconds, after having tried for about 5 minutes with the plastic tool to insert just one. I also printed the clips a second time without the brim (In PETG), and they came out perfectly and were much easier to insert.
(Edited)
The designer has replied
1
Reply
Wow this looks beautiful!!! Thanks!!!
0
Reply
Print Profile
0.12mm layer, 2 walls, 15% infill
This was a smooth, clean print. Everything was perfect. All the gears and everything worked perfectly. I made it at 200% and I love the size. .
1
Reply
Go big or go home! looks great!
0
Reply
Print Profile
0.2mm layer, 2 walls, 7% infill
Looks awwsome in Midnight Blaze PLA ! Thanks alot!
The designer has replied
1
Reply
Wow! looks amazing!
0
Reply
I had some problems with the clips, but that was my fault. I printed the clips in PETG with a temperature of 250 degrees, that was too low because the layers of the clips came loose. I printed the clips again with PETG but now at 260 degrees and the clips working great. Assembling the thing was not that difficult as long as you do it in the right order and have a good look at the arrows.
The designer has replied
0
Reply
This looks Great!!! I hope you love it!
0
Reply
Print Profile
0.2mm layer, 2 walls, 7% infill
connectors are tricky but a great print. use a pair of pliers to squeeze the gear end of the connector before you install the gear. print petg at 260. also printing at 200% relives all issues
(Edited)
0
Reply
Print Profile
0.2mm layer, 2 walls, 7% infill
Went 50% bigger. Looks great.
0
Reply
Boosted
Print Profile
0.2mm layer, 2 walls, 7% infill
sweet. I still need to assemble
0
Reply
blue ones! had trouble learning the use of the tool but slowly but surely.
0
Reply
Boosting because you rock and your designs rock and you shouldn't have felt like you needed to redesign this and kill your gear ball
The designer has replied
2
Reply
Thank you :))))))) - all good broski - there are plenty of shapes!
1
Reply

License

This user content is licensed under a Standard Digital File License.

You shall not share, sub-license, sell, rent, host, transfer, or distribute in any way the digital or 3D printed versions of this object, nor any other derivative work of this object in its digital or physical format (including - but not limited to - remixes of this object, and hosting on other digital platforms). The objects may not be used without permission in any way whatsoever in which you charge money, or collect fees.