Sleeved Card Shuffler

Copyright Claim

Sleeved Card Shuffler

Boost
54
91
22

Print Profile(2)

All
X1 Carbon
P1S
P1P
X1
X1E
A1

0.2mm layer, 4 walls, 20% infill
Designer
10.5 h
7 plates
5.0(2)

Clear PETG Door cover
Designer
2.3 h
1 plate

Open in Bambu Studio
Boost
54
91
22
1
67
25
Released

Description


Designed to help shuffle your favorite cards easier and faster then by hand. Pick a color and we'll do the rest!

Print in a PLA material or if you prefer PETG!

Size:
- Standard - 100 single sleeved

Notes:
- we've tested it with a few brands and some will have the occasional feeding issue which can be quickly fixed with a 1/4 reverse turn or a manual approach if one jam does occur!

Coloring Customizations: (based of preview pictures)
Primary - Red
Secondary - Orange

Materials:
- PLA for the main body parts
- Steel M3 hardware

     - x13 10mm M3's, 

      - x14 M3 nuts, 

      - x4 6mm M3's (plastic tapping like the one BL uses)
- 7x55mm Tactical Elastics (link in BOM)
- 6x3mm Magnets
- TPU rubber wheels


Demo:

  • https://x.com/Ktothestank/status/1800550435406905452

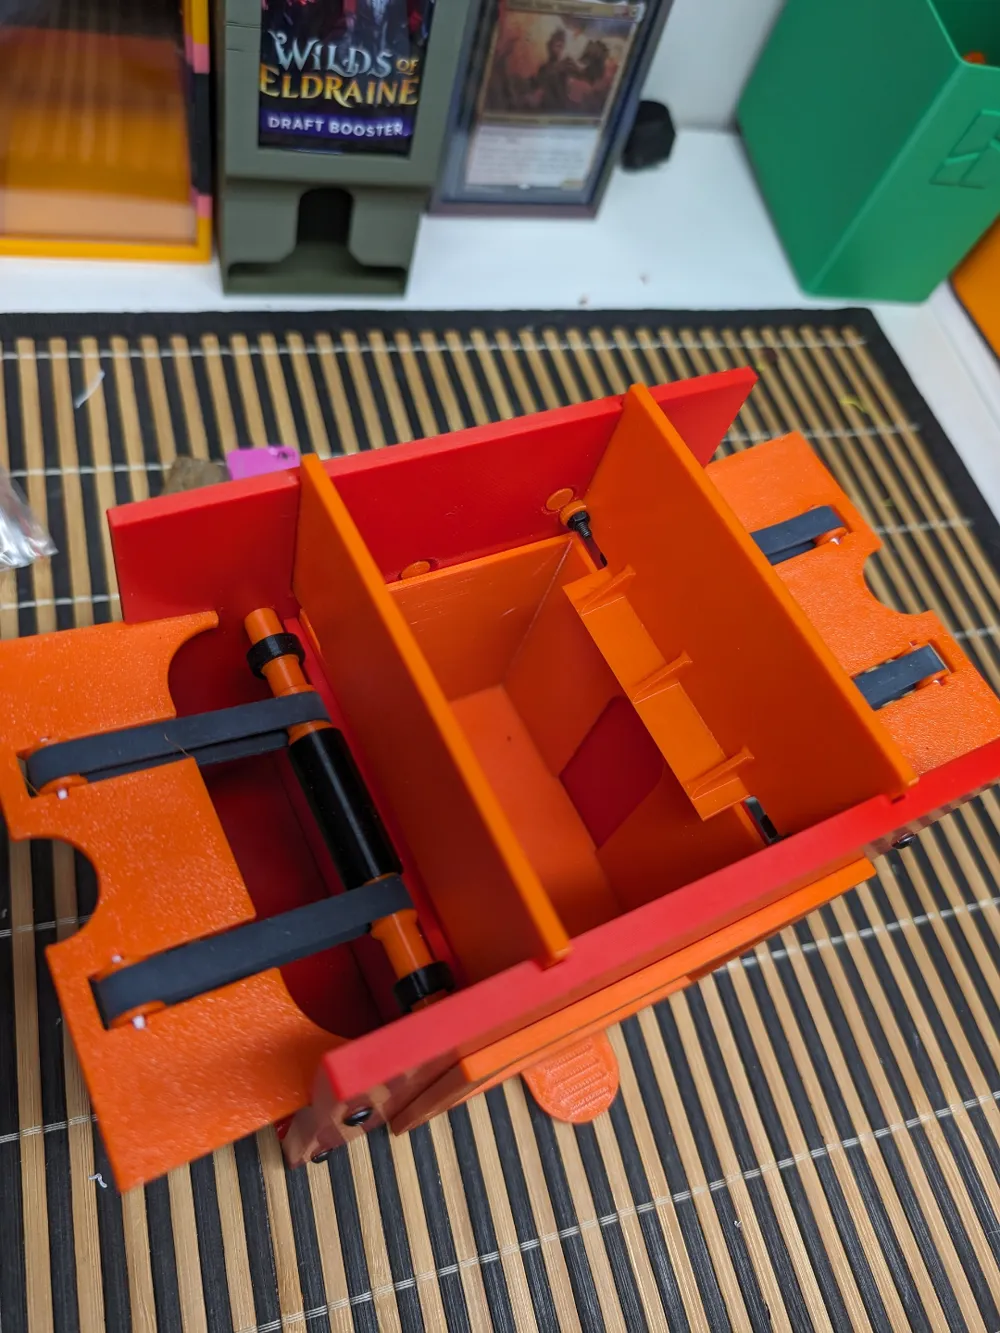
Installation and Build:

  • Assemble the base and interior walls and slide them into the back wall and use the M3x12mm screws to secure them in place
  • Insert the M3 Nuts into the Card Walls and use the M3x12mm into the Nuts

  • Slide on the TPU pieces and ensure the Arrow section of the larger one points toward the card wall as shown
  • Attach the Drive wheels to the back wall and place the smaller gears /w screws into them to secure
  • Loop over the 4 elastics (2 on each Side)


  • Place magnets into front (they'll be fairly stiff) add the front plates onto the ones installed then press them into the front cover (watch polarity)
  • Attach the front to the already constructed pieces and align all the parts to their designated holes


  • Slide in card shelfs and attach them as seen (this is the 2x12mm rod version but you can make your own or purchase, we used filament just for the photos) 
  • after its secure add the M3x12 screws through to help secure it (you dont need nuts its just to ensure they dont slip out)


  • Insert nut into the handle pieces
  • you can install the handle in either option


  • Install the front cover and your set!


some snagging might occur and manual adjustments may be required but shouldn't be to much, the major snag is the back of the card catcher to the back wall which happens occasionally especially if the sleeves have mild warping to them.


Documentation (1)

Assembly Guide (1)
Build Assembly_1312e54e-a9f3-4820-8abf-fb0e87e83218.pdf

Bill of Materials

List other parts
Elastics - https://www.amazon.ca/gp/product/B0B2NVBYL2/ref=ppx_yo_dt_b_asin_title_o00_s00?ie=UTF8&psc=1

Purchase from Bambu Store

Comment & Rating (22)

Please fill in your opinion
(0/5000)

Ended up getting mine done and built I noticed cards were hanging up on the pull out tray and the two kinda tabs that you can see I sanded down and seems to work better without either of those things. Don’t mind the colors that’s all I had left 🙈
The designer has replied
0
Reply
i also have had issues with this, it was an early design option i did too keep the cards from sitting or resting on the card catcher. (and with my testing and longer term use found them to be unreliable) i resolved the issue (i believe the newest file reflects this, I'll double check in the AM) the new one has a recession and a slightly redesigned catcher so it sits into the back wall and more curved top. I'm making extremely minor tweaks as i get feedback to better improve it's reliability as there are so many factors to resolve. and I'm hoping to finalize my build manual (these doc's aren't me strong Suite 😄) I've also been dabbling in a motorized prototype so once i verify i might upload extra profiles for it. (I'm making it backwards compatible so you shouldn't need to print any major parts minus 2 additional swap outs)
(Edited)
1
Reply
Replying to @k2thestank :
Let me know if you update the files and I’m down to reprint the pieces changed and swap them out to give them a try. Also much appreciated for the work and making it available free of cost. I hate shuffling and land clumps or not getting any lands 🤣
0
Reply
Replying to @CookiesKrisp :
the newest and most recent file is uploaded in the profiles, i added a few new items to help with the issues I've had come up from others but its 90% backwards compatible. I did add a Stainless steel dowel option but stick to the filament one and just print the 2x12mm plate for the midline buffer and insert the filament as per the design.
0
Reply
hey great construction...but i need help, how do you attach the rubber bands without cutting them??
The designer has replied
0
Reply
loop them over prior to adding the back plate
0
Reply
Replying to @k2thestank :
yeah got that...but i mean the other side of the rubberband attatched to the plate with the roll
0
Reply
Replying to @matthias_m_muel :
they sit on top, and use a piece of filament as a through pin
0
Reply
Hi ! Looks like a great model. I have a stupid question though, why do you precise "sleeved" cards? It won't work on unsleeved ? Also, a little demo video would be great. Thanks
The designer has replied
1
Reply
i designed it for single/double sleeves (it'll semi pull in 2 singles just because of the tolerance difference) I'll run a few in sleeved through but they shouldn't be an overall issue. I'm going to sit down and make a manual to assemble (it is pretty straight forward as i have everything slotted) and make a video just these things take time i have videos on my socials of my design and testing process
1
Reply
it'll work with non sleeved, I'm just worried of the elastic wear on cards overtime or if there is a slight jam but it'll allow 2-3 through per spin
1
Reply
any chance to get links for the hardware that’s more accessible in a more timely manner on Amazon.
The designer has replied
0
Reply
i buy all of mine off Ali but its just x13 10mm M3's, x14 M3 nuts, x4 6mm M3's (plastic tapping like the one BL uses) and i already linked the elastics in the description
1
Reply
Replying to @k2thestank :
thanks my friend! gonna give this a go!
0
Reply
How do you put it together? Where's the instructions? Does it really need 160 magnets?
The designer has replied
0
Reply
first time using that new feature it's only 8 magnets, 12 bolts/nuts etc 😆
1
Reply
Is there a video or build photos yet? Almost have all the pieces done
0
Reply
Print Profile
0.2mm layer, 4 walls, 20% infill
0
Reply
Print Profile
0.2mm layer, 4 walls, 20% infill
0
Reply
No more