The Scrubbler: Enhanced X1/P1 Nozzle Wiper


Print Profile(12)


Description
Updates
- Update 7/8/2024: Added a First layer scan edition to the Regular edition to allow people to use the first layer scan if they want. See below in “Which Edition to print?” for details.
- Update 5/20/2024: Added custom GCODE (optional) for extra wiping in an "A1 style" with this set of nubs. See section below for how-to.
- Update 5/19/2024: Updated to V2, which is now slimmer and has you put the flinger on in the same direction as stock. This fixes minor but annoying issues with the stock wiping and end-of-print gcode. I now recommend only 4x nubs to avoid any collisions with the nozzle or hotbed. To reduce user confusion, I did blow away my makerworld print profiles for V1 😢. If you're using a contributed one, please make sure it's for V2 !
- Update: 5/18/2024: Changed recommended filament to ABS/ASA/PC/ etc. for higher temp users.
Boost Me (for free)
If you enjoy my work, feel free to boost me. I do work hard on it and all my stuff is free!
Note: The Scrubbler is an evolution of my Nub Scrub design. It does not require any permanent modifications to your printer.
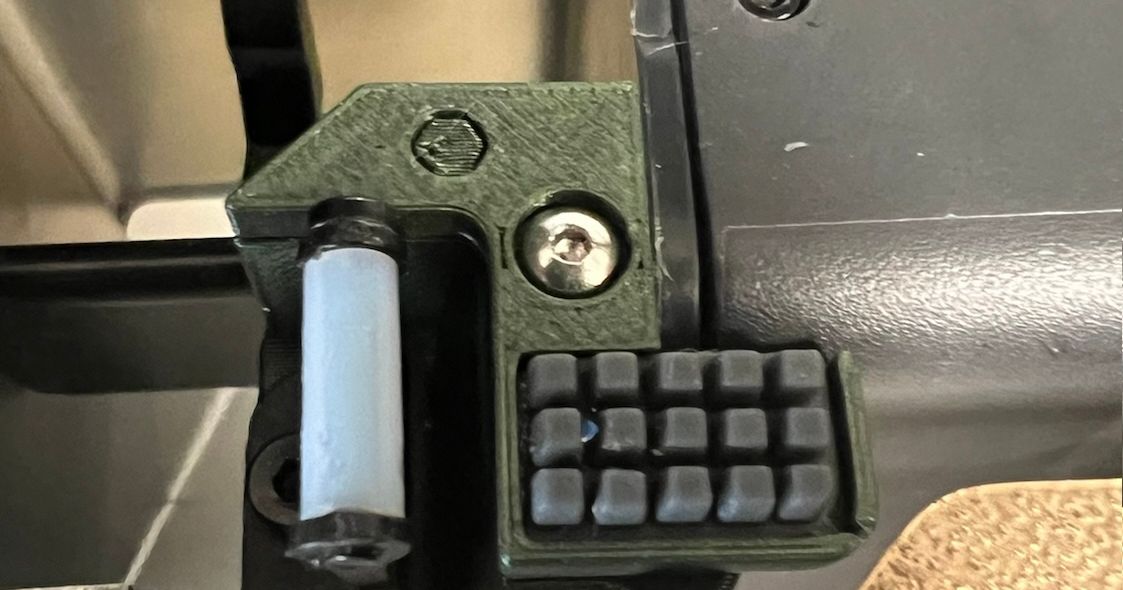
The Scrubbler is a nozzle wiper that cleans your nozzle by adding the silicone nubs from the A1 style of wiper to the PTFE tube “flinger” wiper that came with your printer. This extra wiping mechanism helps catch things that the flinger misses. The model fits on your X1/P1 series of printers and cleans your nozzle with an additional cleaning element borrowed from the A1 printer. It helps removes any filament residue that might cause print defects, especially when you change filaments frequently.
The Scrubbler is even simpler to install than the first generation Nub Scrub design and is very stable due to extra reinforcement. It uses 2 mounting screws plus 2 pre-existing mounting screws that holds the purge chute and flinger in place. These two “new” screws can be either the original wiper self-tapping screws (if you have extra) or regular M2.5 screws.
This design also helps alleviate a common issue with the screw hole in the purge chute which is easily stripped out. But adding 2 stabilizing wall surfaces, a “clip” mechanism and a mounting point on the printer structure, this model significantly reduces the strain on the original flipper mounting hole.
The Scrubbler is a fast print with only a few grams of filament and can install quickly.
Which Edition to Print?
- Regular Edition
- Previously known as ScrubblerV2. It works great on P1 printers and X1 printers. However if you use the first layer scan function on the X1 printer (I do not), then you should not use this as collisions will happen (and I can't work around them with GCODE due to firmware limitations, sadly).
- First Layer Scan Edition
- This was made to allow people to use the X1 first layer scan function. It is extremely similar but moves the location and orientation of the wiper to look like this image below, instead. This is also compatible with the custom GCODE I recommend below. The only downside here is that the wiper needed to be brought closer to the nub holder, and moved down slightly in Z height in order to prevent jamming. Initial tests suggests it also works well, but it is not as well tested as the Regular Edition, which more closely mimicks the wiping behavior of the OEM flinger.

Filament choice and profiles:
I suggest NOT printing it in PLA for heat resistance reasons. I originally used Prusament Carmine red PETG here, but I ended up upgrading to Bambu polycarbonate after PETG started looking a little “iffy” when printing hot filaments like ABS/PC in a warm chamber. Dimensional accuracy is important here, so make sure you adjust for shrinkage if you use ABS/ASA or another material prone to shrinkage.
- Because shrinkage also depends on your print environment (enclosed vs not) my Bambu ABS/ASA profiles are scaled here to 101.5% , but you may wish to scale them slightly up/down based on your experience with these filaments in your printer.
- The Bambu PC profile is sized properly with my profile without scaling and works as-is with Bambu PC.
3MF and STEP included. Pre-setup BambuSlicer for bambu users (although I recommend orcaslicer!). Fusion 360 can be uploaded if people want it.
Parts needed
Parts you almost certainly already have:
- 1x traditional P1/X1 nozzle scrubber ("flinger" style with PTFE tube).
- 1x coarse screw that attaches the PTFE “flinger” nozzle wiper to your printer.
- 1x purge chute attachment screw.
New parts:
- 1x of the A1 Nozzle rubber scrubber (you will cut down to a 5-nubs-wide piece).
- 2x coarse nozzle wiper screws which come with the original flingers:
- Alternatively, you may use 2x of some short M2.5 screws, or a mixture of M2.5 + coarse flinger screws.
Note: There used to be a 5x nubs option in V1, but I removed it in V2 because it was causing occasional collision issues, especially if you didn't modify your machine gcode. If you really want 5x, you could try printing the compatible V1 “4x” version which should let you just barely shoehorn a 5x set of nubs in if you trim things tightly. Some commenters have had success with this approach.
Printing
Printed here at 0.2 mm layer thickness, it needs minor traditional snug supports with paint-on supports when oriented as shown (see also images above in case this is unclear).
Assembly
Assembly is effectively the same for both editions, and for simplicity, the regular edition is shown here. However, if you use the First Layer Scan Edition, be sure to note the different orientation of the flinger for that version, shown in yellow above in the section “Which Edition to Print?”.
- Remove the right-hand chute installation screw, circled here:

- Cut a 4x nub section of the A1 nub strip, and adhere using the adhesive backing to the top piece, as shown here. Preload the to piece with the chute screw from the first step, and an M2.5 screw (or coarse flinger screw), shown here in silver.

- Pre-tap each of the holes in the printed part (highlighted in blue here) in the bottom piece with the screws you will use by putting the screws in the holes and removing them. This will ease installation. Not required, but easier to do outside the printer before hand.

- After removing the stock flipper from the chute, seat the bottom piece into place, like so: The clip will follow the outer contour of the chute. Make sure you have a screw loaded in the recessed hole ready to attach to the chute. Screw in the recessed screw to attach the bottom part to the chute. Now reattach the original wiper to the slot provided for it on the bottom part using a second screw. Make sure to orient the flipper in the orientation shown, away from the nubs! It should only fit this way with version 2. The result will look like this:

- Finally, seat the prepared top part, and fix it in place with the two preloaded screws.
- This completes the installation. Check to make sure bed/nozzle clearances are acceptable. They will be tight (in order to accommodate as many nubs part as possible!), but should fit reliably. Test the filament loading sequence to make sure there are no collisions or weird behavior.
Optional custom GCODE for wiping
The original A1 nubs are designed for a brushing motion with multiple passes, as is used in the A1 series of printers. Since the X1 does not do this by default (it has no brush), I came up with an similar set of wiping set of GCODE to insert into your machine GCODE sequence. Here's how where you put it:
- In the slicer, open up the machine profile (see pic):

- Change to the Machine gcode tab, and find the place you want to insert the wipe code. Here, I recommend doing this just after the nozzle rub on the steel plate. In Bambu's current Gcode for the X1 machines, you can find this by scrolling until you see the line: “;===== wipe nozzle end ================================”, and inserting the extra code a few lines above, right into the spot after the final steel plate arc rub movement (G2 I0.5 J0 F3000) , and before “M221 R” as indicated in this picture:

Here's the recommended code to insert, which you may modify as you wish:
;===== Scrubbler noozle wipe start ABL_5/20/24 ==================
G90 ; ensure absolute mode (should already be in it, but here for saftey)
G1 Z10 F1200 ; Make sure we don't hit the bed during wiping passes
G1 X128 Y265 F30000; start position, should be very close to where steel plate rub seq. ended
G91 ; relative mode
G1 X-45 F30000 ; run snake pattern from top back to front, run at max accell.
G1 Y-0.5 ; increment y slightly , and repeat back/forth while incrementing y.
G1 X45
G1 Y-0.5
G1 X-45
G1 Y-0.5
G1 X45
G1 Y-0.5
G1 X-45
G1 Y-0.5
G1 X45
G90 ; restore to absolute mode
G1 X128 Y265 ; return to start position.
G1 F3000 ; restore previous accelleration
;===== Scrubbler noozle wipe end ================================
Here's what this looks like

This remix is based on


Comment & Rating (671)