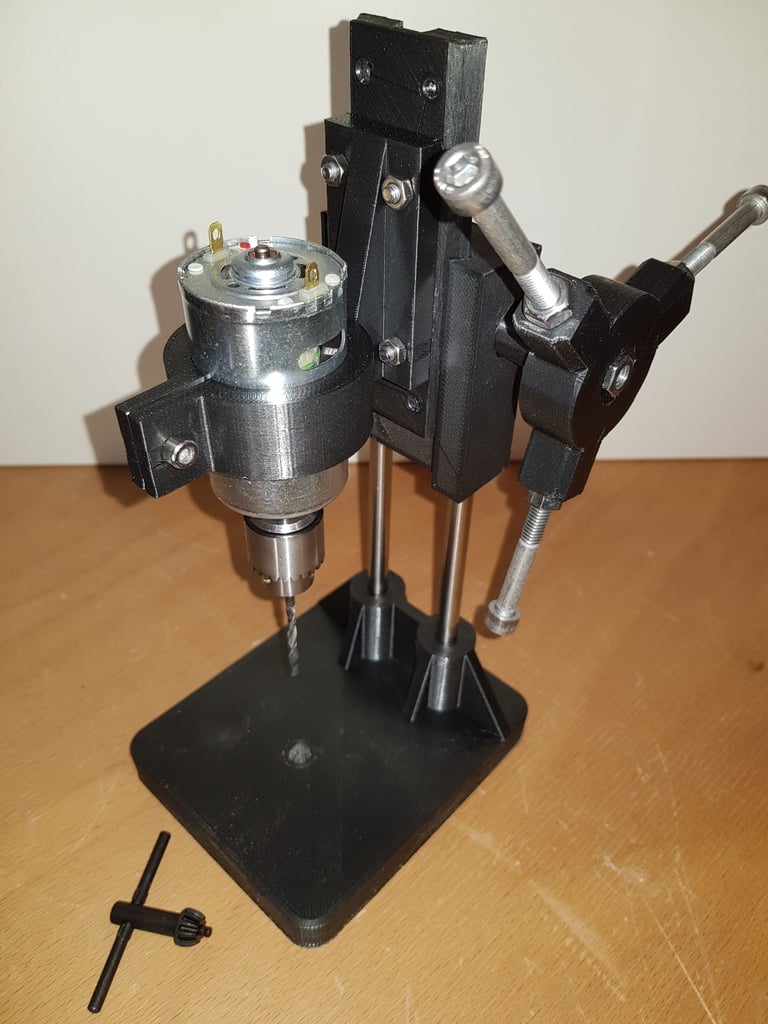
Drill Press Base + Motor/Drill Sleeve Adaptor
Drill Press Base + Motor/Drill Sleeve Adaptor
Print Profile(0)
Description
Summary
I remixed thing:2763330 because I wanted to use the cheap 12v electric Jewelry craft drill (Hand drill kit) that amazon sells. Link: https://www.amazon.com/AUTOTOOLHOME-Electric-Drill-Motor-Drills/dp/B01LZYWFE4/ref=sr_1_5?crid=33LJ1XB5N8PZY&keywords=electric+motor+drill&qid=1706632744&sprefix=electric+motor+drill%2Caps%2C90&sr=8-5 because it is half the price of the larger motor used in this original build.
To use this smaller "Jewelry" Drill motor I had to design a sleeve/bushing that slides over this smaller 26mm motor to adapt it to the larger 35mm motor mount that this drill press was designed for.
I also wanted to have a box or housing to house all of the electronics for the drill such as the battery pack, variable motor switch and the wires. The box I designed works perfect. It is able to be hot glued to the bottom of the original drill press base plate and house all your electronics.
You will just need to drill a 1/2" hole in the front of the housing for the variable motor switch and a 1/2" hole through the back-side of the housing to run your power wires out.
The variable motor speed switch I used is also from amazon LINK: https://www.amazon.com/dp/B07MK1SKRT?psc=1&ref=ppx_yo2ov_dt_b_product_details
With the both STL's and the two links I provided you will be able to make your drill press just like mine with a little DYI skills. :)
Print Settings
Printer Brand:
FlashForge
Printer:
Adventurer 5M Pro
Rafts:
No
Supports:
No
Resolution:
.20 OR .30 Depending On Nozzle Size
Infill:
15%
Filament:
Sunlu PLA+
Black
Notes:
Order the Items from the Amazon links I provided, Download/Print the two STL's and assemble
NOTE: DEPENDING ON YOUR FILAMENT AND PRINT TEMPS YOU MAY NEED TO LIGHTLY SAND/CHAMFER THE INSIDE OF THE MOTOR SLEEVE TILL YOU CAN SLIDE IT OVER THE MOTOR EASIER BUT IT SHOULD BE A NICE TIGHT FIT
The Electronics Housing/Base can be hot glued to the bottom of the original drill plate
-Battery Pack used was a AAx4 Pack but should fit a AAx6 Pack too
The springs I used for the drill press head were from a harbor freight spring kit.. I drilled two 2.5mm holes at the top of the motor plate and threaded in two m3 bolts to hold the upper springs in place and hooked the bottom of the springs around the lower motor mount bolts.. (THIS WORKS GREAT! FEELS MORE LIKE AN ACTUAL DRILL PRESS NOW)
OTHER NOTES:
-I used Two 5/16" Threaded rods instead of what the original guy used ( I cut mine approx.. 5" long for reference)
-The springs I used from the harbor freight spring assortment kit are 11/32" x 1-7/16"


