Flair Pro 2 shakr no handles no ironing bolt with angle
Designer
3.7 h
1 plate
54mm shakr no handles no ironing bolt with angle
Designer
3.7 h
1 plate
58mm shakr no handles no ironing bolt with angle
Designer
3.7 h
1 plate
Click to see more
Boost
16
28
5
2
63
40
Released
Description
First GIF is without sanding (PLA), second GIF is with sanding (PLA) and third GIF is without sanding (PETG)
Since not all print profiles are mine, they may not be up to date (should have been updated on 05.03.24).
Now more space between funnel and bolt
Added rounded transition to the inward sloping angle
Updated and new bolts
Especially if you have already tried a 58mm-54mm version you may have noticed that the gap between the funnel and the bolt was quite narrow and therefore the user experience was not so great - sorry about that. (thanks to @felixna for the tips!)
New pictures and GIFs will follow soon.
Important information on print profiles - read before printing!: Since not all print profiles are mine, they may not be up to date (should have been updated on 05.03.24). Mine ("designer") are up to date. Please check this before printing! You should also read the "How to print" instructions despite the print profile, as the versions are very individual - not just portafilter size and you can also react to any problems that may occur. Have a good espresso!
Donut Espresso Shakr stands for: intentionally creating a donut extraction to achieve a more even extraction. The ring at the edge after filling is therefore intentional, simply tamp without further distribution, more about this towards the end and in the future.
Shaking coffee grounds is fun and, with practice, makes delicious espresso. So I designed the Donut Espresso Shakr especially for 3D printing.
After lot of testing this is what I think works best for shaking, printing and workflow wise.
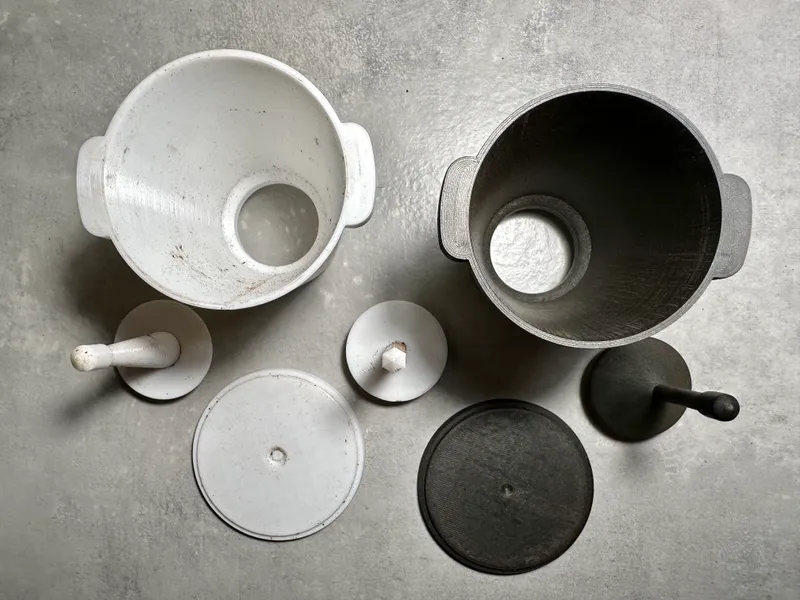
I focused on the biggest problem of 3D printed coffee shakers - coffee that sticks to the walls. There are two approaches, one that you just can pick up from the printer and one to further process after printing with sanding (about 15 minutes of work).
Here is all about the Donut Espresso Shakr in a video, a quick demonstration of both approaches and a ton of additional informations and tips (transcript in the info box):
Note: With use, I had to change the grinder settings for my recipes.
How to print and what to print (read carefully to get the result shown)
Food safe PETG or PLA (With PETG, much less usually sticks without sanding)
Check that it is positioned as shown in the picture
Use the finest layer height your printer can afford relative to the time you want to spend printing or use variable layer heights to safe some time (I used 0.12 mm layer height, tolerances are optimized for that but there are also more tolerance versions)
No support
Bottom/Top surface pattern: Concentric or Archimedean Chords (looks best)
Seam position: back
If you'll use the easy print bolt, the more tolerance lid could offer you a better experience
Enable Ironing for lid (to reduce sticking to a minimum without sanding)
Or print the lid with a fine layer height and Archimedean Chords (Top/Bottom layers)
Ironing: Top surfaces, Rectilinear (change Top surface pattern also to Rectilinear for this)
If ironing fails or gives you a bad result, sand it (PLA should be sanded wet) or see above at 7.
(100% infill will give you a more “premium” feeling, but 15% is sufficient)
(Cleaning with cleaning alcohol can help against stuck coffee, also RDT in another cup)
(More print settings at the end: “My further print settings”)
Fitting problems? The bolts become smoother after being pushed into the funnel several times. There is a lid with more tolerance and the bolts can be scaled by 1-3% if fit issues occur (you don't have to reprint the funnel).
Bolt(s):
6 walls/perimeters (to get a stronger layer connection)
Select one of the following 4 boltsand set the additional settings:
Watch out by removing the bolt from the print plate. Wait until the plate has cooled down and use a scraper. (The bolts are quite stable after removal from the plate, as you can see in the video but you should not forget the leverage effect when removing it).
(More print settings at the end: “My further print settings”)
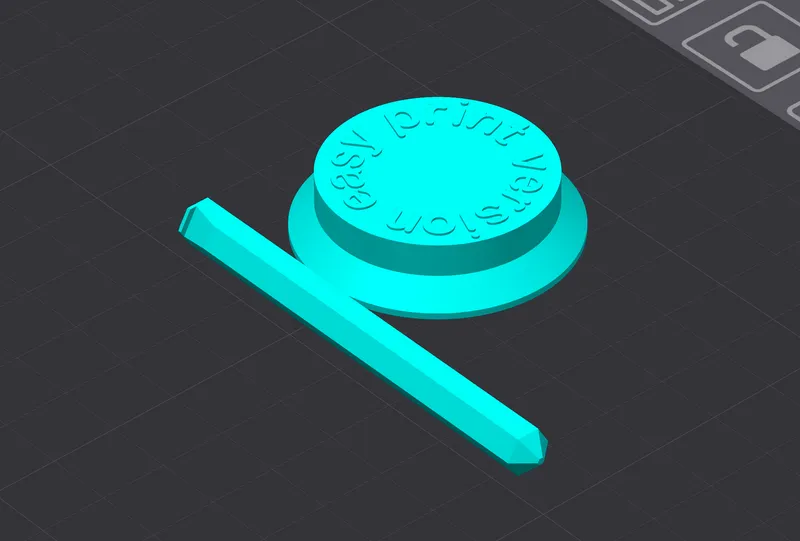
Bolt with angle (should be sanded)
Smoothest experience but you have to sand it (PLA should be sanded wet)
If you don't mind a little coffee sticking to it, it also works without sanding
Lower layer heights enable faster sanding
Bolt flat for ironing (pick up from the printer solution)
This bolt reduce sticking to a minimum without any further work
You can use variable layer height to get a faster and more stable print. 0.2mm layer heights where the flat part goes over to the pin and down to 0.08mm at the top
Ironing: Top surfaces, Rectilinear (change Top surface pattern also to Rectilinear for this)
Easy print bolt for PETG (a flat stopper which can be printed upside down on a smooth printing plate which can be plugged directly into the pin)
Currently only works correct with PETG - I will also adapt this for PLA in the future
more tolerance lid could offer you a better experience with this bolt
position as shown in the picture - a smooth printing plate is necessary
0.2mm layer height
Pin:
6 Walls, Concentric top/bottom layers
Stopper:
Archimedean Chords top/bottom
When joining, make sure that the clips of the stopper are aligned with the notches of the pin
Tolerance is 0.2mm - this works well for most, but may be a little too loose or too tight for you - but should hold together firmly in all cases.
Bolt screw flat part and stift (pick up from the printer solution without ironing but you need a M4 screw)
This bolt reduce sticking to a minimum without sanding and ironing but you need a M4 screw
Place “bolt screw flat part” like on the picture above on a smooth printing plate (upside down)
Place the “stift” like on the picture above on a smooth printing plate (lying down to ensure stability)
Bottom surface pattern: Archimedean Chords (to prevent a seam)
M4 screws up to 16mm long fit - tolerance is 0.2mm here, but sometimes you need a little more force to tighten the screw (lower layer heights could help)
Use RDT (do it in an extra cup or clean the shaker afterwards)
Use the ironing feature at least for the lid (see “How to print” section)
Use a flat bolt (see “How to print” section)
Sanding methods:
Due to the angles, you can also grind the shaker with normal files.
First sand coarse (I used a file, but sandpaper is faster) and then fine(I used this sandpaper like thing from Bosch “very fine”).
PLA should be sanded wet
What I sanded is marked on the picture with green:
You can also use epoxy after that, but I didn't test it yet.
Why would you want a donut extraction?
In Stéphan Ribes paper "Radial uniformity of espresso extractions" from 2020, he found that even with a donut extraction, the sides of the espresso puck are under-extracted. Also nicely illustrated here again by Lance Hedrick. I am currently testing whether the radial extraction yield can be improved for the Flair Pro 2 and later for other sizes.
There is also a subreddit specifically for 3D printed coffee tools where test results of this tool will be discussed in the future. We are happy about everyone interested and about like-minded people who would also like to share their experiences!: https://www.reddit.com/r/3Dprintingcoffee/
Tests and experiments:
Future experiment planned to test the extraction yield radial distribution.
How much coffee remains on the walls (Old Version)?
I first put all the parts together, put it on the scale, waited 10 seconds and read off the value. After use, I put all the parts together again, put them back on the scale and waited 10 seconds. Then, I read the value. After, I used a brush to spread everything into a dosing cup and weighed it again.
Here is the result for PLA-Metal like, 0.12 mm layer height and 19g beans:
Clean container: 65.2g, container after use: 65.3g, coffee residue "0g" (according to the manufacturer, the scale starts at 0.1g, but that doesn't seem to have worked here).
I also thought the result must be more but I think the blue color is very unflattering. When I painted the residue into the dosing cup, it stuck to the wall of the dosing cup and I had to paint it down first to make it look like the picture.
Feel free to contribute.
My further print settings:
(enable advance mode)
For all parts:
0.12 mm layer heights (high quality preset if you have one)
Perimeters / Wall loops: 2
Top shell layers: 5
Bottom shell layers: 5
(In the future or with OrcaSlicer PR-3839: Enable scarf joint to minimize seam visibility)
Funnel:
15 % Gyroid Infill
Top surface pattern: Concentric
Bottom surface pattern: Concentric
Ironing: Top surfaces, Concentric (This is just for aesthetic)
Fuzzy Skin: Outside Walls (better Contour if your slicer already support it). This is to get this finish which you see on my pictures but if you disable it you should get a faster printing time.
Fuzzy Skin settings (enable advanced mode):
Point distance 0.05 mm
Thickness: 0.1 mm
Lid:
I used a textured instead of a smooth print plate.
100 % infill for a heavy feeling (15% are sufficient)
Top surface pattern: Rectilinear
Bottom surface pattern: Archimedean Chords (You don’t get a seam with this setting)
Ironing: Top surfaces, Rectilinear(This reduces sticking to a minimum)
Fuzzy Skin: Outside Walls (better Contour if your slicer already support it).
Fuzzy Skin settings (enable advanced mode):
Point distance 0.05 mm
Thickness: 0.1 mm
Updates:
05.04.2024
Rounded transition to the inward sloping angle to reduce sticking
Bolts now have small roundings between the angles to improve stability
02.04.2024:
The inward tilt angle is now larger - this enables a significantly better user experience, especially with the larger versions
All versions now have the same funnel, bolt and cover sizes, just different contact surfaces - so the experience should be very similar for each size (as in the Videos) and the problem of the sides being too close to the bolt is solved for the bigger versions.
Looks great! Can you please make another 54mm version for the Sage/Brevill Barista grinder where there is a third "knob" at the top to start the grinder?
Just printed this today, its awesome! I have a timemore 075s grinder, and the cup is a bit too short from the spout so grinds are getting everywhere. I made a quick dosing ring if anyone is having the same problem https://makerworld.com/en/models/247803#profileId-264034