
The Impossible Laptop Stand - Fits Most laptops!


Print Profile(3)



Description
An updated version of this model has been published! Find it here!!
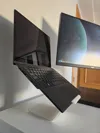
Looks impossible? Think again!
Instantly elevate your bland office desk and get rid of your boring laptop risers and stands!
Watch your envious colleagues' jaws drop as they struggle to process a laptop floating in mid air!
Design has been tested with the pictured 13" HP Elitebook and a 16" Macbook Pro. Most laptops should fit provided that the bottom half is not too thick. Works great with iPads and other tablets too, especially for looking at recipes in the kitchen!
Please provide feedback so that the design can be further optimized!
Printing
The pictured models were printed with wood PLA and PLA+, but any material should work.
- 6 walls
- 20% gyroid infill
- No supports required
Do not change the print orientation! Model must be printed side down to maximize strength at stress points.
Print Profile 1 - FOR THE BRAVE
Prints the entire model as a single piece.
Ensure that you have FANTASTIC bed adhesion if you want to use this option.
The risk of failure due to warping and/or poor adhesion is quite high as there is limited contact between the model and the build plate.
15mm brim has been added all around to help with bed adhesion.
I personally used the cool plate with no glue stick, and would recommend avoiding the textured plate.
Print Profile 2 - FOR THE NOT-SO-BRAVE
The model has been cut in half and dowels added to help join both pieces after printing.
Parts may fit together a little loose or tight depending on your print tolerances. Use a rubber mallet to gently tap pieces together if tight and use super glue if loose.
The end product may have a slight seam down the middle if this option is used.
License

You shall not share, sub-license, sell, rent, host, transfer, or distribute in any way the digital or 3D printed versions of this object, nor any other derivative work of this object in its digital or physical format (including - but not limited to - remixes of this object, and hosting on other digital platforms). The objects may not be used without permission in any way whatsoever in which you charge money, or collect fees.


Comment & Rating (39)