Hexatiles - Hexagon LED Wall tiles

Copyright Claim

Hexatiles - Hexagon LED Wall tiles

Boost
741
1135
54

Print Profile(4)

All
X1 Carbon
P1S
P1P
X1
X1E
A1
A1 mini

Full - Tiles
Full - Tiles
Designer
22.6 h
13 plates
4.9(17)

Half / Quater - Tiles
Designer
16.4 h
16 plates
5.0(4)

Tile for CYD
Tile for CYD
Designer
2.2 h
1 plate

0.2mm layer, 3 walls, 25% infill Rectilinear - A1 mini friendly for something else
16.9 h
16 plates

Boost
741
1135
54
9
631
959
Released

Description

Primary I designed this Hexagon tile set to hide my cables from the TV. So there is plenty of space for cable management behind the tiles. There are four eyelets on each base plate for using zipties.

Since the Tiles are featureing magnets to snap onto the base plate, they can easyly be removed or replaced for further upgrades and changes.


Changelog:

Update 24.02.2024

Added Half and Quater Tiles including Base in various heights
 

Update 10.03.2024
Add 15mm Tile for an "ESP32-2432S028R" - display (CYD)


Features:

Parts and Sizes:

The general Tile size is 175 x 202mm

The heights can go from 20mm up to 55mm in 5mm increments depending on the choosen base plate and tile size.

Parts:

  • Base Plate (10mm / 20mm)
  • Base Plate - Half (10mm / 20mm)
  • Base Plate - Quater (10mm / 20mm)
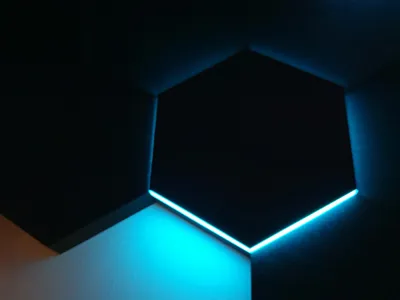
  • Outside LED (Base + 25mm height)
  • Outside LED (Base + 35mm height)
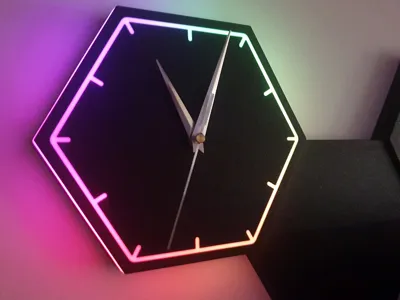
  • LED Clock Tile (Base + 25mm height)
  • CYD - Display Tile (Base + 15mm height)
  • Cable Outlet (Base + 20mm heignt)
  • Standard Tiles (Base + 10 / 15 / 20 / 25 / 30 / 35mm height)
  • Half Tiles (Base + 10 / 15 / 20 / 25 / 30 / 35mm height)
  • Quater Tiles (Base + 10 / 15 / 20 / 25 / 30 / 35mm height)
  • Bowties for connecting the Base Plates (tight or loose fit - version, depending on your filament settings)


Preparing the Project

Before you start this project you should make a Sketch how you want the tiles to be orientated on the Wall. The file of the "Base Plates" consists of 7 individual parts where 6 of them can be removed individually for defining how the cables should run and how the base plates are connected to each other.

If you miss this step and print the base plate without removing the connection sides, you have no openings for the bow ties to connect each tile to another and alighning them will be much more difficult.

Using Bambu Studio for customization:

Right Click on the base plate > split > to parts

Switch to the “Object” Tab and remove the unwanted parts

The LED Tiles can also be splitted apart for easy coloring.


External Hardware

  • Magnets D: 6mm, H: 3mm (6-12 per tile)
  • 10mm wide LED Stripe of your choice (I used WS2812b)
  • Clock mechanism with 12mm long shaft (only if you want to make the clock tile)
  • mounting screws


Used Filament

  • PLA - Black (for Base and Tiles)
  • PLA - White (for the diffusor part of the Tiles)

Printing

For best looking Result the tiles should be printed on a textured PEI - plate.


Installation

The hole for the magnet is a tight fit, I used a hammer and a pin to put them into place. 
Be aware of the magnet orientation. They should all be in the same orientation so you are able to switch tiles!
If your fit is more on the loose side (different filament / settings) then you should add little superglue before pressing them into the hole.

On the Cover plates be more careful when using the hammer.

The bowties can pressfit into place

Screw the Base Plates into the wall

Install the LED stripes into the LED Tiles

Install the Tiles and do the cable management

Have Fun!


Comment & Rating (54)

Please fill in your opinion
(0/5000)

Print Profile
Full - Tiles
work in progress. I made some changes to my game set up. very nice to look at. tnx
The designer has replied
1
Reply
Looks great! Thx
0
Reply
that looks awesome! did you make the asus and headset tiles?
0
Reply
Replying to @user_841758703 :
.Yes, I added the Asus logo to the tiles. and I inserted a headphone holder into a tile..If Laisch, the creator of this project, allows me, I can insert everything as a remix
(Edited)
0
Reply
Print Profile
Full - Tiles
Sehr schönes und durchdachtes Projekt, hat absolut problemlos gedruckt, mit esp32 und ws2812b eine gelungene Dekoration 🙂👍🏻
1
Reply
hi what kind of lighting did you use inside? it doesn't look like an LED STRAP... you're pretty confused
0
Reply
Replying to @user_2786971146 :
Hi, its a ws2812b led stripe 🙂✌🏻️
0
Reply
Are the magnets strong enough, that it could work to Mount it under the ceiling? 🤔
(Edited)
The designer has replied
0
Reply
Yes that should work without a problem. The tiles are just about 50g so not that heavy.
1
Reply
thanks, i have now my Plan made, the printer will run the next 2 weeks, ws2812 are here, only the 500 magnets are still on their way 😇 i will post Photos, when i have finished the Project 😇👍🏻
0
Reply
Replying to @user_2040774660 :
Cool, looking forward to see the pics 😀
0
Reply
looks great, but for some reason every other print is clogging at the mid layer switch, on my p1s. i thought it was the AMS at first, but same thing happens on manual spool, any idea's what's causing this and how to fix it?
(Edited)
The designer has replied
0
Reply
That's strange. Are you using a 0.4mm nozzle? Which material are you printing? At this layerheight the walls are getting thinner, so the printer normally moves slower. If you are printing too hot the material doesn't move fast enough because of this slow down and can get overheated which can clog the nozzle. Another thing could be overextrusion. At this height the printer does a slower top layer on the wall before the thinner wall, and when you suffer from overextrusion this could also have the same effect (material stays too long in a too hot nozzle) This is just a guess but I would try to do the flow calibration once again. Hope it helps.
0
Reply
Replying to @laisch :
0.4 PLA its the first time it happens with this specific pla just like you mention im also fairly certain it is becouse of the chamber getting to hot and the pla is deforming thanks to the extruder gears when the speed changes. i'll try printing with the top lid open and see if it stops thanks! :)
1
Reply
Print Profile
Full - Tiles
The project is awesome, i need to print so much tile 😂 When I finish the assembly I will post a full photo
The designer has replied
0
Reply
Thx, I'm curious to see it 😉
0
Reply
is there a video showing assembly/ how you wired the cut led strips?
The designer has replied
1
Reply
No, but if you search for "WLED" on youtube, you will find plenty of sources. 😉
0
Reply
weird question, where did you geht the shelves?:D they fit so nice
The designer has replied
0
Reply
Thx. Made them after the tiles where finished. Just a few 60° cuts and glue ;)
1
Reply
Replying to @laisch :
Thanks!
1
Reply
Print Profile
Full - Tiles
print perfectly
1
Reply
Print Profile
Half / Quater - Tiles
print perfectly
1
Reply
very nice project.👍 This looks very nice. where did you get the clockwork? Does the shaft of the clockwork have to be 12mm? (translated with Google)
The designer has replied
0
Reply
Thx Hi, I bought this bundle from amazon for some woodworking projects a while ago: https://www.amazon.de/gp/aw/d/B09PNDG9MZ and since they had a 12mm shaft I designed the clock hexagon for this shaft length so it doesn't stick out too far. For sure you can use one with longer shaft's but for shorter ones you have to change the design
0
Reply