Satsana light 5015, only 35g, for ender 3 (with wire management compartment) + cr touch mount
Satsana light 5015, only 35g, for ender 3 (with wire management compartment) + cr touch mount


Print Profile(0)
Description
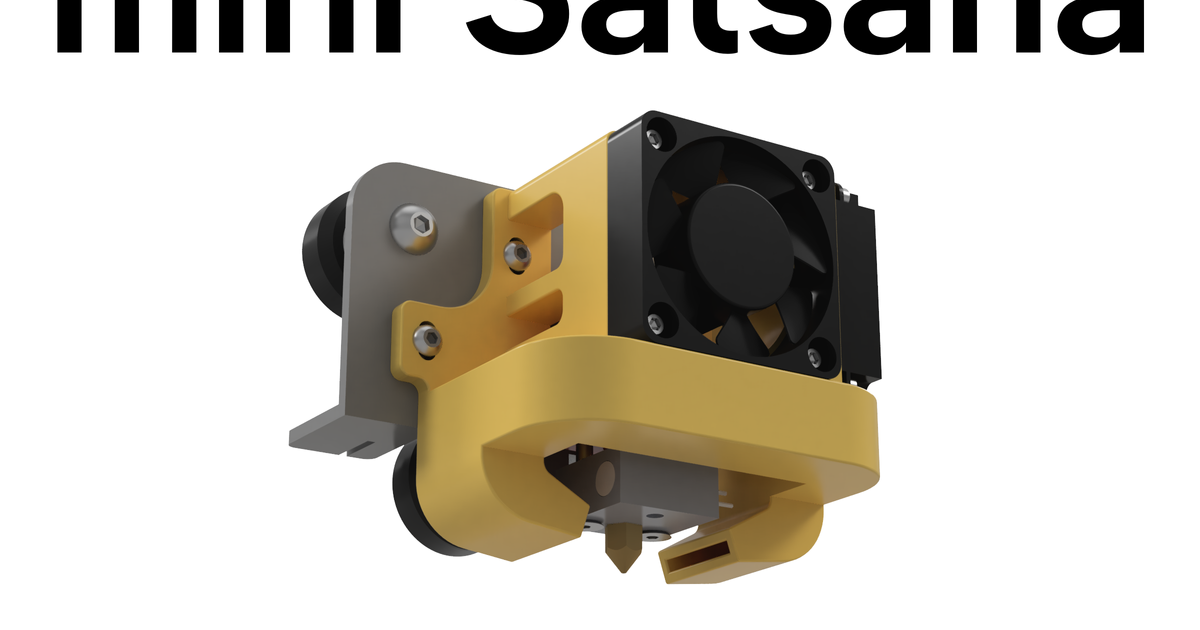
This is a remix of the very popular Satsana fan duct, i really enjoyed the look and the ease of printing of the mini satsana as it was fairly light and compact, i recently upgraded to a 5015 fan but i couldn't find a satsana design that was light, reasy to print an still looked good (in my opinion).
I designed it with a 5015 24v Winsinn fan in mind (check the dimentions of the fan you get, some have different dimentions i think), i used the general shape of the mini satsana and the bigger cooling duct from a 5015 satsana design i found on Scott Yu-Jan's youtube channel, i also added a compartment dehind the can for wire management thats bign ennough to fit the heating element's cable and 2 wago connectors ( https://www.wago.com/global/installation-terminal-blocks-and-connectors/compact-splicing-connector/p/221-412 ) to make the 5015 fans easy to connect without any solder required.
There are 2 zip tie hoe to hold the cables coming from the hotend and fans to the motherboard and there is a bracket to make the whole assembly more stable (the same as the satsana mini), the height of the fan duct is also ajustable.
you can also choose from a few fan covers i designed to make your printer look fancy.
if you have any questions please ask me in teh comment, i will try to respond as quickly as i can.
Print settings:
I printed mine on my ender 3 at 0.2 layer height with no supports, it took about 4 hours to print in pla. mine works fine without melting at all in pla when printing at pla temperatures but i would recomend printing it in something like abs if you have the option it. (you might need to do a bit of cleaning with an utility knife if the bridging does not print that well, and if you dont have an utility knife consider checking out tis other design i uploaded ;) https://www.printables.com/fr/model/229155-utility-knife-box-cutter-v1 )
Hardware:
all you're gonna need is:
2x M4x20 bolts
2x M4 nuts
1x zip tie, mine is 2.5mm wide and 1mm thick
4x M3x15 bolts (if you use a fan cover, if you dont the stock bolts should work just fine)
1x M3x5 bolt (or M3x12 withe the included spacer, you czan probably resize the spacer in cura to fit the bolts you have)
2x wago connectors like those https://www.wago.com/global/installation-terminal-blocks-and-connectors/compact-splicing-connector/p/221-412 (you can also solder the wires directly in place)
Assembly:
To moutn the fan duct, i recomment first connecting the 5015 fan to the existing 4010 fan wiers if you dont want to / cant connect the new fan directly to the motherboard. after that you can tuck the wagos of the solders you did in the compartment on the rigth side of the duct as well as the 2 thick wires comign from the hotend (its a tight fit but it works). then you can moint the 5015 fan to the duct, it can be hard to put the bottom nut in place with the wires and 2020 extrusion in the way so i recommend mounting the fans before mounting the duct to the printer.
please be careful to not pinch any wires as it can be a fire hasard.