RepRack: Open Source Spool Holder And Storage System by Repkord


Print Profile(7)


Description
@Repkord on Printables created this. I uploaded it under the Share model and will receive no points for downloads. The description is copied from the Printables page. Any donate or affiliate links go directly to @Repkord.
----
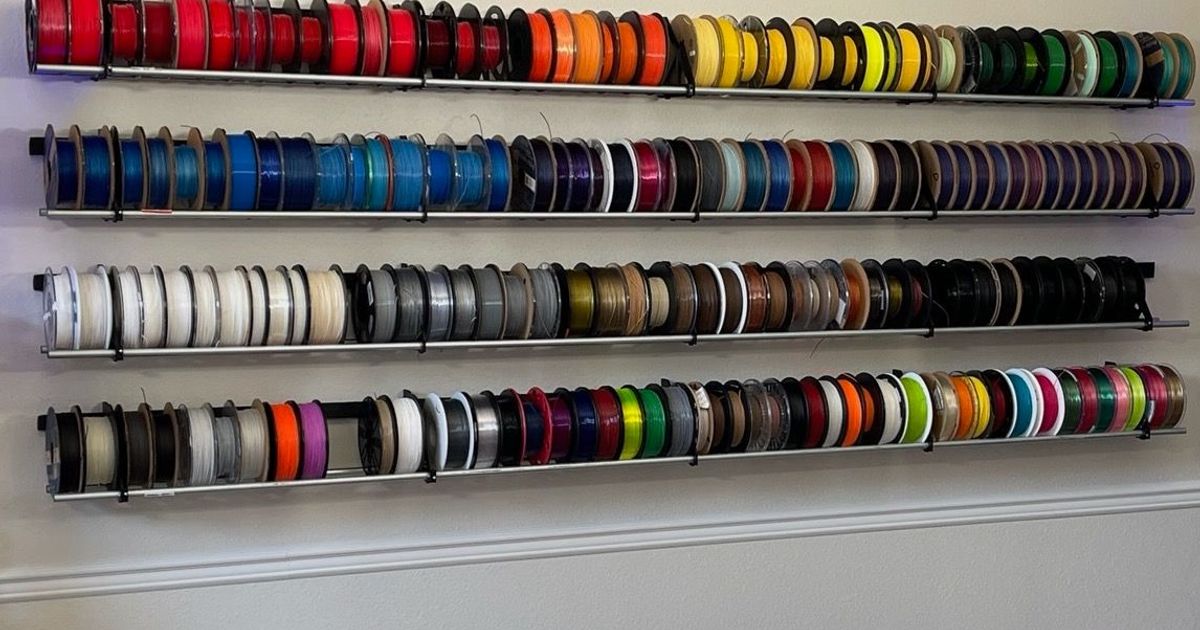
Welcome to RepRack! A modular, inexpensive, functional, easy to source, mass filament storage and spool holder system. Wall mountable or for use on the desktop. RepBox compatible. All source files are included to either 3D print or laser cut your own. The rail system is compatible with our new slip rod covers allowing you to print directly from the rack in any number of configurations.
To give you a sense of expense a 10 foot long RepRack holds ~50 spools and costs about $20 or so in materials depending on how you decide to make it.
If you prefer to buy starter kits directly from Repkord rather than make yourself you may do so here
Ready to make your own? Read on:
The hallmark of the RepRack system is its versatility. You may wish to use it for storing large amounts of filament spools neatly on your walls. Perhaps you want a small rack to hang above your printer that you can print directly from. Maybe desktop use with anti-skid feet is your preference? Perhaps you want a rack you can load and unload from your RepBox… we've got you covered there too.
Take a look at the photos to get a sense of how the system works. You can print or laser cut as many or as few of the RackHangers as you need. If you are printing them we HIGHLY recommend using the thickest nozzle you can as that will greatly increase the part strength. Locate the hangers everywhere you can anchor it to a wall stud or something secure. For hanging options you may use continuous french cleat strips or the provided individual brackets. If using printable brackets again use the thickest extrusion you can for the most strength and locate them closer together. Laser cut hangers may be spaced up to 32" apart OC typically if using ¼" thick (6mm) material. For laser cutting we recommend melamine or plywood. Never plain MDF. 3/16" (4-5mm) May also be suitable if used in closer spans. When in doubt, more is better.
BILL OF MATERIALS
Non-Printable Parts:
- ½" EMT (~19mm Outer Diameter pipe) Conduit commonly found at local hardware supply stores like Home Depot, Lowes, ACE, or other regional home stores. In addition you may be able to source it at any local Electrical supply store. Simply cut to length using a standard pipe cutter, hacksaw, abrasive cutoff wheel or similar metal cutting tool. Often times home stores can cut to length for you if you plan what you need ahead of time.
- #6 x 5/8" (16mm) Thread Forming Screws for Plastics… also known as Plastite screws. These screws work really well fastening 3D printed parts to other materials. If you need a source for these Repkord sells them in packs of 50 here.
- #8 x 3" (75mm) Wood screws for anchoring cleats to wall. You'll need at least two per printable cleat, less if you cut your own cleats. The total number needed will of course depend on how long your RepRack installation is. We HIGHLY recommend anchoring into studs or solid material. Wall anchors may be used as well but you will need to decide how many and what spacing is appropriate for the load intended.
- Optional French cleat… see the provided drawing below for cutting your own french cleat strips. You will need to drill and countersink your cleat at whatever intervals you decide are appropriate for proper anchoring to the wall. Wall mount kits with a 485mm (19") long cleat and fasteners are available from Repkord here.
Printable / Laser Cuttable Parts (USE PETG FOR BEST RESULTS):
- Hanger Sides… at least 2 but as many as you need for the length of rack you're trying to build.
- Rod Clamps… for laser cut hangers you'll want two clamps per hanger. There's an option to use the “U” style if you decide to clamp the pipe to the bracket after you've already run the pipe through it. Its sometimes easier to get your wall mount spacing right this way. The standard clamps are a bit more robust but you need to attach them prior to threading the rod through the hanger holes.
- Optional Printed single wall mounts… If you're not using continuous runs of french cleat you'll need as many of these as you have hangers. Print them using the thickest extrusion you can for maximum part strength.
Optional Add-Ons:
- Rack stands / RepWinder stands - Go here for the cardboard spool / RepWinder stand solution compatible with RepBox 2.3.1 and up and RepRack.
- Rack Rollers / RepBox Compatible Bearing Flange Rollers
- Slip Rod Cover for EMT for printing directly from the pipes
- French Cleats for RepBox, RepWinder, RepRack, and Catch Bin kits.
Files are available to all. We appreciate your recognition of our brand as the creator of this system and are very excited to see how you use it. Remixing for personal use is allowed but we do kindly request that you maintain our branding if doing so. Your support of our company allows us to continue to create and share projects like this with the community. If you would like to see more open source contributions like this from us please consider donating whatever amount you feel is fair to help our efforts here: https://www.paypal.com/donate/?hosted_button_id=2C3K3DV44QAFQ
By no means is this required but it is ALWAYS appreciated.
Comment & Rating (460)