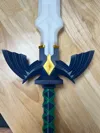
Master Sword V2.0 from The Legend of Zelda Tears of the Kingdom


Print Profile(8)


Description
I wanted to thank all that have supported this model with their likes, comments, and boosts. As it nears 1000 boosts, I wanted to do something special. I am working on some improved blade options such a dowel rod reinforced blade. I might even try to some fun but not canonical options.
Also I hope to put together simpler instructions. I will simplify the profiles to be more straight forward (basic sword combo and a separate profile for the specialty blades).
Update: I have released a wall mount that works with both V1 and V2 version of the sword.
Update 11/21/24: I have posted V2.0 in the profiles. This has many improvements that I have been wanting to add:
- Drooping issues with the tips of the cross guards should be solved. I have round all sharp angles to 1mm. This help the printer maintain a smoother flow of printing. My test prints have come out perfect. Also makes the model smoother and nicer to touch.
- I have added a spiral path for the wrap to follow while being installed. This makes the grip more solid feeling and removes the need for glue. This has also had the benefits of adding more mass to the wrap making it easier to print.
- The pommel also follows that spiral path but has a horizontal portion that “locks” it into place helping prevent it from falling off. This also removes the need for glue.
- Most exciting is that I have integrated the Adafruit RP2040 Prop-Maker Feather into the grip using an electronics sled to hold it into place. I have adapted Adafruit's project into my model. Most of the parts are the same except that I use Bambu Lab's Self-Locking Button Switch - IA006 for the on/off button. This is covered by a button that prints in line with the grip to help blend it in. Instructions and photos are coming soon. Also the battery will need a connector soldered on the appropriate pins since the dedicate header will not be usable.
- I have included a hollow blade meant to be lit with 2 700mm led strips back to back. There is a backer strip that will help guide and keep the strips in place. It can be installed and removed for maintenance after the blade is built. There is a maintenance cover that is locked into place with the blade is installed. Wires are set into pathways to the bottom and fed into the grip. Instructions are coming soon.
- V1 Blades will work the new cross guard. V2 Blades will not work with the original V1 cross guard due to a change in thickness were the blade is inserted.
Update: I have added a scabbard that is designed for this Master Sword.
This one was a fun project to see if I could make a master sword that would could be all encompassing for its appearances in Tears of the Kingdom. The party trick being that the center jewel acts as a locking peg for which ever blade is inserted. It's modeled with a tight tolerance so that it will friction fit in. Just press the center of the jewel and the peg will slide out. This allows the blade to be removed. My idea was that this would be more convenient then printing and finishing 3 different hilts for each blade. Storage should be easier as well. Plus its just cool.
Glue and supports will be necessary for some parts.
I have kept tolerances tight on some parts to help with friction fitting. I've found the blades need a couple insertions before it becomes easier. I figured this was better then a wobbly blade.
Parts
- Blades - Each blade is designed to be printed upright on the plate. You will need 2 center portions to make a full length blade. I have included pegs which should be glued to join all the sections. I suggest thick walls. I print with 5 walls for good measure. Really helps with flex. Use supports for the peg holes. On the restored blade, I did not include a tip since it is the same as the original blade.
- Cross guard - I have sliced this 2 ways: Sideways for more vertical printing. Excellent cooling is a must. I had very slight sagging towards the top of mine due to the sharp angles of the tips. Or sliced in half for a wider print but easier details if bed adhesion and warping isn't an issue. Supports are a must for both. Focus on the interior portions and tips.
- Grip - Simple part. Print with flared portion on the plate. Make sure to glue it with the cutout portion facing forward. Important for the wrap to be aligned with the cross guard.
- Wrap - This is was a trickier part for me since it kept coming loose from the bed. It doesn't have a very wide base so bed adhesion is critical. Supports and brims help. Has a built in peg to lock it into the proper orientation.
- Jewels and Blade surrounds - Super easy print. Glue peg into jewel with inset on the back. Glue surrounds on cross guard.
- Pommel - Two parts for nicer printing. Use grip to help align while gluing halves together. Can remain removable with future upgrades...
Comment & Rating (1544)