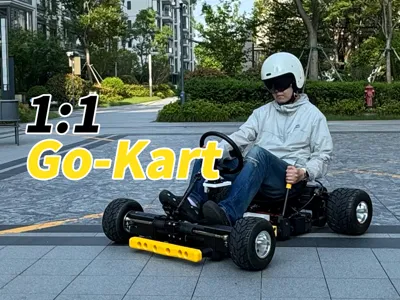
Go-Kart V1.1: Carbon Fiber Tubes and Nylon 3D-Printed Components


Print Profile(1)


Description
⬇️ V2.0 is now live ⬇️
https://makerworld.com/zh/models/1644666-ke-jia-shi-de-3dda-yin-ma-li-ao-sai-che-qia-ding-c#profileId-1738169
To friends using the CN version: My CN page is automatically synced from this page, and I apologize that I cannot directly reply to comments. Some part links seem to have issues; please switch to the international version to open these links correctly
This project is large in scale, time-consuming, and costly, existing to explore new structural possibilities for four-wheeled single-person vehicles. I originally thought there was no need to organize it for open source. However, friends on Bilibili, Douyin, Xiaohongshu, Xigua Video, and the MakerWorld community all seem to love this project. Therefore, I have carefully organized the model data and written this page. Please read the following content in detail before deciding whether to start this project
Foreword:
This is a new exploration after I practiced building bicycles with the [carbon fiber tubing frame + engineering filament FDM 3D printed connectors] structure
If you are interested in bicycles, you can watch my two videos on building bicycles
1. Single-speed road bike (PPA-CF structural parts): https://www.bilibili.com/video/BV1Fo15YcEXX
2. VPP structure mountain bike (ABS-GF structural parts): https://www.bilibili.com/video/BV1WCfbYVEeb
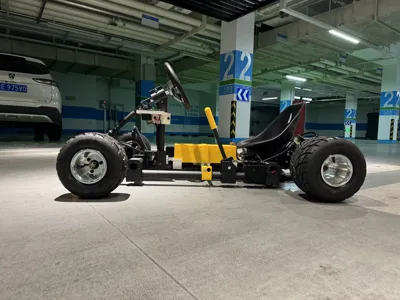
The kart in this project uses 40mm outer diameter, 2mm wall thickness carbon fiber round tubes (T300) as its frame
Parts printed with PA6-CF material by an enclosed 3D Printer are used as connectors and structural components
After test driving (driver 183cm 82kg), the structural strength has been verified as qualified with a large safety margin
And because both carbon fiber tubing and PA printing filament have a certain degree of deformation, the chassis has a wonderful feeling similar to the flexible frame of an off-road truck (like Benz Arocs/Man TGM models)
This project has been released as video content on Bilibili: https://www.bilibili.com/video/BV1nyEszNES8
After manufacturing and test driving, I have evolved the kart to V1.1
V1.1 Version Description
1. Optimized the installation process, adjusting the fixing methods of some parts for easier assembly
2. Corrected multiple structural interference issues found during the installation process
3. Reduced the size of printed parts and lowered the infill rate within a reasonable strength range to save material
4. Additionally designed a small front bumper to prevent objects in front of the vehicle from getting caught under the chassis while maintaining a decent approach angle (with a certain height)
For hardcore players:
To integrate power, transmission, differential, and brakes, I purchased the rear axle assembly from the first link below. However, it includes a rear differential and dual disc brakes, which work well but are a bit heavy. If you are a hardcore player, I suggest you try a "genuine" kart rear axle without a differential and with only a single disc brake. This will make the kart lighter, and a locked rear axle allows for smoother drifting. Therefore, in addition to uploading the standard parts, I will also upload the complete Rhino file for this project. You can confirm critical dimensions and mounting positions with your preferred rear axle supplier, then check the model file to see if it can be used, and modify the rear axle mounting method on the drawings I provide
Preparation:
➡️Kart Parts
Rear axle assembly
https://item.taobao.com/item.htm?id=854286183868
Sku: 60v1500w (with brake, three-hole flange
Reference price ¥830
Steering components
https://item.taobao.com/item.htm?id=597053912467
Sku: I bought: 32CM (1.5 turns, telescopic universal joint 33cm
After testing, I found 1.5 turns too casual and not competitive enough. I recommend choosing: 32CM (one turn, telescopic universal joint 33cm
Reference price ¥220
Spindles, front wheel bearing components
https://item.taobao.com/item.htm?id=742255732813
Sku: Spindle + clevis + 5-inch wheel flange (bearing type
Reference price ¥90
Wheels
https://item.taobao.com/item.htm?id=755099200004
Sku: Front + Rear Tires + (Front bearing type, rear three-hole hub
Reference price ¥700
Simple kart seat
https://item.taobao.com/item.htm?from=cart&id=569159352258
Reference price ¥18
➡️Structural Materials
Carbon fiber tubing
Common standard products, so no link provided
Size 1: Outer diameter 40mm, inner diameter 36mm, i.e., 2mm wall thickness
You can choose to buy 1500mm long tubes and cut them yourself. 6 pieces are needed. The advantage is more flexible sizing, allowing you to decide the length based on your needs. The disadvantage is that you need to do it yourself, and cutting neatly is still challenging
1.5m tubes can be sent by express delivery and are not considered oversized, so there's no extra cost; a perfect size
Reference price ¥235/piece, 6 pieces total ¥1410
Or you can ask the seller to cut them to the following specific dimensions:
1300mm x2 for main beams (designed wheelbase 1050mm, this is the minimum length for the main beams. If you are taller than 180mm or wish to install a non-integrated rear axle structure that takes up more space, it is recommended to lengthen the main beams)
660mm x2 for front axle
530mm x2 for cross beams
320mm x1 for steering column support
Size 2: Outer diameter 20mm, inner diameter 18mm, i.e., 1mm wall thickness
You can choose 1000mm length, one piece is enough
Reference price ¥60/piece
Or you can ask the seller to cut them to the following specific dimensions:
510mm x1 for battery holder
230mm x1 for handbrake lever
➡️Hardware (Class 8.8 is sufficient for securing composite and printed parts)
All screws are recommended to be hex head or flanged hex head for easier installation in confined spaces
All nuts are recommended to be nylon insert lock nuts, as they involve securing composite and printed parts, and cannot be torqued too high
M12x120 4 sets for spindle seat reinforcement and through-fixing the spindle seats
M8x90 10 sets: 2 sets for through-fixing the front axle to the main beam fixtures + 8 sets for through-fixing the rear drive axle to the main beam fixtures
M8x80 26 sets: for through-fixing the 7 cross and main beam fixtures of the chassis (3 sets of screws and nuts per pair of printed parts) + 2 sets for through-fixing the bottom steering column fixture + 1 set for through-fixing the steering gear fixture + 2 sets for through-fixing the handbrake components
M8x65 5 sets: for through-fixing the motor wire outlet fixture + 2 sets for fixing the main beam rear axle fixture to the rear axle mounting tabs (shims will definitely be needed to adjust the spacing because the welded tabs on the rear axle are not precise)
M8x60 2 sets: for fixing the battery crossbar to the main beam fixtures
M8x50 2 sets: for through-fixing the steering column mounting components
M8x30 2 sets: for fixing the charging port
M6x40 6 sets: for fixing the start button + slow charging port
It is recommended to buy at least 10% more of each hardware item (if less than 2 pieces, buy 2 more)
➡️3D Printing Filament
PA6-CF for structure 6KG. Reference price ¥400/KG, total ¥2400
For decorative and electrical parts, 2.5KG of any filament is fine, choose any color you like
I chose PA6-GF yellow. This color is stunning, absolutely amazing
➡️Electrical Components
Friends who have read this far should have a solid foundation. The selection of this power system considered cost factors. If you want to improve it, remember to modify the support parts for the electrical section yourself (there will definitely be size differences)
Using 20 Gotion High-tech 33140 LiFePO4 cells to make a 60V 1kWh battery. Batteries come with copper poles and nickel-plated terminals. If using a regular spot welder, you need to buy batteries with good nickel plating. For copper pole batteries, either use laser welding for steel strips or a 150W soldering iron for copper wires. It is recommended to tin plate all soldered copper wires to resist oxidation
Battery link: https://item.taobao.com/item.htm?from=cart&id=770705227853
Reference price ¥17/cell x20 = ¥340
Protection board link: https://item.taobao.com/item.htm?from=cart&id=719045877570
Sku: APP version 8-20 series universal, 60A peak 100A, balance 0.4A, built-in Bluetooth
Reference price ¥150
Controller link: https://detail.tmall.com/item.htm?from=cart&id=628215634883
Sku: Flagship version 60V/72V 1500W
Reference price ¥80
Charger link: https://item.taobao.com/item.htm?from=cart&id=818063079059
Sku: Aluminum casing digital display: 60V LiFePO4 20 series [73.0V5A]
Reference price ¥70
Home charging pile slow charging interface link: https://item.taobao.com/item.htm?from=cart&id=781557931223
Sku: 3*2.5 square 1-meter electric motorcycle power take-off
Reference price ¥95
➡️Consumables
Adhesive
It should be noted here that because it involves bonding carbon fiber tubing, epoxy adhesive is the optimal choice, such as 3M DP460 or SikaPower1200 that I used
Furthermore, since this is an integrated project, it is recommended to individually disassemble each part for additional adhesive application and secure the nuts only after all components are correctly assembled
The total consumption for this project is within 50ml. The two adhesives mentioned above have similar prices. The reference price for this quantity is ¥70
Brake fluid 1L (DOT3)
During installation, the angle of the brake lines will be adjusted, which may cause air to enter the brake lines. After the entire vehicle is built, air needs to be bled. Prepare 1L of brake fluid for circulation
➡️Tools
Small or medium automotive repair tool set (must include common sizes of socket wrenches, and since double-locking is involved, at least two pieces of each size are needed)
Common size drill bits (for reaming 3D printed parts when extrusion is not properly calibrated)
Carbon fiber tube cutting tool (fixture/special saw)
Soldering iron (for wiring electrical parts, etc)
Spot welder (for battery pack assembly)
Convection oven (for annealing 3D printed parts made with carbon fiber/glass fiber infused filaments)
At the end of the text section, and before the assembly manual:
Above are all the materials I have organized. In addition, I have organized the installation steps and presented them as a PDF document (in the list below). The document presents the installation process in the form of drawing components and annotations. However, because this project is indeed very large, I cannot provide detailed, step-by-step guidance to every friend. There are many small details that you will need to figure out yourself. If you encounter any unsolvable problems, you are welcome to discuss them with me in the comments section, and I will reply to you as soon as I see your comments
Documentation (1)
License
You shall not share, sub-license, sell, rent, host, transfer, or distribute in any way the digital or 3D printed versions of this object, nor any other derivative work of this object in its digital or physical format (including - but not limited to - remixes of this object, and hosting on other digital platforms). The objects may not be used without permission in any way whatsoever in which you charge money, or collect fees.
Comment & Rating (101)