


Print Profile(1)

Description
Project Overview
This is a three-part, heavy-duty tarp clip system, specifically designed for woven PE tarps (the kind commonly used for covers and shades).
Factory-installed metal grommets often tear under stress – this DIY solution is stronger, reusable, and easy to install.
Perfect for:
Shade installations (on fences, pergolas, etc.)
Sun sails and canopies
Camping and tent setups
Temporary covers or tarp shelters
I’ve personally tested this on a 2x3 m tarp, mounted on a fence for shading.
It’s been outdoors for over 4 weeks, exposed to wind and sun – and it's holding up perfectly.
Two galvanized support wires run across the top and bottom, and the clips easily hook onto them.
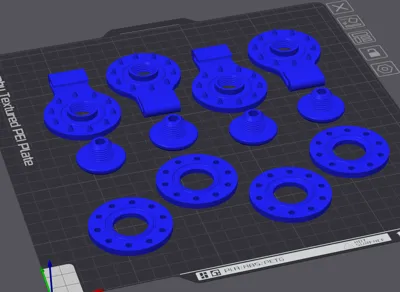
Clip System Breakdown
The tarp clip consists of three parts:
Hooked Base Piece
Center thread for the locking bolt
Sharp spikes to grip the tarp from underneath
Circular ridge that matches the top plate
Hook for easy hanging on wire or carabiner
Top Plate ("Disc")
Features the matching groove to the base's ridge
Spreads out the compression force evenly
Locks the tarp between the two pieces
Threaded Bolt
Requires a 6 mm hex key
Pulls the top and bottom together
Simple to install and reuse
Printing Recommendations
Material: PETG is recommended; ASA is ideal for extended outdoor use
Infill: 100% – needed for strength under stress
Layer Height: 0.2 mm
Support:
Only required for the hooked base part
Unfortunately, unavoidable due to geometry
After many design iterations, supports are now easy to remove
Design note: Threads were modeled with slight offset to ensure smooth operation no post-processing needed.
Installation Guide
Place the hooked base on the desired tarp location
Mark the inner circle using a permanent marker

Cut the hole – I recommend using a soldering iron

This melts the tarp fabric and prevents fraying
Reposition the base, align the top plate
Insert and tighten the bolt with a 6 mm hex key
Field-Tested
Installed on a 2x3 meter PE tarp
10 clips used
Outdoor test for 4+ weeks – wind, rain, UV
No loosening or tearing – extremely stable
Note for Makers
This is a DIY design, not a factory-made part.
Support removal on the hooked base requires a bit of patience, but it’s part of the fun 🙂
Feel free to remix or improve it — I’d love to see what you come up with!
Boost Me (for free)
If you like plese click here and send me a boost! :)
Comment & Rating (39)