Prusa Core One Rear Vent Mount 3in 4in Hose 90deg


Print Profile(2)


Description
UPDATE:
V3 Released! I've enlarged the screw holes slightly, and added counterbores, so as to use 8mm magnets or sink the screw head. May need to use shorter M3 bolts, possibly M3x8 or 6. A special 100.3ID version was added per request to adapt to an inline fan. STP/STL included.
P.S. I am not responsible for toddlers eating magnets, so please be careful!
I need to work on print files for V3 but you can at least bring it into Bambu Studio and slice yourself.
Why?
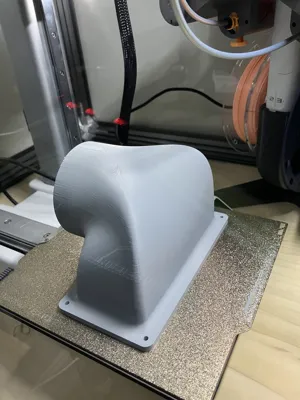
Reusing the Core One's rear M3x10 vent bolt pattern, I lofted that profile to a 3" or 4" vent hose cylinder. I wanted to keep it as tight as possible to the back of the Core One, and point it vertically (90deg).
For those of you who are getting the Advanced Filtration system but still want to vent outside thru a hose, this is an option. This also uses less material than the original P60 filter can, if you need something quicker/cheaper.
Function
V2 has a 72mm hose OD (3in) as modeled exit
V3 has a 98mm hose OD (4in) as modeled exit
I've found a 3" vent is plenty as long as you have the fans to push/pull the air. But I made a 4" version as well. I have 3 8ft sections of 3" hose joined by an inline ventilation booster fan, and that combined with enclosure fans does a good job pushing fumes outside my home. Link below if you’re looking for one.
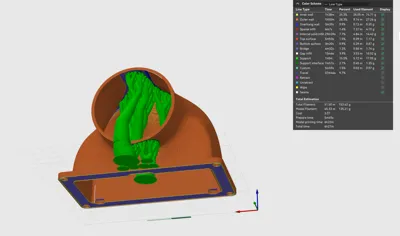
Printing
Printed in .2 layer height, 60% infill, 4 walls, with painted supports below the overhangs on an A1 Mini (see pics). Probably could get away with 15%.
Printed in Polymaker Polylite PLA Pro. HT-PLA(GF) or PET-GF would probably be ideal candidates for this. Easy to print, lower fumes than ASA, and much better heat resistance than PLA!
Probably will print in engineering filament once I get some.
Tried annealing at 200F (95C) for 7min, then left to cool slowly with Oven, for additional temp resistance, but it did experience warping (ruined the part). If you’re going to do it I would probably recommend a lower temp, maybe 150-160F (70C) for the same amount of time. Increasing the temps in slower steps (10deg C every 10 mins?) until the set point. I’m contemplating pinning the hood at the bolt locations with bolts washers after drilling the bolt locations on a steel/aluminum plate, or the sand trick, and see if I can keep it from warping.
Print time is 6-8hrs depending on settings. 150-170g ish part.
Future??
In the future my design goals are:
- Somehow adapt this to the canister in the original make.
- Add magnet counterbores AND internal slots to the model - so you can
- Bolt it on
- Use button magnets.
- Or add internal magnets with a layer pause
- Move it even closer to the core one
Links
Inline fan:
- Powerful 3 Inch Inline Duct... https://www.amazon.com/dp/B0D6N9246C?ref=ppx_pop_mob_ap_share
Boost Me (for free)
If you like my obscure designs, want to support my work, and also share it with more people, please consider boosting me! If you don’t have any boosts, I appreciate a like, download, and follow. They all motivate me to keep up the good work!
Membership
Consider my subscription or lifetime commercial license to print my models commercially. Only original designs apply (not remixes or derivatives), see my profile for details.

Comment & Rating (2)