Article is in PROGRESS FOR PHOTO AND DETAILS
# Printing Glass (Almost): My Experience with Transparent PETG
_A journey through swatches, profiles, humidity and... surprises._
## Prologue: The Swatch Obsession
This is the story of a small maker (yes, it’s going to be long, so make yourself comfortable — it might be worth it in the end) who has the flaw of wanting to do things properly.
Every time I get a new filament, the first thing I do is print my swatches: always the same models, always with my custom designs, which I’ve published on my MakerWorld profile.
Some time ago, I came across a transparent filament that really intrigued me:
👉 PETG Overture Transparent
After some good research online — between guides, forum posts and YouTube videos titled things like _“Print Ice”_ or _“Print Glass”_ — I had a decent idea of the parameters to try.
You can do the same search — after all, we’re makers, we love experimenting.
---
## First Tests: Swatches, Profiles and Satisfaction
With a mix of patience and trial-and-error, I found settings that worked and printed my usual swatches:
🧩 Ultimate Filament Sample Remix with Label
Yeah, I know, I’m a bit obsessed — but I love collecting swatches. They’re like little snapshots of every material I test: they tell the story of the hunt for the perfect profile.
### Parameters I tweaked:
- **Speed**: reduced for more accurate deposition
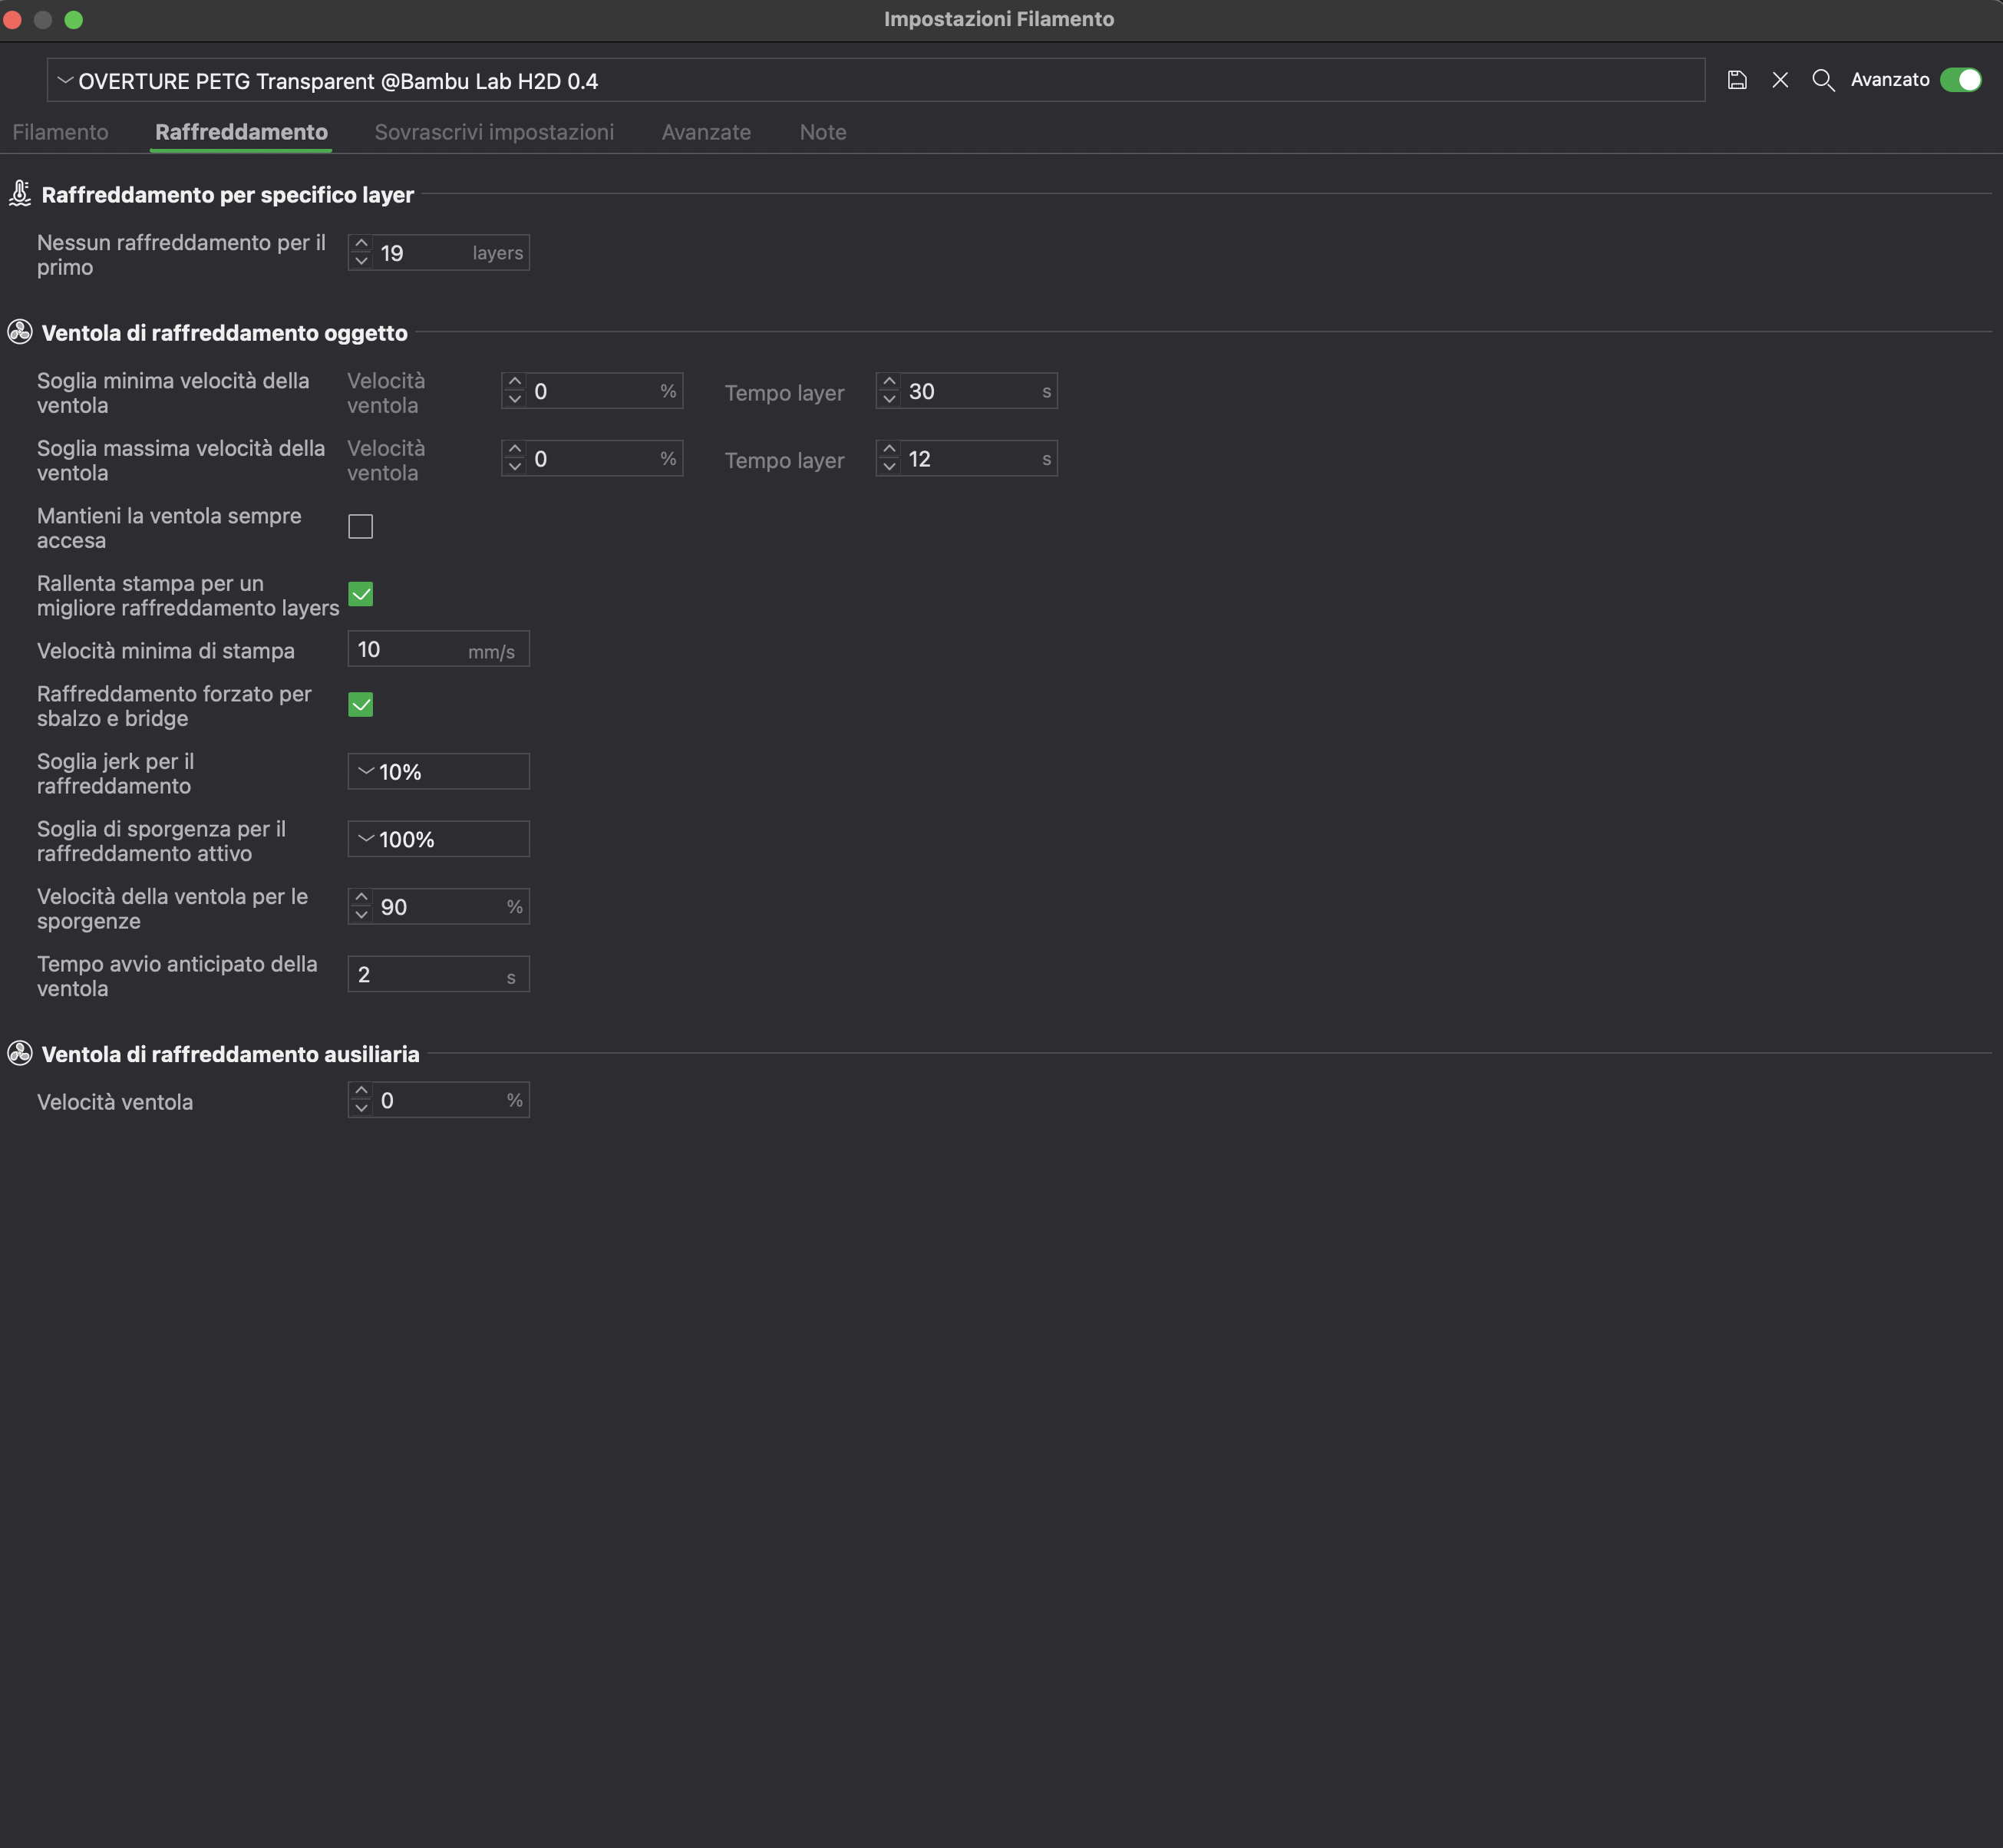
- **Fans**: turned off or to a minimum
- **Temperature**: slightly increased
- **Layer height**
- **Line width**: tuned for optimal fusion
- **Infill**: variable
- **Top/bottom shells**: reduced or disabled
**Result?** Pretty satisfying. Clean, clear swatches. I archived them proudly, ready to show anyone interested in “crystal-clear” prints.
---
## The Newcomer: A Translucent Disaster
Then one day, a friend gives me a new filament:
👉 Bambu Lab Translucent Clear
I load it up, apply the same settings I used for Overture… and the result?
👉 A complete disaster.
The printed part was **much more opaque**, with a cloudy, milky finish that had nothing to do with the transparency of the previous swatch.
*"What a crappy filament!"* I thought.
I dried it just in case… but no improvement.
I was ready to label it “not worth buying.”
---
## Doubts (and Obsession)
Then I asked myself:
**“Is it really possible that Bambu Lab, usually known for high-quality filaments, made something this bad?”**
So I decided to dig deeper. With only 1–2 hours a day for my 3D printing hobby, it took me **several days**. I changed every single setting. My house filled up with swatches.
Each attempt improved one thing and worsened another. Still not happy.
I even tried using the **perfect Overture profile** — slight improvement, but nothing significant.
Bambu Lab’s filament remained **noticeably more opaque**. And I was getting frustrated.
---
## The Plot Twist: Overture Turns Opaque Too
At some point I went back to Overture, printed a new swatch…
👉 And it came out opaque too!
That's when the light bulb turned on:
**“Could this all just be a humidity issue?”** (but I *had* already dried it...)
---
## The Breakthrough: Extreme Drying
I decided to go all in:
👉 18 hours of drying at 65°C.
I wanted to be sure the filament was **100% dry**. Then I ran one final print.
### The result?
**Stunning.**
Even better than my very first Overture print (which probably arrived fairly dry, but definitely not at 8% humidity like both filaments were now).
Looking back, I can confidently say **both filaments are equally good**. The only real difference was **moisture**.
The print was flawless. (Yeah, I know the bridges are a bit weak, but we’re talking *zero cooling fan* here!)
While printing, the surface even felt **rubbery and smooth**, meaning the layers were fusing perfectly and uniformly — **no microbubbles**.
---
## The Takeaway: Humidity Changes Everything
I wrote all this just to highlight something Bambu Lab keeps repeating (and most of us tend to ignore):
> 🛑 **DRYING FILAMENTS IS CRUCIAL.**
Not just a friendly tip: **it literally transforms your prints**.
The microbubbles caused by absorbed moisture aren’t visible, but they make the plastic cloudy and even change the filament’s original color.
- On **transparent filaments**, it’s obvious.
- On **colored or opaque ones**, less so — but the surface will still appear duller.
---
## Conclusion
I hope this article helps someone out there. It definitely changed the way I approach my prints.
And if you’ve read this far: thank you for your time!
### My advice?
👉 **Before tweaking endless print settings… dry your filament!**
---
## Extras (for the curious):
🔗 My MakerWorld profile with all the swatch models
📷 Photo gallery of all my tests (coming soon...)
🛠 Drying tips: use a filament dryer, convection oven, or a printer with a heated chamber.
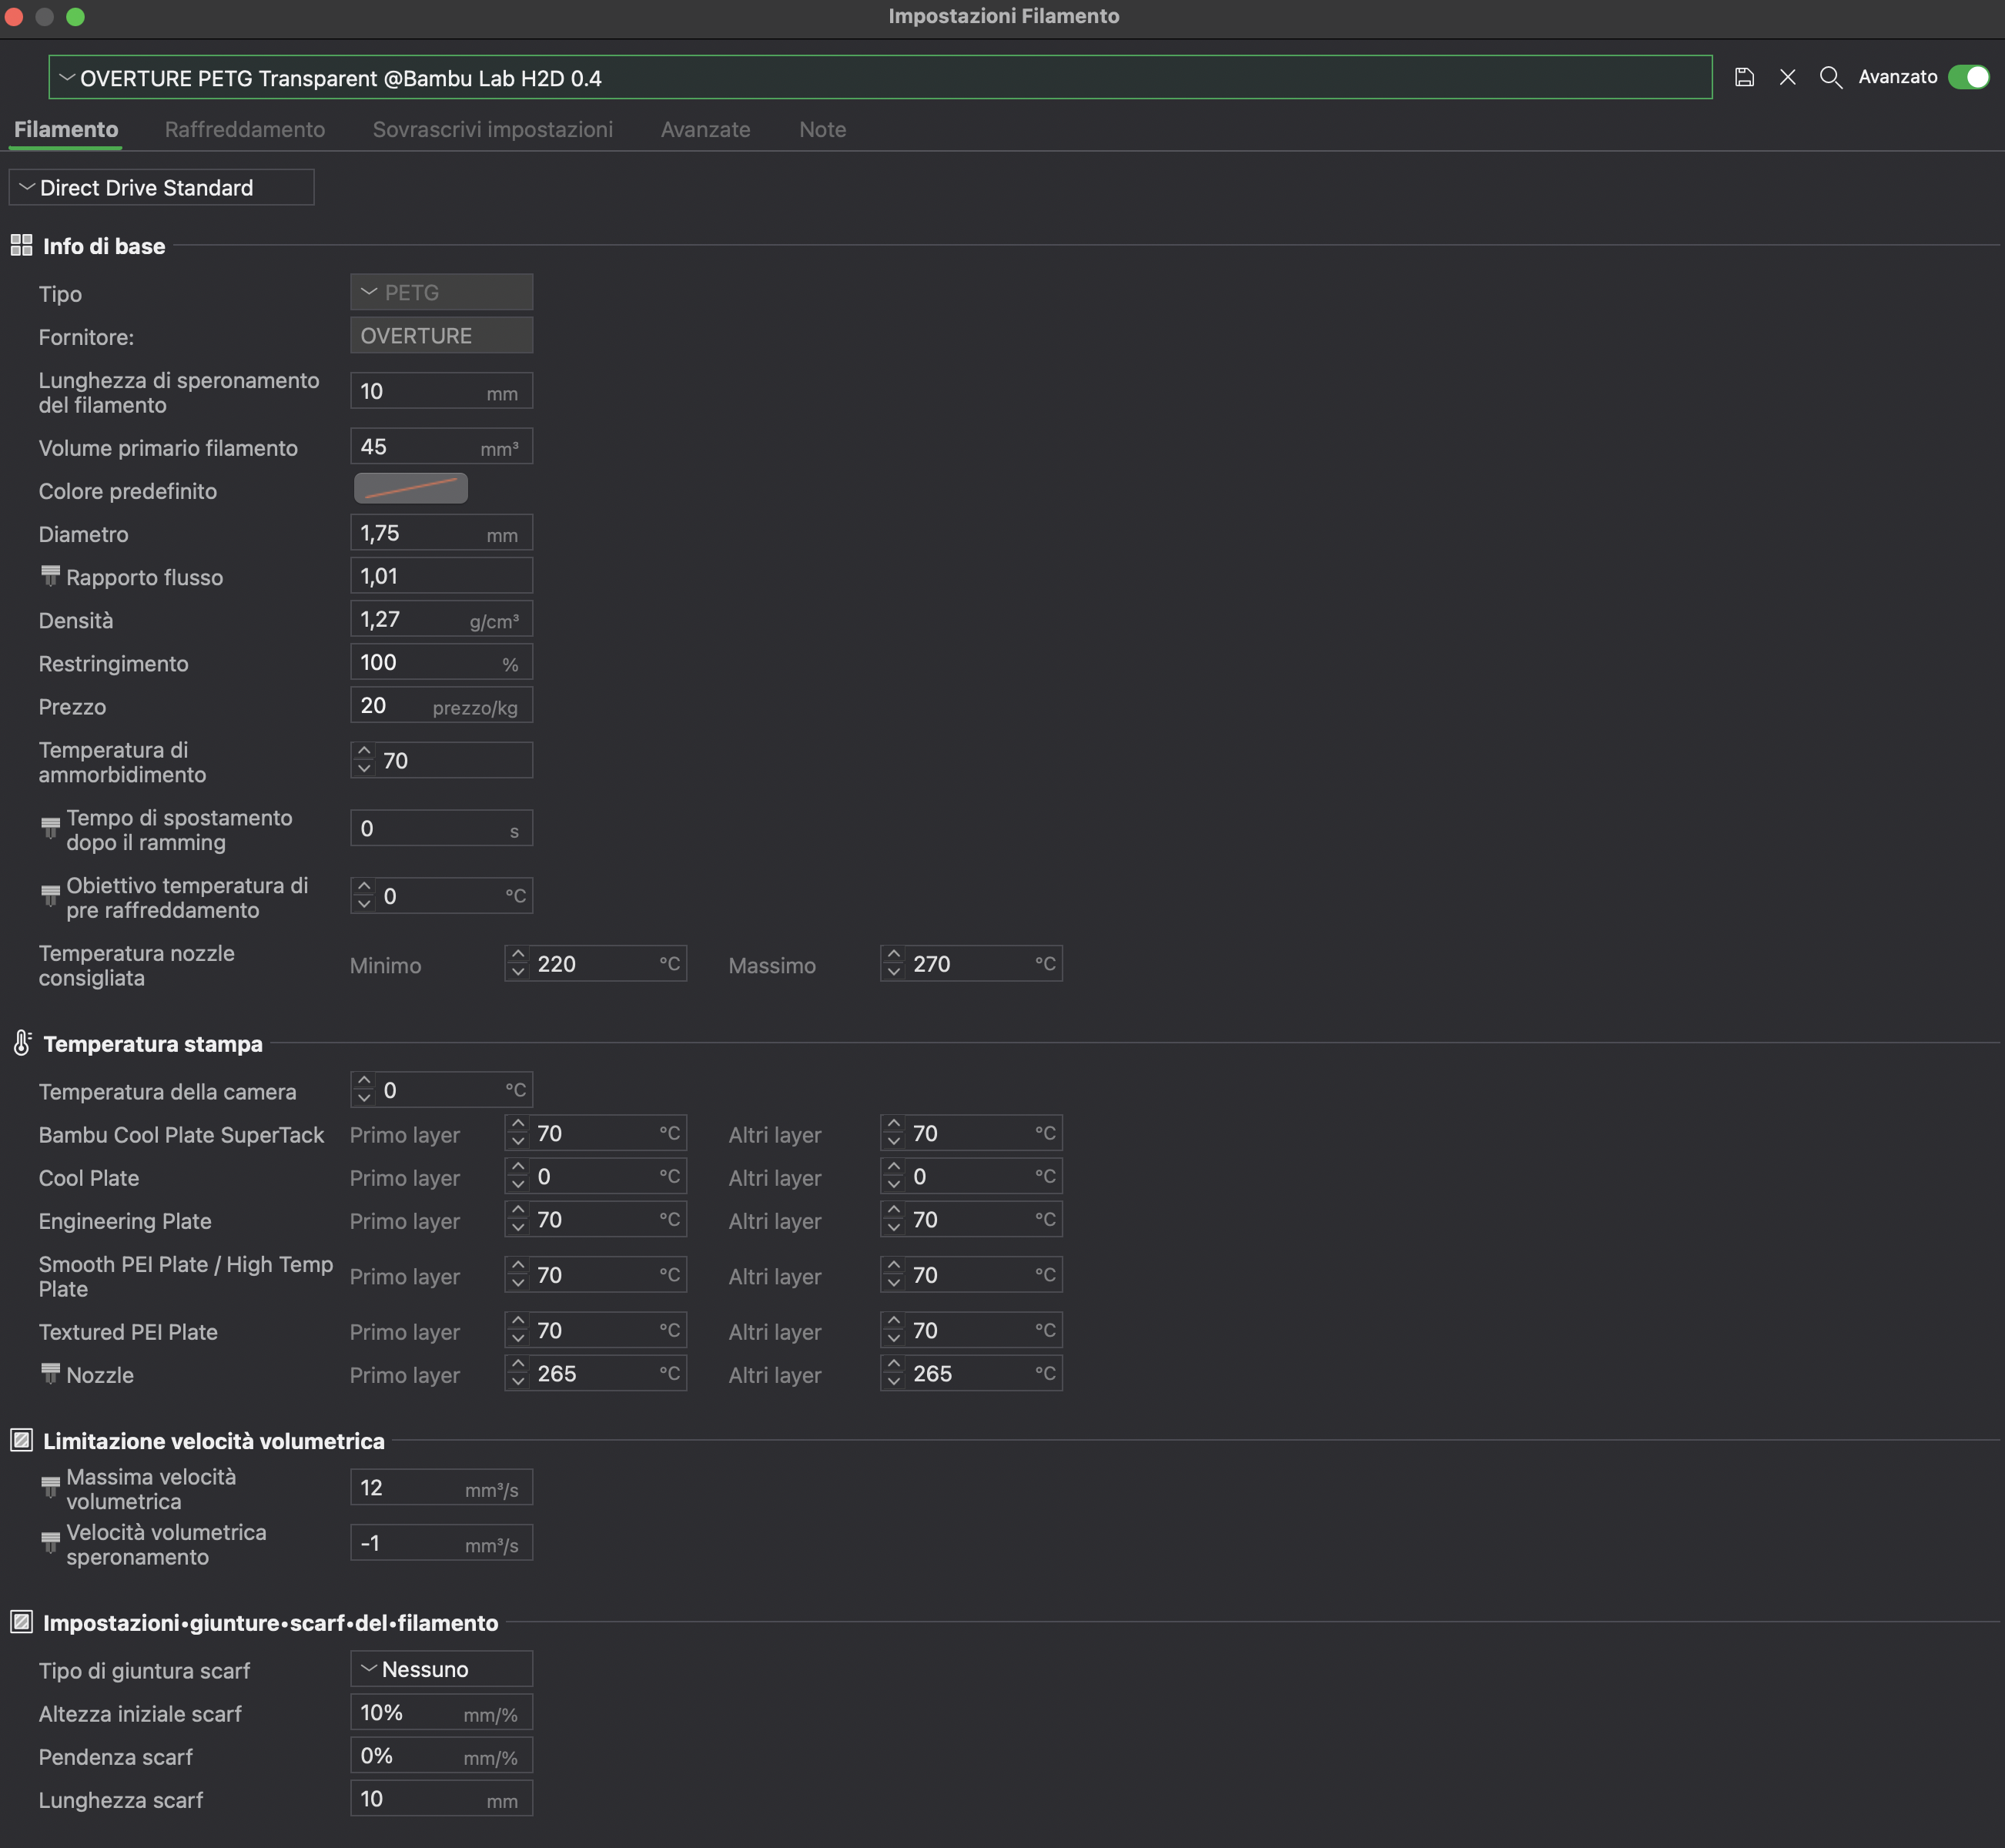
👉 SETTINGS FOR FILAMENT:
💰 Best Buy Filament Dryer Suggestions for few bucks:
## One Last Tip (Really)
If you've made it this far, here's **one final piece of advice** — and it's an important one:
> 🧼 **The build surface matters a lot**, especially for flat or low-profile prints where surface clarity is critical.
A rough or textured bed will always leave a matte or frosted bottom layer, no matter how perfect your settings are.
👉 **Use the smoothest surface you have** — if you own a completely smooth plate (like glass or a mirror finish bed), that’s your best choice. It can make a huge difference in achieving true clarity on flat surfaces.