Search models, users, collections, and posts


Bio
Just a nerd trying to improve their day-to-day life with some practical 3D prints... and maybe some cool toys
Achievements

MakerWorld Guardian
This badge has expired

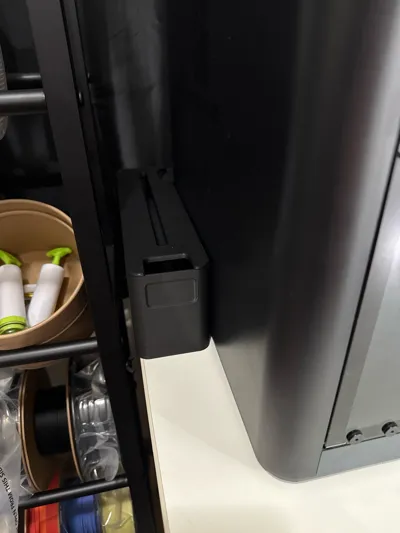
sits perfectly, and even helped to stabilize some rockiness the printer was experiencing, so a win win for me!
Share
0
0
0
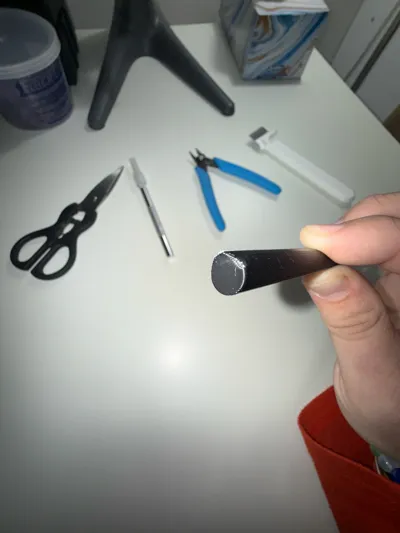
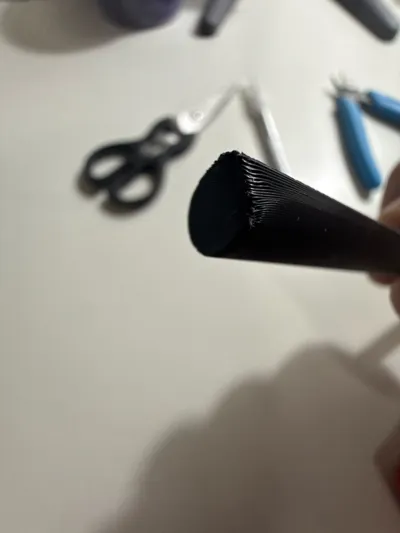
some of the bars came out kinda warped, but to be fair I didn’t customize any of the settings on the print profile and just let it print by default.
Share
0
0
0
Thank you SO much for this! Solved a very irritating problem for me, and it only took snipping a bit of filter material to insert into it. <3
Share
0
0
0
Printed to use with my A1, which of course doesn't have a frame like the X1C/P1S/P1C, so I just hang it on the side of my poop bin, and it works great.
Share
0
0
0
Worked perfect for a project I had, and the recipient absolutely loved it!
I had to cut down the height of the columns a bit, but otherwise great! Very versatile and useful for tons of projects I'm sure!

Share
0
0
0
Works perfect, but having some of the types split between rows bothers my perfectionism :P
Then comes the debate of sorting the samples in Bambu's model-number order, or ROYGBV color order! haha
Share
0
0
0
Love this, but it feels very loose when attaching to the printer, and over time it just fell off. I might try printing at a slightly adjusted scale to make it a more secure fit, but otherwise it's so cool! Way better than the default spinner thing.
Share
0
0
0
Perfect for applying lubricant and grease! I'll probably re-print this again in the future and add some magnets so the tools sit more firmly in the plate for storage, but otherwise I love it.
Share
0
0
0
Prints easily without issue, and perfect size for hex key tools and a bed scraper. I also keep needles and other tools in here that I use to unclog the nozzle in the rare event that happens. Very helpful!
Share
0
0
0
Works great! Maybe it's just the specific cotton pads I bought from Amazon, but they're ever so slightly too small to sit comfortably in this. I may just print another at about 95% scale to rectify this, but it's not the print profile's fault!
Share
0
0
0
Just what I needed for use with the filament spool cover system. I found it easier to insert or remove this screw after taking out the desiccant container that sits above it. This allows the panels to flex a bit more, making it easier to insert the screw, or take it out when I need to rotate it further to reach the back rolls.
Share
0
0
0
Perfect! Just be aware that once snapped into the roll it can be kind of tough to take off. To help loosen them off, just apply a small amount of pressure on the pins from the outside (use anything small enough, I had some pliers nearby so I gently poked them with the tip of that)
Share
0
0
0
Looks great, but the functional parts are a bit finnicky. For some reason, the internal mechanism didn't rotate far enough when pulling the trigger to properly activate the slide mechanism. Then I had a totally different problem when the trigger itself snapped off the internal mechanism, which was very hard to reattach after I had glued the body together.
TLDR; be very careful with the mechanism pieces, and be sure to test their range of motion before gluing anything together!


Share
0
0
0
Looks great in the end, but was kinda frustrating to print and assemble. Some parts are curved which makes avoiding visible layer stepping a bit tough. Also the tolerances for inserting the red trim pieces are SUPER tight, I had so file/sand some of them down to make them fit.
In order to avoid the extended print time necessary to print the black panels on the side of the nose section with AMS, I instead opted to edit the model in Blender to create insert pieces similar to the red trim pieces. In the end, painting after printing would've been a lot easier. :P


Share
0
0
0
Love these! Currently working on making one for every new roll of filament I get. The thinnest section can sometimes tear when removing from the print bed, so just be careful!
Share
0
0
0
I really appreciate the functional aspects of this model! It really helps with the immersion and fun.
However, I kind of found the system of assembly using lengths of filament as dowels a bit unprecise, and parts didn't line up perfectly. Also, the top spring on the trigger is supposed to attach to a peg that is split between two parts, making it very difficult to assemble properly. I used superglue in the end to assemble.
(I also found the "Arasaka" font printed a bit messily, but that might've just been my issue and not the print profile's fault?)


Share
0
0
0
Definitely suggest PETG for the added heat resistance. Only took off 1 star because when fully snapped on it didn't really make much of a difference for aligning my plate.
Share
0
0
0
I used 48 links in total (plus one of the flat rings at the base) which reached almost all the way up to the top-mounted AMS, which left things completely mobile but neatly aligned.
Share
0
0
0
Works great with the AMS enclosure that's also on MakerWorld, but the normal screw doesn't fit when doing so. A flatter knob on the screw would work though.
Share
0
0
0
Printed with a 2mm nozzle on the smallest layer height, but they came out a little weirdly angled on the bottom half. Worked for my purposes though, and I think it might've been something I did, so I can't fault the profile
Share
0
0
0