Search models, users, collections, and posts


Bio
Retired US Navy, Retired from IT.
Achievements

Stellar Reviewer
Rate or Comment 608 different models

Pioneer Maker
Print successful 522 different models and 6,145 hours

MakerWorld Guardian
This badge has expired

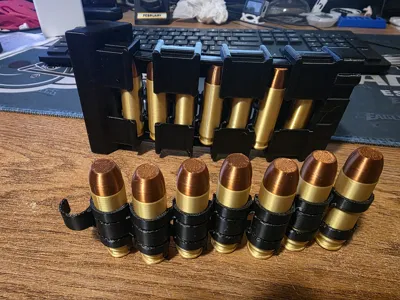
Excellent model, printed and fitted perfectly. I created linked ammo to fit the feed system. It can be found here:
https://makerworld.com/en/models/2397653-linked-bullets-for-the-m134-minigun?from=search#profileId-2627650
Share
0
0
0
Printed beautifully, no issues. Used H2C with 4 colors plus dedicated interface support material. Filament: PLA Matte Sky Blue, PLA Silk Gold, PLA Black, PLA White, BL PLA Support. Supports separated easily with no marring.
Model(s): 57g, Tower: 58g, Support: 11g, Waste: 0.9g. Print time: 15h18m
Willing to share colored print .3mf file upon request.


Share
0
0
0
Not much to share. Just wanted a place to put stuff while using telescope.
Nexstar Evolution Tripod Shelf
1
4
Share
0
0
0
Prints great, works great.
Share
0
0
0
Printed the LARGE CASE (P1/X1) on a P1S using PLA, changed case scale to (X=110%, y=120%, z=110%). Added the SeeStar S50 logo on the front.
Also added the following items:
Foldable Handle (scaled to 135%)
https://makerworld.com/en/models/106232-foldable-handle#profileId-957918
Superglued handle to the top then plastic welded to ensure strength. Don't look pretty but isn't coming off.
Tool box basket x2 (mod all to 83.05% - x=195mm). This setting allows the two baskets to fit into the case perfectly.
https://makerworld.com/en/models/1076817-tool-box-basket#profileId-1067793
Had to trim rear basket back top and the forward basket front top (40mm down, 10mm in) to fit the inner rims of the Case.
Using this case to store and transport my extra Seestar S50 gear.


Share
0
0
0
Printed the pocket free version using Black, Red, and White PETG. Not planning to use as cooler but as a Seestar S50 equipment box, hence the black filament vice white. Printed perfectly (no issues at all), hinged top and handle worked perfectly without any binding. Printed the front clasp separately in White PETG for contrast and to reduce waste. A great print, highly recommend. Will probably print another in base White PETG (the version with air pockets) to use as an actual cooler. Took almost 15 hours and 587g filament (486g Black) to print using a P1S. Printed the clasp on A1 Mini.


Share
0
0
0
Excellent model and print. Haven't put the colored tile in yet. Tree support came out easily and in one piece. Fits perfectly and snugly over Kleenex box. Adds weight to Kleenex box so pulling tissue out of box does not raise the box, even when near empty. Good print.
Update: Added tiles, they easily snapped into place. May print another mixing the top and side tiles like an unsolved cube.
5/31/25: Printed mixed up cube matching a real mixed up Rubic's cube. Got the 4 colors on top by leaving the two 'blue' tiles black in the slicer and put a 'Pause' right as it was to start the color tiles layer on top. Started print again and after the two black square layers were printed and printer switching to a different color, swapped out the black for blue. Chose the darkest color to switched to so wouldn't notice the initial 0.2mm black layer (as much). Didn't need red tile on top as tissue hole omitted. Hope above helps for 4 color tops. Printed using P1S and single AMS.


Share
0
0
0
Excellent print and fit. Model picture is of AMS Compatible Print Profile. Recommend splitting the parts to separate plates by color. The multi color shoes stay on one. This saves a lot of purged filament.
>>> The 1st, 3rd, and 4th print profiles have two left hands. Need to mirror one. <<<
Overall, very pleased with result.


Share
0
0
0
Printed perfectly and snapped together without glue. Mounted on tree out back but can see front of birdhouse from my easy chair in living room. Up for four days but no resident yet.

Share
0
0
0
Had the V3 version with angled LED mounting on my P1S. My worry was taking the LED strip/mounting out of old V3 bracket and remounting into the V5 frame. It was easy and I didn't even have to unglue the LED strip from the old mounting bracket. It came apart easily in one piece and snugly fit into the new V5 mount. The hardest part was getting the USB connector plugged back into the P1S. The LED mounting frame can also reduce V5 frame bending, worth a print even without LEDs. Highly recommend.

Share
0
0
0
No more data