Search models, users, collections, and posts
Arpboy
@Arpboy
93
1.7 k
2.8 k
933
Social Media Links
Bio
I've been working with 3D Printing for several years. I'm doing both organic and practical design now. I just replaced my Creality printers and now run an Flsun T1 Pro (very fast), a Creality K2 Plus Combo (great printer as well), and an Flsun SR for overflow projects.
Achievements
MakerWorld Guardian
This badge has expired
Recent Article
FINALLY Clearing an Obstacle!
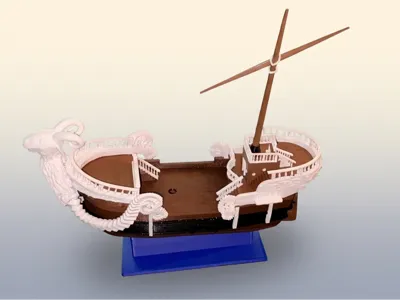
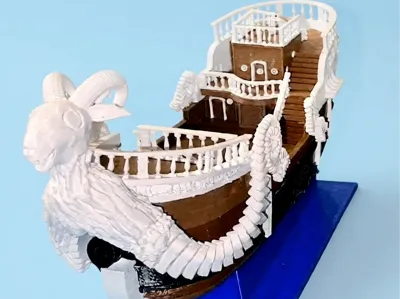
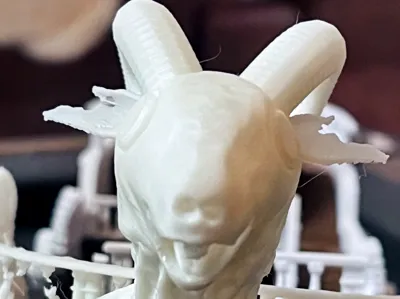
FINALLY Clearing an Obstacle!So after about a month of effort, I've finally broken through and I  finally have the front end complete -- I think. (Edit: I think I'll have one more trim piece to add just below the cannon, but again, that's for tomorrow). I had been having problems cleaning up internal errors in the front-end white structure because the original piece (ironically, a "one piece) was just too complex to clean up. I also couldn't combine parts to clean up overlaps ("boolean") so the piece would mount cleanly to the hull. To clean up the internal structure (making it "manifold" - let me know if you'd like to know more about what that means and how it impacts models), I used Blender, Nomad, Meshmixer, Windows, and a couple of other packages - all either froze or gave up.  So I went back to the original parts and made the front rail a separate piece from the ram's head and scroll work. I down-sampled the pieces to keep the triangle count somewhat sane. I worked to keep everything clean. That said, there are some manifold errors in the ram's head now, but I decided to leave them, as the piece printed cleanly. The piece shown in the photos won't be the final piece - a part of the spirals didn't print correctly because I was trying a different orientation of the piece. I'll re-print tonight and mount the piece. My next step will be to assemble the aft mast structure -- the "mizzen" mast. I'll complete the mizzen sail and mast, then work on the front mast and mainsail. After that, it's the rigging and I have a pretty cool idea for putting the jolly roger on the sail. This has been BY FAR the most complex piece I've created -- in its basic model prior to prepping for printing, it's had nearly 1,500 pieces -- so when I finally release this model, I'll ask folks to let me know about any fitment issues. It's been too difficult to reprint all the pieces after any small change, which I often do with more simple models.  The mizzen sail work will begin tomorrow night, as it's too late for me to start the next stage tonight - I'm simply too tired. The issues I foresee are how to realistically bind the boom and mast, have some sail mounting rings that make sense, and figure the best way to print the sale to minimize waste and maximize its strength.Anyway, I finally feel like I'm over the last month of being stuck.
Flaws, but Progress on the Going Merry
Flaws, but Progress on the Going MerryIf you've been following me, you know I've been working on the Going Merry from Netflix's One Piece.  I took a big step in testing the Going Merry. I decided to print the entire white part of the bow, including the ram's head, scroll work, trim around the cannon, rails, ballisters, posts, and filigree all as a single piece. My goal was to dramatically simplify assembly and ease some of the fitment issues that are so common on complex pieces.  Note: the pictures show that test piece set on the hull, but it's not attached, so it might be slightly off. I'm hoping the next print will be the one I keep. I have mixed feelings on this: it felt wonderful to see the primary focal point of the piece finally take shape in reality, but disappointed by how many issues there were. So many things became an issue! First of all, the initial model was too complex to render. Nomad kept aborting when I tried to export. Finally, I split off the piece to its own project, which helped. I simplified, re-structured, etc. When I exported, it tried to put out a 5 GB file - incredibly huge and not practical. I worked on that for quite a while and ultimately got it down to about 300 MB -- large, but useful. Several attempts to print the piece all failed until I re-oriented the piece. Then it printed.  Then: so many flaws!The ballisters in the railing all failed, but the square posts printed fine. The ears to the ram's head were too thin to print properly.The bottom rail for the ballisters, something I added for print stability, was not on the bottom plate, but floating.The filigree around the front face wasn't anchored properly, and came off with the supports.The fit was close, but a little out of scale.I've taken steps to address each item, and I plan to test-print tonight:Since re-orienting isn't a possibility, I thickened the ballisters by 30%. It doesn't noticeably change the look, a good thing.I thickened the ram's ears front-to-back. It doesn't change the look, but should fix the print.I repositioned the rail so it should now sit properly.I put the filigree into the face a bit, then worked on the "twist" so that it was more flush to the face as well.I had scaled up the total piece slightly so it would fit on the hull. I'll do a lighter touch there.Since I had to go back to the parts to fix the issues, I haven't gotten the file size down enough. In my last export, the piece was 1.9 GB - simply too big. I'm going to use the "decimate" function in Nomad to see if I can simplify the piece without losing meaningful detail. The "simplify" function in Orca (and derivatives) is too heavy-handed for this kind of work. I'll also mention that one thing that has been a huge help has been an ultrasonic knife. It allows a very light and precise touch when separating supports and brims from very delicate parts. I do have my support settings nicely dialed in (slim tree support, 0.3 top z-layer gap, 3 interface layers) and they separate very nicely from the model, but for the most delicate parts the knife allows separation with no pressure on the pieces. I'll work again on bringing down the file size for the piece, then test-printing it tonight.