Search models, users, collections, and posts

Vault Customisable Code

GIF

Print Profile(3)

All
P1S
P1P
X1
X1 Carbon
X1E
A1
H2D
H2D Pro
H2S
P2S
H2C
X2D
A2L
A1 mini

0.2mm layer, 2 walls, 15% infill
Designer
9.7 h
11 plates
4.6(22)

Optimized - 0.2mm layer, 2-6 walls, 10-20% infill
10.4 h
5 plates
4.6(14)

0.2mm layer, 2 walls, 15% infill
9.7 h
11 plates

Open in Bambu Studio
Boost
1639
3656
95
200
1.7 k
338
Released 

Description

CHECK THE V2 Available https://makerworld.com/en/models/966761#profileId-937541


Hello Everyone, 

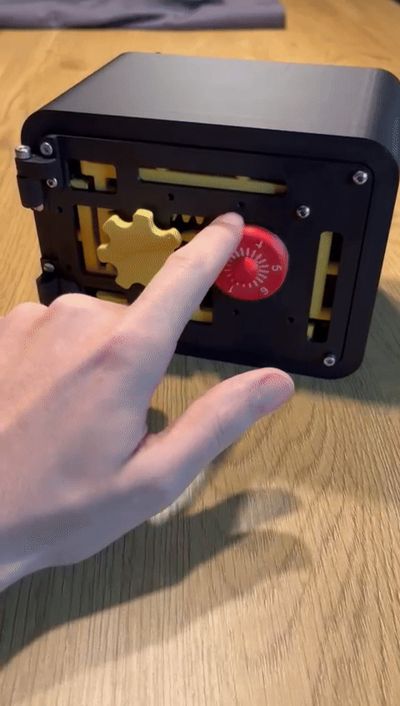
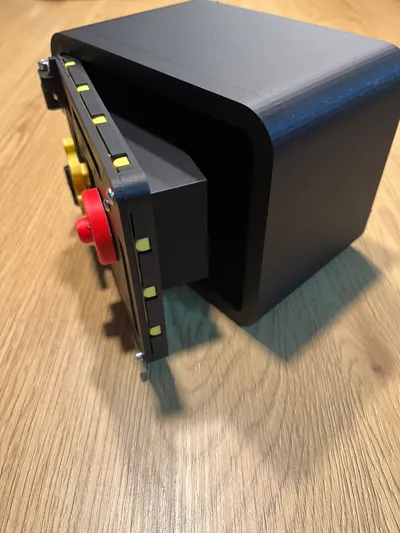
Here is my first attempt of designing a pretty complex vault . 

The code can be customized by inserting the pins in the discs at the desired position from 1 to 6

Before you enter the code reset spinning few times to the left.

It uses some 3 and 4 mm screws. 


I will try to upload some assembly instructions soon.


Disclaimer. It works but you have to give good care ( It can also be opened if you use force :D ) It is designed to be a fun project not a perfect one . 


Thanks! 

Boost Me (for free)

If you considered it cool . You can donate a boost . It's free and it really helps . Thanks!

Comment & Rating (95)

(0/1000)

Normally I research more before I print. I didn’t realize this print lacked assembly instructions, and didn’t specify amount of screws and sizes. I’ve made my own adjustments and am still tweaking bits. The lock is not the best, I don’t know if the change I made, makes it work better or worse, but it makes it easy to put together. For the 2 parts that fit together with screws and a hollow cylinder, I got rid of the screws and the hollow cylinder replacing them with solid cylinders. 1st cylinder size X 3.99 Y 3.99 and Z 22 mm. 2nd cylinder X 2.99 Y 2.99, and Z 22 mm. They push in snug to fit the 2 parts together without screws or glue. I used 20 qty m3 x 6mm button head screws for the rest. If my count is off I’m sorry. The hinges are different lengths. I think m4 screws 26 and 24 length might have been used for hinge pins, but I downloaded another creators hinge pins for a different project and remade them to fit this one, using measurements I took from the hinges. My measurements were a little tight. one hinge length 25.22 mm and the other 22.27 that is with an added 2 mm end. the end piece 7mm wide with the inner cylinder 3.78 x3.78mm. I also refitted an end to snap in place using 2 cylinders. middle cylinder 5.33 length that is adding the 2mm length for the bottom cylinder. when I combined objects the added 2mm is within the first object, so only 3.33 is protruding. the second is 7mm wide and 2mm length. I’ve included pictures. I am still learning how to make adjustments and add links to them. I am still make adjustments to front gear, I want it to fit tight enough to snap on. I also want to fit a piece to prevent the door from pushing in. The vault door is also heavier in than the vault so it falls over, when the door is opened. The gif. the designer created was only helpful for lock assembly to a point. you also have to make sure the mechanism is aligned properly when you install it or the lock won’t work at all. I think my pictures show how it is aligned. I meant to make instructions sooner. And it would have been better if the designer just put assembly picture instead of wasting time on a gif. that can’t be paused and doesn’t show full assembly. I know it’s easy to get excited wanting to move on to a new design, but it would have been less frustrating had the time been taken to provide instructions or simple pictures. I didn’t take the time to provide full instructions but it’s not my design and if someone has questions about what I did, I will take the time to help. Also I did watch the video for the newer vault, but the lock mechanism is different so it’s not helpful to people printing this vault.
The designer has replied
1
Reply
thank you for that!. I apologize for lack of instructions since I focused more on the v2. That has every improvement this one needs. but I did not felt like this one is worth shutting down since it can be done with a little experience and handyness. Thank you for that feedback
0
Reply
Print Profile
0.2mm layer, 2 walls, 15% infill
Good job. I am printing now also V2 model 👍
0
Reply
what screws do you need?
0
Reply
made and i love it but the lock is kind of fidgety like when spinning you stop but the disc doesnt
The designer has replied
2
Reply
Thank you very much for your feedback. It seems like the tolerances are a bit too loose . In this case you have to rotate it slow for it to stop in time.
1
Reply
Replying to @Ovidiu :
i have gone slowly and it works when you do (btw still love the model) hope you win the contest
0
Reply
Replying to @SpecDesings :
Thank you very much!
0
Reply
Print Profile
0.2mm layer, 2 walls, 15% infill
Super....
0
Reply
can you please enable to the A1 mini? I checked and it fits on the print bed
The designer has replied
2
Reply
yes. I did the dimensions on purpose to fit the a 1 mini I will thanks
0
Reply
I just uploaded the profile for a1 mini, waiting for approval
1
Reply
thank you
0
Reply
The print profile is no longer public
The profile uploader has replied
0
Reply
Fixed and updated
0
Reply
thank you I really appreciate it, I’ll test it out right now
0
Reply
Replying to @Pocketrush3D :
which overhangs did you add supports to? I tried printing plate 11 and the overhangs still need supports
0
Reply
Wonderful! Is it possible to make a version 100% printable? (screw included)
The designer has replied
0
Reply
Thank you for your feedback. I ve tried in the past and many people complained about the tolerances of the screws. It is 100% possible but it has to be bigger. So for the moment I am just working at the version two of this with a better locking mechanism
0
Reply
Replying to @Ovidiu :
It makes sense yes. Thank you for explaining. :)
0
Reply
yeah thanks
0
Reply
I think the safe is cool Is there an assembly instruction
The designer has replied
Show original
0
Reply
there is not at the moment. It is pretty intuitive but I am working at the instructions
0
Reply
Replying to @Ovidiu :
Okay, I will attempt assembly without instructions
Show original
0
Reply
I couldn't figure out assembly either :( unfortunately I gave up after watching the gif 100 times and just tossed all the parts in a bin.
0
Reply
Print Profile
Optimized - 0.2mm layer, 2-6 walls, 10-20% infill
worked out great! no issues at all.
profile
1
Reply
Boosted
Thank you for the assembly instruction GIF, support again!
The designer has replied
Show original
0
Reply
there is a v2 model on my page where I also posted a video. you can check it out because is very similar
1
Reply

License

This user content is licensed under a Standard Digital File License.

You shall not share, sub-license, sell, rent, host, transfer, or distribute in any way the digital or 3D printed versions of this object, nor any other derivative work of this object in its digital or physical format (including - but not limited to - remixes of this object, and hosting on other digital platforms). The objects may not be used without permission in any way whatsoever in which you charge money, or collect fees.