FOSBOS - Free Open Source Bambu Organizational System

FOSBOS - Free Open Source Bambu Organizational System

Boost
312
576
86

Print Profile(1)

All
A1 mini
P1S
P1P
X1
X1 Carbon
X1E
A1

PRINTABLE 0.2mm layer, 2 walls, 20% infill no support
61.1 h
36 plates

Boost
312
576
86
12
570
5
Released

Description

Free Open Source Bambu Organizational System

This is a the full assembly directing you to the parts you want to download, you do not have to download the step files unless you want to make changes to the full assembly, further down in this post you will see all the parts you want to build your own custom organizational system.


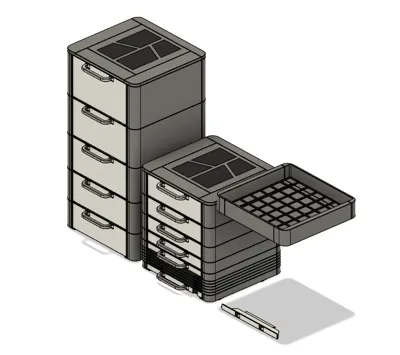
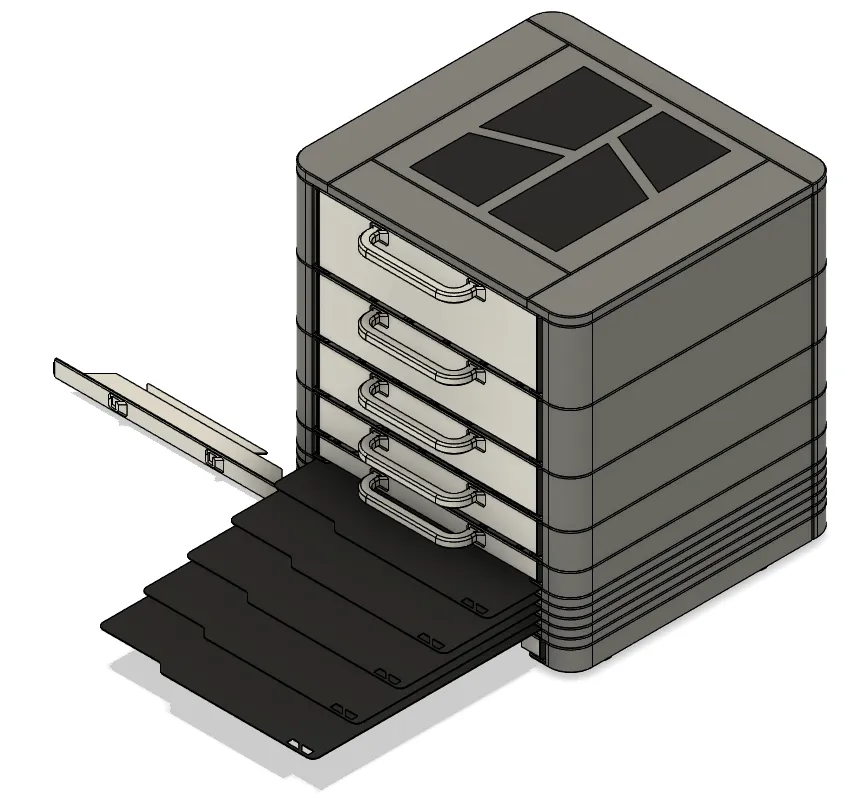
The system besides the drawer for the spare bed sheets and the bed plate holders are following the gridfinity standard, any gridfinity bins you have will fit this design. All drawers are 6 units wide and 6 units long, the drawers I provide are 2,4,6,8 and 10 units high. If you want a different size the fusion 360 and step files are included in all models.


As requested by the community I have now added taller drawers, 12, 14, 16, 18 and 20 units high, these are a couple real tall boys and can no longer print the corner pieces straight up. The corners will need support to be printed. There is only a single line being supported so its easy to clean, only a couple extra grams of wasted filament unfortunately.

Note: Even though the image show the drawers next to the original system, they all stack and fit the same, they were just so tall it would not fit the frame.


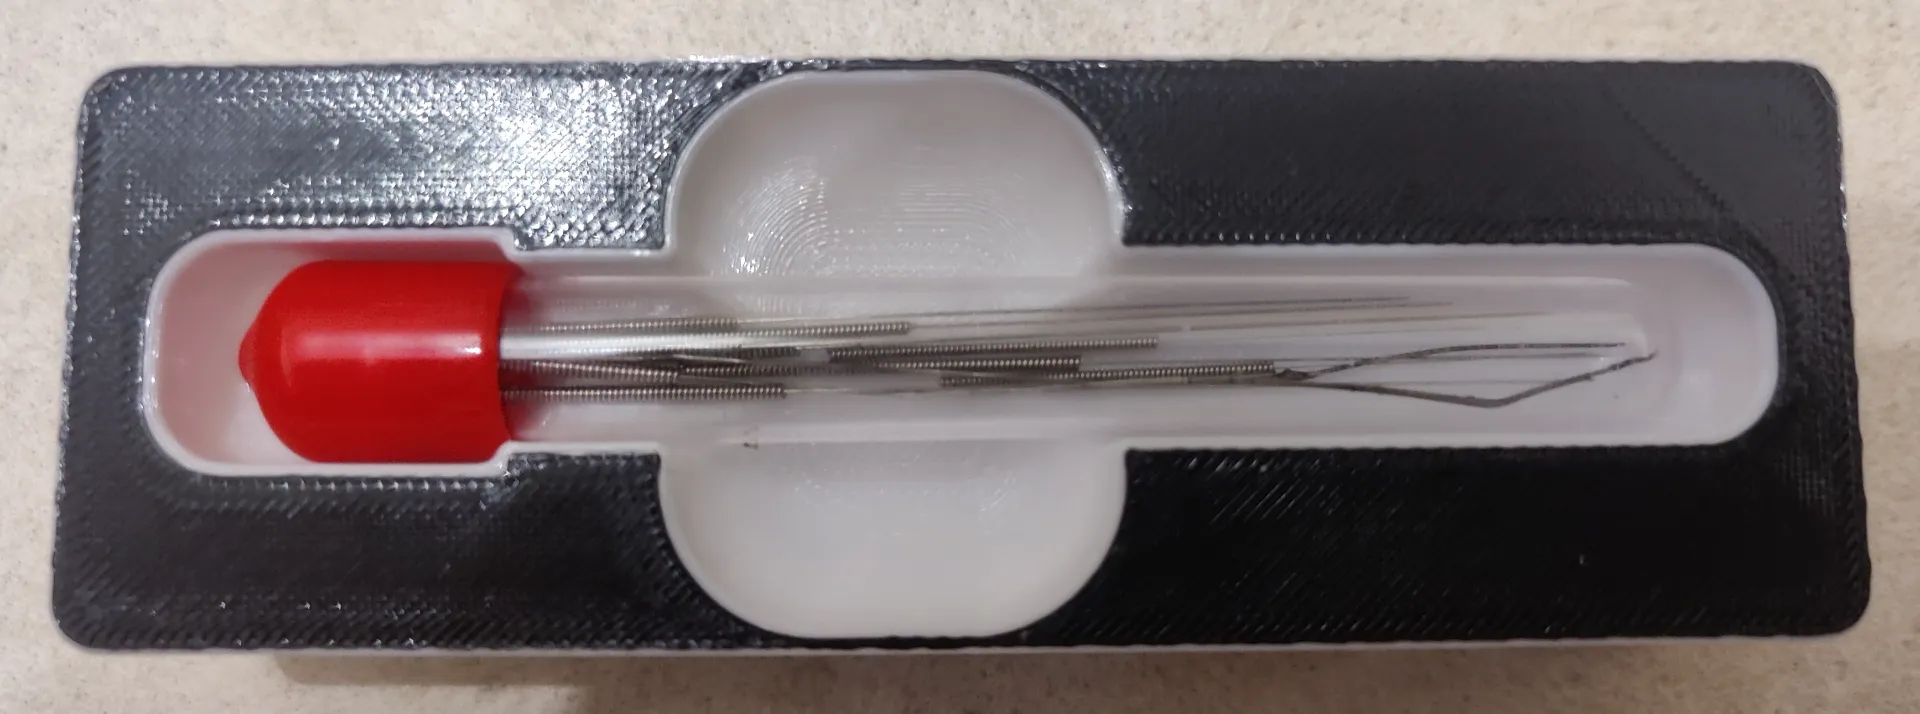
Due to me needing an organizational system ASAP and not currently owning every tool and item you would want to organize there is a chance your item do not yet have a bin to store it in. If you make a bin for your item please share it with the rest of us. I will keep the list updated with all new bins I make. If you do not have the knowledge to make a bin, please comment and I will try to prioritize that bin for you. If I do not have the item I can not take measurements and test it, in that case please check out my other models, if you find something you like please download and print it so I can get a gift card and buy said item to make a bin for it.


The organization system needs no extra hardware besides super gluing the drawers and the lid. The rack are all press fit and do not have to be glued, I would suggest gluing them together as well, a lot easier to lift/move the entire system if its stuck together.


The system is fully customizable, use the drawers you need. You can build a system with only a single drawers, multiple of others, 2 bed plate holders or 15, you get the point, it does not matter, every drawers stacks the same. I suggest first making the bins to then figure out what drawer heights you need to store it all.

Models included in the organizational system

Rack
Lid
Open top
Drawer - 10u
Drawer - 20u
Drawer - 8u
Drawer - 18u
Drawer - 6u
Drawer - 16u
Drawer - 4u
Drawer - 14u
Drawer - 2u
Drawer - 12u
Plate Holder
Drawer - Spare Sheet
Feet
Bins
4mm OD PTFE Tube Bin V2
4mm OD PTFE Tube Bin
12g Super Lube Bin
Activated Carbon Air Filter Bin
Acupuncture Needles Bin
AMS Active Extrusion Wheel Assembly Bin
AMS Active Support Shaft Assembly Bin
AMS Driven Support Shaft Assembly Bin
AMS Internal Hub Unit Bin
Angle Gauge Bin
Anti-Vibration Feet Bin
Bed Knob & AMS Disconnect Tools Bin
Calipers Bin
Capricorn Tubing Cutter Bin
Carbon Shine Bin
Ceramic Heater Bin
Complete Hotend Assembly Bin
Filament Cutter Bin
Glue Stick Bin
Grandma's Favorite Filament Clip Bin
Lubricant and Thermal Grease Pack Bin
Hex Key Bin
Hotend with Nozzle Bin
Liquid Glue Stick Bin
Nozzle Wiper Bin
Original Feet Bin
PTFE Tube Connector Bin
Radius Gauge Bin
Retaining Clip Bin
Scraper Bin
Scraper Grip Bin
Side Cutter Bin
Silicone Sock for Hotend With Logo Bin
Silicone Sock for Hotend Without Logo Bin
Spool Holder Bin
Super Screw Scrubber Bin
Filament Swatch Bin
Thermistor Bin
XYZ Belt Bin
Y-Splitter Bin
Community Made Bins
Empty Bin by Batsma
Filament Cutter Bin by Adamko
General Purpose Bin by Adamko
Wiper With Screws Bin by Adamko

Comment & Rating (86)

Please fill in your opinion
(0/5000)

That looks like a lot of work, well done! 👍 But it's not nice to publicly insult others. Wish you much success.
The designer has replied
3
Reply
Thanks! I thought I kept it moderately family friendly, its nothing personal, just trying to nudge you in another direction.
(Edited)
4
Reply
Replying to @Asdfgasdfg :
You've channeled your anger into something productive, respect for that, really good way to deal with it. Be the change you wish to see in the world. But the stupid geese thing only casts a shadow on you and your project and is unnecessary. PS If it's an animal then I would prefer any bear, "stupid panda" would be better. 🤔
1
Reply
Replying to @Willi3D :
I didn't call you guys stupid, I know your not. I said silly gooses, it might be a language barrier but that is not really a hardcore insult. https://www.urbandictionary.com/define.php?term=Silly+Goose, It wasn't ment to particularly offend you, my bad.
(Edited)
5
Reply
Great model! Interior comes next. Thanks
The designer has replied
2
Reply
Looking good! Nice color scheme and nice swap on the handles. But you did install them upside down. Nothing wrong if you like it that way, just not the way I intended it.
0
Reply
Replying to @Asdfgasdfg :
Youre right installed the handles up side down, this way the bottom drawer handle was not so close to the table.. :-)
1
Reply
Replying to @ebracht :
Ah I see. Maybe I should make some higher feet's, I didn't think about that with my scrawny fingers ^^
0
Reply
Hi! Just decided to bite the bullet and print this magnificent organizer for myself, but ran into an issue with the final layer on the lid. Print went flawlessly until then but as you can see in the pictures, the last layer (bottom of the lid) looks all sorts of wrong. Any idea what might have happened at this specific point? Printing on a P1S with AMS using Bambu Lab PLA basic. Cheers!
The designer has replied
0
Reply
Looks like a bed levelling issue? Maybe test with a bed levelling print, otherwise re-slice?
(Edited)
0
Reply
Hmm, looks like some extrusion issues of some sort. Are you ironing the top layer? Did you change the amount of top layers in the print profile? In my profile its is 4, that's what I usually run, but I think Bambu Labs default is 3. But it does look like extrusion issues, did you get a clog mid print or something? Have you run any flow calibrations on the filament?
(Edited)
0
Reply
Bed-leveling should not be an issue, auto-bed leveling is on for all my prints and the issue seems to have affected only the final top layer. I did however notice upon closer inspection one of the far back corners did warp up a little bit (photo attached), however this does not seem to have translated past mid-height of the total print, so I am not convinced this is the culprit, especially given the issue has mostly affected a halo on the outer edges of the lid and not just one corner. The more I look at it, the more the extrusion/clog issue is the only thing that makes sense. Maybe alao vibrations caused by the long and rapid straight lines at the end. I did not use ironing, I thought it was a feature reserved for X1C, but I think I've seen the option in Bambu Studio, so maybe I can try turning it on. All in all, I think/hope it's only a cosmetic impact and the lid should still fit on top of the organizer. I'll give the other parts a try, as I have pumped out a few other long prints today and so far so good, so if it was a clog, it's now gone (look at me jinxing myself haha). I'll report back on my upcoming results :)
1
Reply
I Love it ! Im making a remix for a Bin only for Nozzles :) Used all my cheap filament for this ( so its colorful 🤣)
(Edited)
The designer has replied
0
Reply
Loose nozzle? Do you mean the not completed one? Like this one: https://makerworld.com/en/models/43809#profileId-45091 or you mean for A1 nozzle?
0
Reply
Here : https://makerworld.com/models/131818 I have a hotend where i can change the nozzle from aliexpress
0
Reply
I would love to see a 5x5 version where the drawer prints as one piece.
The designer has replied
3
Reply
that was my first plan. its just such a loss of space, 6x6 gives me 11 extra units. an increase by 44%. I were planning on making a little brother version at some point. 5x5 will be a lot easier to print as long as you're not having a too warped bed you could print everything in whole pieces. but a couple people have been asking for bigger drawers, just finalized them, was under the impression people wanted more space. I just have a few bins left until my shoebox is contained, I'll see what I can whip up after that :)
(Edited)
2
Reply
Replying to @Asdfgasdfg :
no worries these drawers are already amazing I am in the middle of printing some. it would be cool to have a stack for a few 6x6 and then have a top that has connections so a 5x5 can site on top. either way amazing job with these.
2
Reply
FYI there is this: https://makerworld.com/en/models/85205
1
Reply
Turned out pretty good. The lid blue is a little bit darker because I ran out and used a different brand on it. I have a few changes I may try to remix I'd my Fusion360 skills get better.
The designer has replied
0
Reply
That is a good color combination, looks like R2D2.
1
Reply
I feel like I am assembling them wrong I am on my second drawer and putting in the bottom plate is really different. on the first one I got it in with a lot of force but on the second one I have not been able to get all 4 side pieces in at once. I am installing the corners first super glue them in place with the 4 sides then glueing the base plate in is this the Correct way?
The designer has replied
0
Reply
that sounds correct, or at least the same way i do it. to be very percise, i glue up 1 side of a corner piece, attach is on a flat surface and push it down so its flush then sideways so its all the way in. next corner piece on same drawer side. do the same on the opposite drawer side. then i put glue in all 4 remaining slots, place the last drawer pieces in the middle and firmly push it all together as a sauare. I put a generous line of glue over the 4 puzzle pieces and put the middle piece in. Check so everything looks good, dosome last pushes on the corner pieces then, since my bed is wonky af and most my pieces are warped I place some weight on the drawer, a couple old bottes filled with water etc. when that is dried up i glue the drawer seem from the underside, probably a bit overkill. let that sit and dry. to get the grid align i do them one by one with a 6x4x1 piece as reference. Throw in all grid plates, take one out and place a couple trops of glue where it fits, intersection and som small dabs on the sides. put it in and the 6x4x1 piece to align everything, same bottles on top. give it 2-5minutes then do the next grid plate the same way. repeat for all gridplates. lastly i glue the rack together all in one go and place it on top of the rest which has the feets to square it up so it doesn't get skewed
0
Reply
in the middle of printing a huge wine rack right now, but maybe I can print a new drawer andmake an instruction video when im done in a couple of days
1
Reply
Replying to @Asdfgasdfg :
Thanks,look forward to your video.I printed the 10u,its hard to print the corner and hard to install the corner.Or is there any other way to replace corner?
0
Reply
Boosted
It is amazing. I'm using waste filaments for it, so it's a bit colorful, but definetly great!
0
Reply
Just a suggestion, for anyone printing it on a P1/X1/A1, each drawer can be printed on 6 plates instead of the 16. All 4 drawer slides can be placed either all horizontally or all vertically on one plate, the corners and drawer base on 2nd plate, rack back + handle on 3rd plate, rack left + right on 4th plate (they need to be rotated 55 and 235 degrees), 3 of the 3x3 gridfinity base on 5th plate and last gridfinity base + 6 plugs on 6th plate. If you mod your printer to remove the bottom left exclusion zone, you can actually fit all the gridfinity bases + 6 plugs on the 5th plate!
(Edited)
0
Reply
working well.
0
Reply