Search models, users, collections, and posts

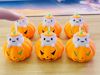
Halloween Stress Relief Pumpkin Cat (3D printed shaft body, can also be installed with keyboard shafts)

GIF
GIF
GIF
GIF
GIF

Print Profile(10)

All
P1S
P1P
X1
X1 Carbon
X1E
A1
A1 mini
H2D
H2D Pro
H2S
P2S
H2C
X2D
A2L

Pure 3D printed version (no other accessories required, separate parts painted)
Designer
18.2 h
5 plates
4.9(178)

Install keyboard switch version (requires a mechanical keyboard switch, paint by part)
Designer
17.8 h
4 plates
5.0(94)

Spring Version Pumpkin Cat (Replace printed parts with springs, optimize hand feel)
Designer
18.2 h
5 plates
5.0(6)

AMS Multi-Color Print Cat Head (Multi-Color Print, No Assembly Required)
Designer
10.3 h
2 plates
5.0(14)
Click to see more

Open in Bambu Studio
Boost
4402
10013
454
524
7.2 k
2.4 k
Released 

Description

Content has been automatically translated.
Show original

Boost Me (for free)

Time flies. Wishing you a new year filled with laughter, smooth sailing in all endeavors, and a bright future

Boost Me (for free)

If you like our design, can you give a free boost?

Halloween Stress Relief Pumpkin Cat (Pressable)

A cute-shaped decompression key toy

2024.10.7 Update:

1. Added Pumpkin Split Printing (Eyes and mouth printed separately after splitting) configuration. This print file includes two split pumpkin bases. The eyes, mouth, and nose on the pumpkin are printed separately and installed on the pumpkin base. Suitable for users without AMS multicolor printing (Note that there are two pumpkin print files inside. One is a pure 3D printed version and the other is for mechanical keyboard shafts. Choose the print you need. The two are not interchangeable).

2. Added Pumpkin with Wiring Holes (Requires Keyboard Shaft) configuration. This configuration requires a keyboard shaft. To make it easy for everyone to modify the keys, we have added wiring holes on the pumpkin. You can modify the pumpkin cat into any electronic key you want (such as modifying it into a computer power button). We have reserved magnet holes at the bottom (magnet size Φ7*T1.5 /Φ6*T2), and you can install magnets and stick them to the computer host. The file includes six different sizes of pumpkins.

2024.10.09 Added small pumpkin headdress here: https://makerworld.com.cn/zh/models/545842

Version 1: Pure 3D Printed Version

This cat has a built-in spring mechanism that can be printed. You can have a cute decompression pumpkin cat with only a 3D printer without purchasing additional accessories.

It is recommended to use PETG or PLA material for printing (the spring needs to be printed with PETG material, the elasticity of PLA printing is not so good). The cat's two paws and pumpkin hat are fixed with glue, and the split design,requires no multicolor printing


Installation diagram is as follows:

  • When installing, note that the pumpkin hat has a direction, and the two positions with notches are stuck on the cat's ears.

  • When installing the cat's paws, install the flat side facing the cat's head.

------------------------------------------Divider Line----------------------------------------------

Version 2: Keyboard Shaft Version

Of course, we also provide a version that can be installed with keyboard shafts. Installing mechanical keyboard shafts can bring satisfactory feel and clicking sound.

1. Mechanical keyboard shafts need to be purchased separately. Both audible and silent shafts have been tested and sound great (tactile or linear shafts are also fine). I personally like them both. Please use them according to your personal preferences. If you like a crisp and bright sound, choose tactile audible shafts like blue shafts. If you like a more stable sound, choose black and red shafts. Just find cheap ones on Taobao or Pinduoduo.

2. Ordinary cross-shaped shafts and shafts with dust covers can be installed and used smoothly.

(If the keyboard shaft is too tight or loose during installation, you can set XY hole compensation in the slicing software to adapt to your keyboard shaft).


We also designed three different expressions for the cute cat

------------------------------------------Divider Line----------------------------------------------

If you do not have AMS multicolor printing, or want to print the pumpkin cat as quickly as possible, you can remove the color and use monochrome printing. Paint the printed cat's eyes and mouth with black acrylic paint (acrylic markers are also fine).

If you have AMS, it is recommended to directly print the multicolor version (printing several at once can reduce waste).

Printing Precautions:

1. If the top of the printed cat's head has a circle of layers, you can appropriately reduce the layer height for printing.

2. If the assembly is too tight or loose, you can adjust the XY hole compensation and outer contour compensation in the settings to achieve the best effect (material type and material flow settings will affect the final print size, and it is impossible for one graphic to adapt to all materials and printing parameters, you need to adjust the compensation parameters yourself).

3. When printing the pumpkin, the mouth position needs a small amount of support, other items do not need support.

4. When printing the cat's paws and pumpkin seedlings, it is recommended to add a skirt to print, or apply glue to the printing plate before printing. Too small a contact area may cause printing failure.

5. Regarding multicolor printing color change purge amount:

When printing pumpkins, you can set the purge multiplier back to 1.0, the wiper tower width to 35, and the purge amount to 45 to reduce material waste.

But when printing multicolor cat heads, it is recommended that you use the settings in the following figure (purge multiplier 2.0, wiper tower width set to 50, purge amount set to 100). Black and white are easy to mix colors when changing materials, this setting can effectively avoid color mixing.


The effect of color mixing is shown in the following figure. There will be a gray area around the eyes and mouth. It is not recommended to affect the printing quality in order to save materials:

It's not easy to make. If there is a problem with printing, please point it out so we can solve it together. Please do not give a bad review maliciously, thank you.


We have also designed another decompression cat cup, which can be downloaded here https://makerworld.com.cn/zh/models/505310

(The two cat heads can be used interchangeably; the difference is that one has a pumpkin hat and the other does not.)

Decompression Koffinghttps://makerworld.com.cn/zh/models/598977

Decompression Lucky Cat https://makerworld.com.cn/zh/models/792196

Membership

Join

想要更多有趣的模型欢迎进我主页下载打印:https://makerworld.com/zh/@devout

Comment & Rating (454)

(0/1000)

Printed a 100%, 200% and 400%. Took some time with the larger one, but totaly worth it :)
The designer has replied
7
Reply
400% is fantastic, I really like them!
1
Reply
what green did you use for the stem?
0
Reply
How do you change the size in bambu handy when you print?
0
Reply
came out well with glow in the dark.
10
Reply
Boosted
Print Profile
Install keyboard switch version (requires a mechanical keyboard switch, paint by part)
they came out very well. I dared to flush into the infill of the cat heads. There now is a small shadow between the mouth and the eyes so that didn‘t exactly work out as expected. I put 12 pieces on a plate. With a little effort, 14 would probably have been possible as well.
The profile uploader has replied
2
Reply
I am delighted you like them. The shading on the head is due to insufficient purging. When printing the multi-colored cat head, I recommend the following settings (purge multiplier 2.0, wipe tower width set to 50, cleaning amount set to 100). Black and white are prone to color mixing when changing filaments. These settings effectively prevent color mixing.
(Edited)
Show original
2
Reply
Boosted
Replying to @devout :
Yes, I actually left the purge volume as recommended but changed part of it to purge to infill. The white filament I use just isn't opaque enough so the partially black infill shimmers through. My comment was not meant to discount any of your instructions, just adding that flushing to infill may not work out as expected. :) Just to be clear, this isn't an issue with the model or the provided slicer settings but with me trying to get away with a little less purge :D I have no one to blame but myself.
(Edited)
3
Reply
Boosted
Print Profile
Pure 3D printed version (no other accessories required, separate parts painted)
Printed with Sunlu Orange PLA+ and 3DHojor Matte White PLA with a 0.2mm nozzle. I printed the spring with RepRapper White PETG. I painted the black parts with acrylic paint because the purging when swapping at 0.1mm layer height is an obscene waste.
profile
3
Reply
Very cute, including the previous cat cup, I printed several!! The spring printed with PLA also has acceptable elasticity, this time the cat's paw assembly is very very very convenient, the pumpkin's face assembly is also very simple, the mouth part requires a bit of force Then, at the bottom of the top curve of the cat's tail, a black blob easily attaches there, when aligned, it's roughly at the height of the eyes and mouth (forgive me for not having a photo, because it was too cute, it was snatched up as soon as it was printed), I suspect it might be due to the 'Infill/wall overlap' setting, the nozzle might scrape the black part and just carry it to the corresponding tail section Regarding the plate arrangement, it is suggested that the hands could be placed on the same plate as the cat head, after all, they are the same color and it won't increase the number of filament changes The downside is the cat's face, perhaps because a new method was used to create the expression, when slicing and printing, it's easy for expressions to be missing, with a small corner of the mouth or eyes absent, the cat cup's expressions usually don't have this issue, you can refer to the images in my post X1C, I wonder if there's a setting to prevent this
The designer has replied
Show original
0
Reply
I've tried printing with different 3D printers, and the missing eye issue did not occur. You can uncheck the 'seam' box in the top right corner to hide the seam. The white dot displayed on your end might be the visible seam rather than missing eyes
Show original
0
Reply
Replying to @devout :
It must be my fault This didn't happen after re-downloading the sliced file, perhaps I don't know what I adjusted, I messed up Bambu Studio haha Thank you for your lovely design, it warmed the hearts of many of us Below is the slicing result of the file I saved, Bambu Studio completely omitted the right side of the mouth
Show original
0
Reply
I found the reason The thin wall setting causes slicing problems for the expression part
Show original
0
Reply
Print Profile
Install keyboard switch version (requires a mechanical keyboard switch, paint by part)
huge hit and bought mechanical switches of Amazon for a dollar a switch, so very worth it.
1
Reply
That looks amazing! but a dollar per switch is crazy!
0
Reply
Print Profile
Install keyboard switch version (requires a mechanical keyboard switch, paint by part)
sksksksksks very good
profile
2
Reply
Boosted
The print profile is no longer public
Very nice! thanks for the profile
The profile uploader has replied
1
Reply
You're very welcome. I like you're black cat!
0
Reply
Print Profile
Pure 3D printed version (no other accessories required, separate parts painted)
printed perfect, gonna try with keyboard switches also. great halloween toy, but without keyboard switch cats are sticking a bit when pressed in, maybe needs some lubrication
profile
2
Reply
Which type of shaft do you use
The designer has replied
Show original
0
Reply
Mechanical keyboard switches are fine
Show original
0
Reply
Can I just use super glue
Show original
0
Reply
Recommended blue switches
Show original
0
Reply

License

If you want to use this model commercially, please join my membership.
Join Now
This user content is licensed under a Standard Digital File License.

You shall not share, sub-license, sell, rent, host, transfer, or distribute in any way the digital or 3D printed versions of this object, nor any other derivative work of this object in its digital or physical format (including - but not limited to - remixes of this object, and hosting on other digital platforms). The objects may not be used without permission in any way whatsoever in which you charge money, or collect fees.