


Print Profile(2)

Bill of Materials

- AA battery finishing nail or screw for wall hanging x 1:
Description
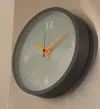
This is a normal modern clock that I wanted for my living room. It’s intended to look nice on your wall and tell the time. And it purposefully doesn’t shout out to the world that you own a 3D printer.
Customize the frame colour to match your decor. Primary colours will make it pop. Beige or white will make it blend in. And black will convey stern practicality.
If you have beige or cream walls, the pure white face will be very bright. If you want less contrast, consider a colour scheme of white numbers and hands against a lightly coloured background and matching darker shade frame.
- Measures 225 mm (9”) in diameter
- Drywall hanger included
ASSEMBLY

- Install the movement, rubber washer, and front nut in the clock frame as shown.
- Use the hex socket included in the wall hanger to snug down the nut.
- Install hour hand, then minute hand with the build plate side facing out. Align both hands to 12.
- Forcibly remove the pressed-on cap from the short metal second hand included in the clock kit.
- Install the longer printed second hand onto the cap. Build plate side faces out. The wall hanger also includes a tool to help press the second hand onto the cap.
- The tolerance on the second hand is very tight. If the second hand is too loose or too tight to stay on the cap, tweak the XY hole compensation to dial in the fit.
- I also recommend adding a drop of CA glue to secure the second hand once it is pressed onto the cap.
- Install the second hand into the clock and twist the clock face into the frame.
- Use a finishing nail, wood screw, or drywall anchor to attach the hanger to the wall and place the clock on the hanger.

History
2025-08-10: Increased face thickness from 1.2 to 1.8 mm because some white filaments are very translucent with thin walls
2024-05-24: Set bridging direction to shorten bridges on clock face and fixed bridge overlap at edge
2025-02-20: Fixed more bridging issues, added center support, increased thickness of digits
Documentation (1)
License
You shall not share, sub-license, sell, rent, host, transfer, or distribute in any way the digital or 3D printed versions of this object, nor any other derivative work of this object in its digital or physical format (including - but not limited to - remixes of this object, and hosting on other digital platforms). The objects may not be used without permission in any way whatsoever in which you charge money, or collect fees.
Comment & Rating (73)