Retra Maxi Replacement Knobs


Print Profile(1)
Description
Retra Maxi & Pro Max Custom Knobs

The responsiveness and precision of the Retra controls are superb. While the Retra control precision is excellent, I don't like that the Mode Switch and Power Level knobs look identical to each other. The power level is longer, but I found it hard to discern which was which, especially when wearing gloves. This is exacerbated when the strobes are in different orientations, resulting in mirrored positions. Both control knobs feel the same resulting in mistakes that screw up settings.
I love to customize the gear I use, so I addressed this with custom made Retra Maxi mode switch and power level knobs. The Mode switch is rounded with a “fin” to aid in alignment. I choose red and white colors to better distinguish the two controls. I find these changes to the Mode switch work a lot better for my style of shooting.
It also fixes another issue with the Retra Knobs - salt deposits. The Retra knobs are completely flush to the back of the strobe, and they have internal voids that retain water. Even after a long soak and air blow dry, you will find salt encrusting the base of the knobs a day or two later.
My replacements are solid with smaller voids and leave a 1mm gap from the base. This allows any trapped salt water to be flushed out. The included Power Level knob is nearly identical to the original design but adds the small gap for drainage.
Installation:
- Use a 2mm allen key to remove loosen and remove the inset hex screw from the original knobs.
- Use the same screw in the replacement knobs. Thread it a few turns into the custom knob.
- Align the new knob on the appropriate post. Note the hole that will receive the screw.
- Gently turn the screw with the allen key until it is flush with the knob.
- If installed correctly the knob will be solidly attached with no wiggle room.
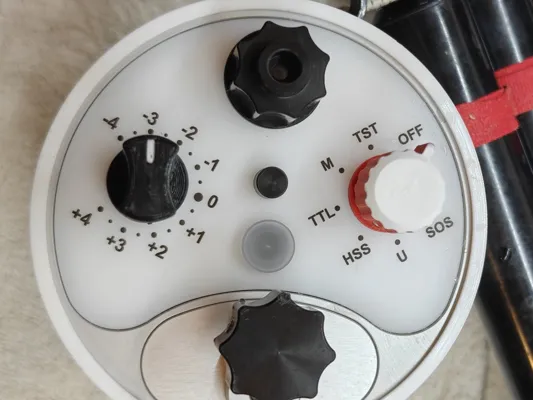
Original:

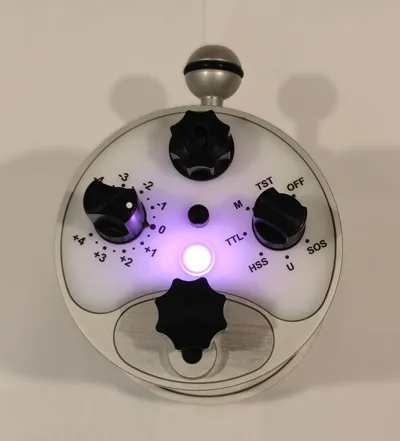
Custom:

Boost Me (for free)
If you find this design useful, please share a Boost to recognize the effort that went into making it. Your support and encouragement are greatly appreciated!
License
You may create derivative works based on this object, provided that all such derivative works are published exclusively on the MakerWorld platform and include proper attribution to the original creator. You may not share, upload, host, distribute, or publish this object—or any derivative work of this object—on any other digital platform, marketplace, or distribution channel. Commercial use of this object and any derivative works is strictly prohibited. This includes, but is not limited to, selling, renting, sublicensing, or using the object in any context in which you receive monetary compensation or other financial benefits.
Comment & Rating (0)