Counter


Print Profile(3)


Description
Re-posted from Printables a counter designed by JMV38 for folks to print using MakerWorld/Bambu Handy. Two digits (0-99) and bi-directional counting up/down.
I made one for my wife for her knitting to keep track of stitches.
My print profiles support single colour, dual-colour (non-AMS) or dual-colour (AMS).
Profiles
Couple things I've added to the print profiles:
- Single perimeters on first layer for clearer number readouts.
- Ironing for all top surfaces for smoother gear functionality.
- PAUSE or COLOUR change commands on the second plate for contrasting number colours. (PAUSE for non-AMS to manually change filament or COLOUR for AMS printers).
Additional instructions from original design below:
Slicing
Designed for 0.2 mm layers and 0.4 noozle.
caseB17 and unitsA17 must be sliced with "normal" supports, "everywhere"
others dont need supports
check ‘monotonic top/bottom order’ to get a perfectly uniform outer case surface.
Printing
unitsA and tensA can be printed in the same batch, in 2 colors: start with one color (eg: white), pause just before layer 5 starts (=1mm height), change filament to a contrasted color (eg: black) and finish the print. This way the numbers will appear in black on a white background, so very readable.
caseA and caseB can be printed in the same batch, same color.
unitsB can be printed in another color to contrast with the case color.
Total printing time: a bit more than 2h.
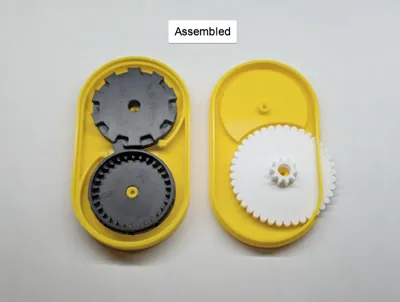
Assembly
Remove supports. Be careful not to break the slit of caseB while doing this.
insert wheel unitsB in caseB. Push unitsB carefully inside the slit, not to break caseB (it is ok).
Move a little bit the springs (the rounded bars) of caseA (in case they are stuck to the case)
Insert the wheels unitsA and tensA in caseA, numbers face down, the spring pressing them. Make sure the wheels can turn and click in the positions defined by the springs.
Assemble caseA to caseB, so that the gear of unitsB goes nicely inside the gear of unitsA.
When the case is properly closed, you can pull the wheel and the units will change. The first time it will be a bit rough for each number, but after going through tthe whole range a few times, operation will be quite smooth.
You can go both directions, count up or count down, and the tens numbers will change when needed.
I have printed 10 of them, with different PLA colors and brands, always worked fine.
Make sure you leave the counter in a "clicked position" (the 2 numbers properly aligned with their window), otherwise the springs will become loose.
Boost Me (for free)
I appreciate you taking the time to explore my work. Boosts, likes, and follows help me share even more designs with the community!
Explore more work by Loform Studio:


Comment & Rating (39)