4 Digit Code Lock Container


Print Profile(3)


Bill of Materials


Description
Boost Me (for free)
Thank you for the support. Boost help fuel the creativity and keeps projects active. Much appreciated 👍🏼
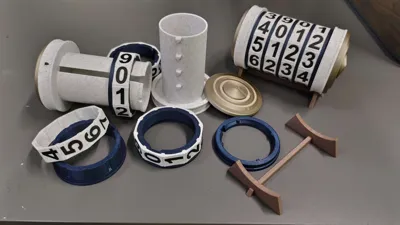
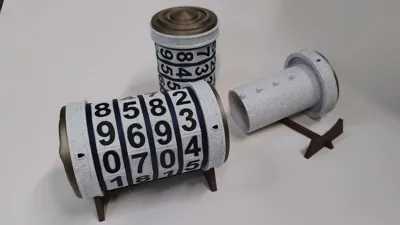
This is my original take on a classic. I designed and modeled all parts. It took me quite a few trials to get things the way I wanted but I think it's finally there. Like most others, the combination can be set during the assembly and changed later on if need be. I have included an AMS version and a single color per plate version as well as a stand. I used 2 nuts and bolts to hold the end caps on so the parts could be printed with as little support as possible.
The inside dimensions of the storage is a 39mm X 74mm cylinder.
I hope you enjoy this fantastic little lock cylinder.
Hardware and Filaments are listed below.
Update: Tweaks to the main body for extra strength.
Assembly Instructions
During plate one print (end caps) there is a pause at layer 27. You will need to insert an M3 nut into each cap and resume the print.

Once all the pieces are printed, carefully clean off the supports on the main storage tube and the 4 number ring sleeves.

Tip: you can run the M3 x 10 screws into the caps to make sure the threads are smooth and clean before attaching the tops to the body pieces.

Place the M3 x 10 screws through the main body pieces and thread the caps onto each end. The caps are identical.

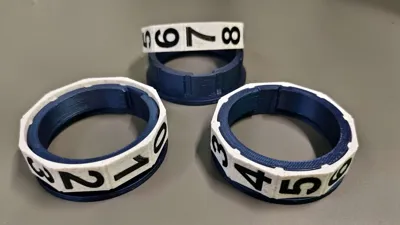
Place the Number Rings on the sleeve with the designed combination numbers lining up with the groove inside the sleeve (blue). The Number rings can only go one way. If they are not flush, the ring is upside down.

Place the 4 Number rings onto the main body piece with the slit down the side. The colored (blue) ring should be at the bottom. You will need to flex the lip of the main body to slide the 4 rings over the end.

Place the smaller (blue) lock ring at the top of the main body piece. The slit on the body piece should line up with the groove on the inside of the locking ring.

Put something inside the storage sleeve (the one with the teeth)

Line the combination up with the black triangle on the end of the body and slide over the storage piece. The 4 teeth should slide into the slit in the main body piece.

Twist the number rings to lock the container together. Place it on the stand and enjoy.

License
You shall not share, sub-license, sell, rent, host, transfer, or distribute in any way the digital or 3D printed versions of this object, nor any other derivative work of this object in its digital or physical format (including - but not limited to - remixes of this object, and hosting on other digital platforms). The objects may not be used without permission in any way whatsoever in which you charge money, or collect fees.
Comment & Rating (39)