Lopmon


Print Profile(1)
Description
Summary
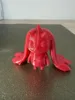
All started as a gift for a friend. Very quickly the 3D modeling escalated & I started to perfectly model my interpretation of Lopmon in Blender. After finishing I 3D printed my Lopmon & colored the figurin. As I like to share my work with you I was thinking about creating a rendered image. That escalated once again. First I modeled a background for the image & even rendered a video of a turning cube & my Lopmon turning on the spot.
If you want to create a memory counter for the Digimon trading card game use the "Memory Counter Lopmon.stl" & "Memory Counter Base.stl". Both parts are designed to be connected with a tooth pick.
Modeling the Lopmon was a hell of work. If you like leave me a tip for a coffee.
Print Settings
Printer Brand:
ELEGOO
Printer:
ELEGOO MARS
Rafts:
Yes
Supports:
Yes
Resolution:
0.05 mm
Infill:
solid
Filament: Anycubic Resin
White
Post-Printing
Clean, cure, paint & top coat.
I did the cleaning with a spatula & Isopropanol.
For curing I baught a big UV LED from AliExpress & glued aluminium foil on the inside of a paper box. I cured the model while cleaning the 3D printer.
As paint I used simple acrylic paint. I started painting by primering the model grey. After drying I painted the model with a loop of applying paint, drying & repeat.
As top coat I used clear car paint.
Comment & Rating (0)