Magnet Pen


Print Profile(13)
![[LATEST] All-In-One for X1 and P1](https://makerworld.bblmw.com/makerworld/model/US9b230df55165b8/398662889/instance/2025-08-28_d8da97e91be3b.jpg?x-oss-process=image%2Fresize%2Cw_100%2Fformat%2Cwebp)
![[LATEST] All-In-One for H2D/H2S/H2C](https://makerworld.bblmw.com/makerworld/model/US9b230df55165b8/398662919/instance/2025-08-28_3e86ec5e9c2e7.jpg?x-oss-process=image%2Fresize%2Cw_100%2Fformat%2Cwebp)
![[LEGACY] Version 2, for AMS](https://makerworld.bblmw.com/makerworld/model/US9b230df55165b8/393433141/instance/2024-10-08_3e931a5f29a3f.jpg?x-oss-process=image%2Fresize%2Cw_100%2Fformat%2Cwebp)
![[LEGACY] Version 2 - No AMS](https://makerworld.bblmw.com/makerworld/model/US9b230df55165b8/393433588/instance/2024-10-09_844c994eeb7b9.jpg?x-oss-process=image%2Fresize%2Cw_100%2Fformat%2Cwebp)
Bill of Materials


Description
Boost Me (for free)
A boost is a free way for you to show appreciation for my models - and helps me improve my 3D printing setup and experiment with more novel mechanisms to turn into useful tools.
2025-08-28: Redesigned again, with several new features:
- Supports are no longer required for printing the shuttle.
- Added a slot to show how many mangets are remaining.
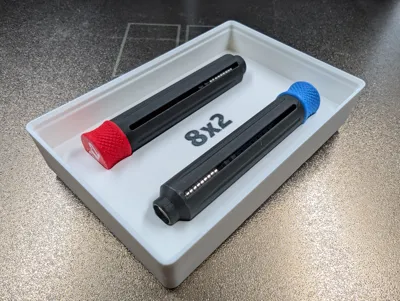
- Print a set of two pens and a Gridfinity-compatible box on a single build plate!
- Shorter, making it more convenient to store and use an infrequently-used tool. The shorter length also eliminates print issues due to printing tall, thin objects.
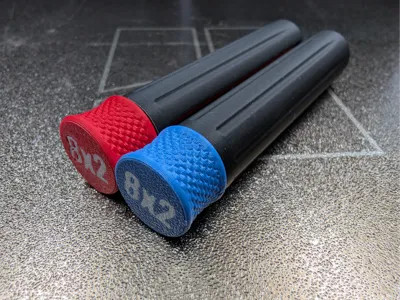
This tool serves as both a holder for your cylindrical magnets and a way to conveniently dispense and apply them. A half-turn on the end of the pen and the next magnet rises up, ready to be inserted into your build. Works for magnets as small as 2x1mm and and as large as 15x3mm!
Entirely 3d-printed with no parts needed except one magnet of the type you want to dispense, this pen is robust enough in PLA with default settings that you needn't worry about breaking it even when inserting the snuggest press-fit magnets. The dispenser also has no problem with magnets that are thinner than nominal, such as those often found on Amazon or Aliexpress.
Includes a ‘fuel gauge’ slot in the side to easily check how many magnets are left. One 95mm long pen has approximately 63mm of useful space for magnets. A complete set of two pens, with a gridfinity bin, prints on a single build plate in 4-5 hours (depending on magnet size) on an X1C or P1S.
Standard (not Matte or Silk) PLA is highly recommended. Matte and silk variants will work, but lead to the joint between the knob and the slider being quite fragile during construction; you will need to handle with care until the pen is assembled, at which point it's perfectly robust. The retention clips are also more likely to break on disassembly if printed using Matte or Silk PLA.
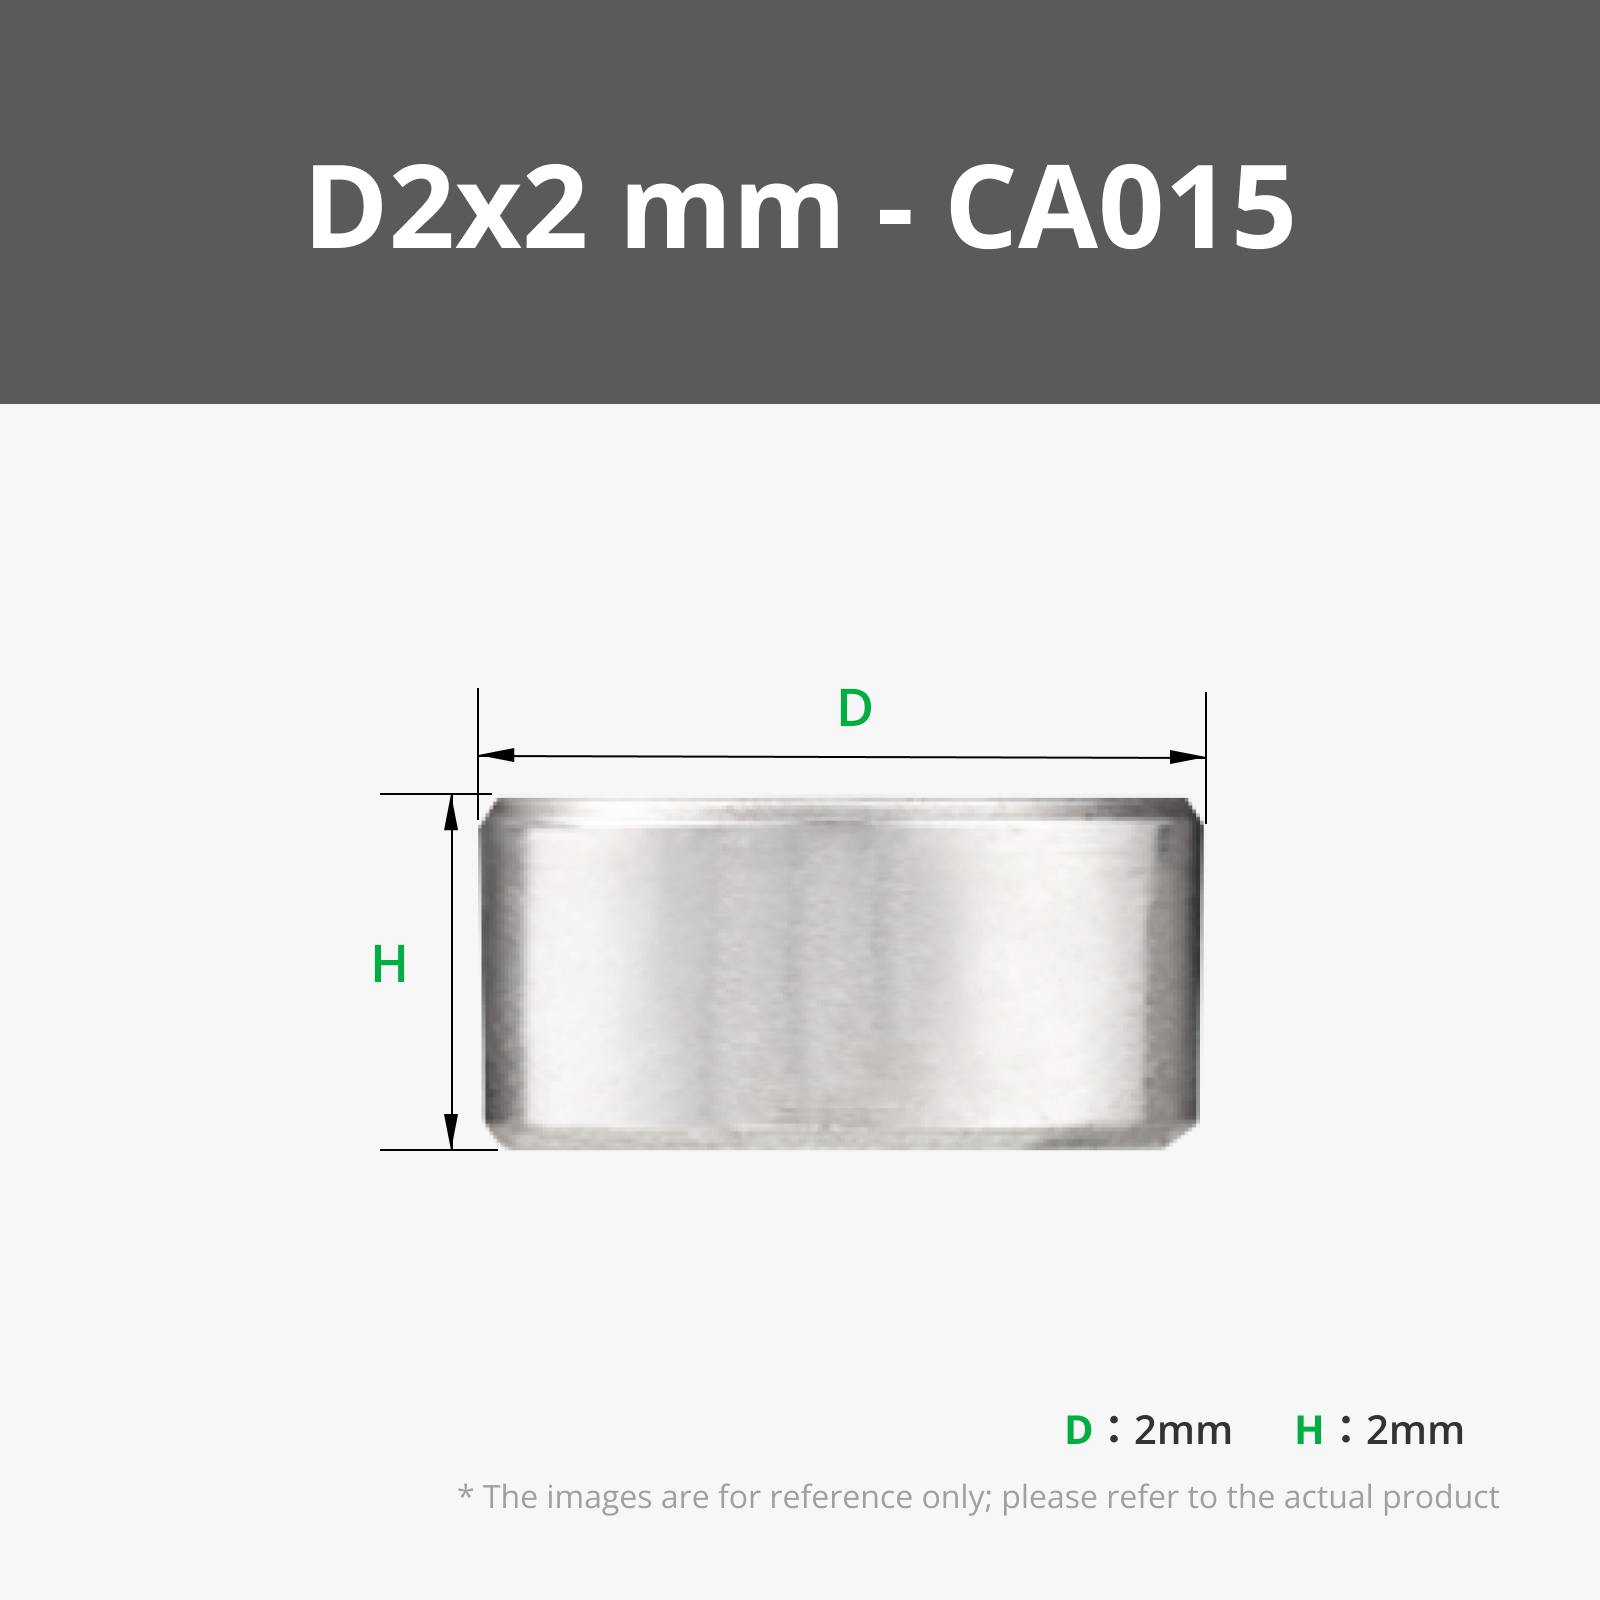
Currently available in the following sizes:
| Diameter/Thickness | 1mm | 2mm | 3mm | 4mm |
| 2mm | ✓ | ✓ |
|
|
| 3mm | ✓ | ✓ | ✓ |
|
| 4mm | ✓ | ✓ | ✓ |
|
| 5mm | ✓ | ✓ | ✓ |
|
| 6mm | ✓ | ✓ | ✓ | ✓ |
| 7mm | ✓ | |||
| 8mm | ✓ | ✓ | ✓ |
|
| 10mm |
| ✓ | ✓ |
|
| 12mm |
| ✓ | ✓ |
|
| 15mm |
| ✓ | ✓ |
|
If a size is missing, request it and I'll add it!
Printing
Each size of magnet has its own plate. Simply choose your preferred size and hit print. If you don't have an AMS, you can delete the text elements from each object that has them to produce a version with debossed lettering.
Be careful when removing the knobs from the build plate - the attachment between the knob and the large slider is fragile. Grab the knob, not the slider, and use a scraper to remove it from the bed.
Assembly
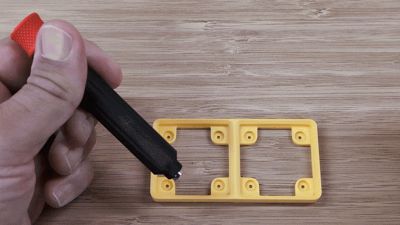
Take one of the shuttles - that's the smallest part - and a small stack of magnets of the chosen size. Lay the stack of magnets on of the sliders - that's the long curved piece attached to the knob. Apply a small dot of cyanoacrylate superglue to the tapered end of the shuttle, place it on the slider facing the magnets, and push the magnets and shuttle together to glue them. Move it about a bit as a unit so that any overflow glue doesn't stick the whole thing to the slider. Blow on it to speed adhesion!
Take the second shuttle and apply a small dot to the tapered end, then attach it to the other end of the stack of magnets. The end result should look like this:

Once the glue has dried thoroughly, you can separate the sliders into two parts, each with at least one magnet attached.
To assemble each pen, place one glued shuttle on the slider, with the magnet end facing away from the knob:

Now, insert the slider into the body of the pen. Let the shuttle rest up against the body, and turn the knob clockwise to thread it into the body until it is at least a few mm inside. Press the knob firmly into the body; it will click into place. If you encounter difficulty threading the slider in (either at the start, or further along), add a little lubricant. I use SuperLube, but any mechanical lubricant will do the job fine. Even a small drop is plenty.
Finally, insert a stack of magnets into the end of the magnet dispenser. You're ready to go!
If you ever need to disassemble it, don't pull on the knob! This will almost certainly break the clips. Instead, twist the pen until all the magnets have been retracted, then keep twisting; the shuttle will push the knob up out of the body of the pen. Be warned that doing this is likely to loosen the retaining clip.
Comment & Rating (1637)