Astroneer Medium Platform


Print Profile(8)


Description
ENGLISH
After playing more than 250 hours in Astroneer and seeing that marian42 (link) had made the resources and a "Medium Storage", I decided to create my version of the storage and connectors.
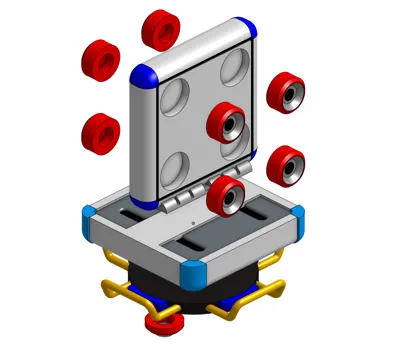
To assemble a storage you will need:
- Print one of the two versions: "Two Sides" or "Expanded".
- Print a “baseCon”
- Print 8 female connectors.
- 8 neodymium magnets 6x3mm
- Glue
Although I love the multicolor, I dislike the times and throw so much filament, so in each model you will have plates with separate versions to print more efficiently (but then you will have to use glue). Choose the one that best suits you.
All the models have custom settings according to my preferences and the "Main" models are with variable layer adjustment. I have not been using Bambu Studio for that long so any improvement will be welcome.
The "BaseConnector" model has two holes at the bottom for future attachment with platforms just like in the game.
The resources of marian42 (link) are also uploaded, but got to his profile to leave him a "Like".
To assemble them, choose the color and model according to the resource you want (you can check it here: Astroneer Wiki) and print a "Male Connector".
Tip: use a "Master" magnet to put the same orientation on all the "Female Connector" and the opposite on the "Male Connector". In the "Two Sides" version, glue the ones on one side first, wait and then glue the ones on the other side.
ESPAÑOL
Después de jugar más de 250 horas en Astroneer y viendo que marian42 (link) había hecho los recursos y un “Almacenamiento Mediano”, decidí crear mi versión del almacenamiento y los conectores.
Para montar un almacenamiento necesitaras:
- Imprimir una de las dos versiones: “Two Sides” o “Expanded”
- Imprimir una “base”
- Imprimir 8 conectores hembra.
- 8 imanes de neodimio 6x3mm
- Pegamento
Aunque me encanta el multicolor, me desagradan los tiempos y tirar tanto filamento, por lo que en cada modelo tendréis platos con versiones separadas para poder imprimir mas eficientemente (pero luego tendréis que usar pegamento). Elegir el que mas se adapte a vosotros.
Todos los modelos tienen configuración personalizada según mis preferencias y los modelos “Main” están con ajuste de capa variable. No llevo tanto tiempo usando Bambu Studio así que toda mejora será bienvenida.
El modelo “BaseConnector” tiene dos agujeros en la parte inferior para en un futuro, engancharlo con plataformas igual que en el juego.
Los recursos de marian42 (link) también están subidos, pero pásate por su perfil para dejarle un “Like”.
Para montarlos, elije el color y modelo según el recurso que quieras (puedes consultarlo aquí: Astroneer Wiki) e imprime un “Male Connector”.
Consejo: usa un imán “Master” para poner la misma orientación en todos los “Female Connector” y la contraria en los “Male Connector”. En la versión “Two Sides”, pega primero los de un lado, espera y luego pega los del otro.
Comment & Rating (22)