Labeling aid


Print Profile(1)
Description
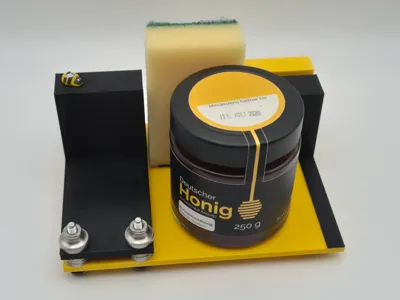
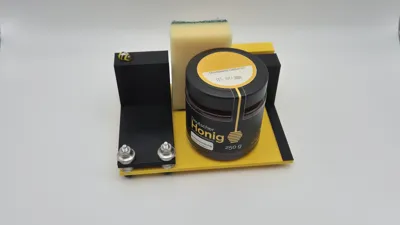
Printed Labeling Aid
The Original from the August 2025 giveaway from the Instagram beekeeping community. Here you can now download the labeling aid and print it yourself
Bill of Materials
- 6x M5 30mm hex screws
- 7 anti-slip pads (10 x 3mm)
- Small piece of Velcro (minimum 4 x 5 cm)
- Small sponge (50 x 70mm)
- Washers 5.3 x 15 x 1.2 mm
- PLA glue or superglue
- 4 knurled nuts
- 2 heat-set inserts (Ruthex M5Sx5.8)
Assembly after printing
First, the heat-set inserts must be melted into the `halter-vorne` part into the designated holes
The `halter-vorne` part must be glued onto the base plate. For this, use the gluing aid `klebehilfe-halter-vorne` and hold it to the back right corner, using the overhang of the part as a stop against the base plate. The `halter-vorne` part is then glued into the free area. Once the glue has set a bit, the gluing aid can be carefully pulled out. Allow it to dry thoroughly. It is best to use PLA glue or superglue. Please ensure that the gluing aid does not get glued in
You can continue with the `halter-hinten` part. A piece of Velcro should be glued into the recess there, so that the sponge can be attached later
The 7 anti-slip pads can be glued onto the 3 feet of the base (without holes). The remaining 4 are glued onto the heads of 4 M5 30mm hex screws. The 4 screws can then be inserted through the 4 designated holes on the base plate. Insert carefully if the newly glued part has not yet dried. An equal number of washers are then placed on each of the 4 screws. These determine the height and can be changed as desired, see instructions. The `ausrichter` part then goes on the washers and is secured with the knurled nuts so that it no longer wobbles
For everything else, please refer to the instructions
Have fun with it
Changelog
- 19.06.2026
- Added Boden.3mf
- Added extension.3mf
Documentation (2)
License
You shall not share, sub-license, sell, rent, host, transfer, or distribute in any way the digital or 3D printed versions of this object, nor any other derivative work of this object in its digital or physical format (including - but not limited to - remixes of this object, and hosting on other digital platforms). The objects may not be used without permission in any way whatsoever in which you charge money, or collect fees.
Comment & Rating (0)