Oldputer


Print Profile(1)
Description
Oldputer
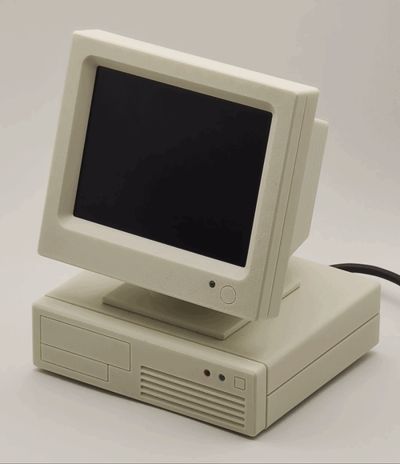
I present to you the result of buying a cheap e-ink display 🙂 The moment it arrived, I had an “aha” moment, which led to this project.
Parts list (below) could look a little weird, but that's just what I had in my drawer that night.
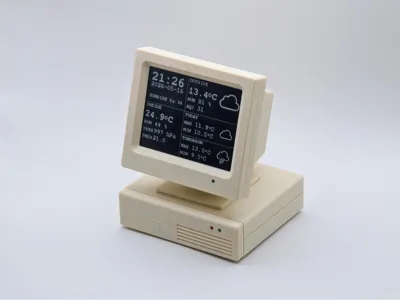
Right now, it works as a simple weather station on my desk (hence the BME280 inside), but it can be anything - I guess you could even run Doom on it.
I highly recommend printing on the main filament profile with scarf seams and using any PLA as a support interface - this will make your life 10x easier as well as improve the print quality.
Boost Me (for free)
I'd be very grateful for boosts if you like this project :)
Firmware
The firmware that can be seen in the photos is available on GitHub. It's a simple weather station that works on data pulled from Home Assistant.
Although the firmware is 100% vibe coded (that was my personal challenge), it works flawlessly for a few weeks already.
BOM
Filaments
- Sunlu Bone White PETG for body
- Any PLA for the support interface
Hardware
- Heated insert M3x5x5 - 9 pcs (or 8 if you won't mount BME280 inside)
- Screw M3x25 (or longer) - 1 pc
- Screw M3x6 - 5 pcs (or 4 if you won't mount the BME280 inside)
- Screw M3x10 - 8 pcs
- Washer M3 - 2 pcs
- Nut M3 - 1pc
Electronics
- LED 3mm green - 2 pcs
- LED 3mm red - 1 pc
- Resistor 1 kΩ - 3 pcs
- WeAct 4.2" black/white e-ink display - 1 pc
- ESP32 devkit v1 (36 pin version) - 1 pc
- BME280 board - 1pc (optional)
- Goldpin cables - a few pieces, depending on how creative you are
- Some heat-shrink tube or insulating tape
- Micro USB cable (to flash firmware and to power the device) - 1 pc
Assembly
Needed tools
- Soldering iron
- Screwdriver(s) for your bolts (H2.0 in my case)
- Hot glue
Instructions
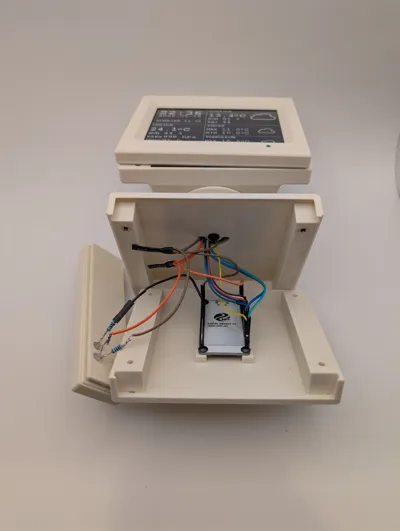
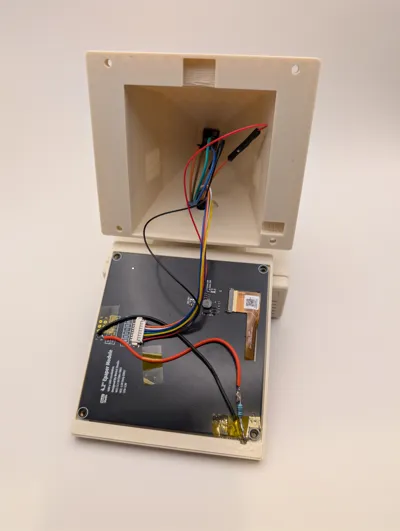
I recommend checking the pictures first, which will help a lot 🙂
- Press all the heated inserts in places (4 in the front frame, 4 in the computer upper body)
- Solder resistors to LEDs - one for each, doesn't matter which leg, but remember where the cathode and anode were.
- Place the LEDs in their places and glue them with hot glue.
- Solder two wires to GND and VCC on the screen PCB.
- Place the screen more or less in place and solder the other two ends of the wires from #4 to the cathode and anode of the screen frame LED. I've used a few Kapton tape pieces here and there to avoid short circuits, but heat-shrink tube and/or insulating tape will do.
- Screw on the ESP32 board to the bottom of the computer case with M3x6 screws - no heated inserts there, so be gentle.
- (Optional) screw on the BME280 board to the back of the screen case.
- Solder some wires to the LEDs in the computer front panel.
- Screw the computer top, screen stands, and screen back case together - in the order of application on the longest M3 screw:
- a washer
- the computer top
- the screen stand bottom
- the screen stand top
- the screen back case
- a washer
- a nut
- Wire things 🙂 in my case, it was as follows, looking from the ESP32 side:
- GPIO25 → red LED cathode
- GPIO21 → BME280 SDA
- GPIO22 → BME280 SCL
- GPIO5 → e-ink CS
- GPIO4 → e-ink BUSY
- GPIO17 → e-ink RST
- GPIO16 → e-ink DC
- 3V3 → computer LEDs anodes, e-ink VCC, and BME280 VCC
- GND → computer green LED cathode, e-ink GND, BME280 GND
- Slide the computer front into the computer top, then slide the computer bottom onto the front, and screw together with M3x10 screws.
- Insert the screen plug, then screw the screen front to the screen back with M3x10 screws.
- Plug the USB cable, flash the firmware, configure, and enjoy 🙂
License
You may create derivative works based on this object, provided that all such derivative works are published exclusively on the MakerWorld platform and include proper attribution to the original creator. You may not share, upload, host, distribute, or publish this object—or any derivative work of this object—on any other digital platform, marketplace, or distribution channel. Commercial use of this object and any derivative works is strictly prohibited. This includes, but is not limited to, selling, renting, sublicensing, or using the object in any context in which you receive monetary compensation or other financial benefits.
Comment & Rating (2)