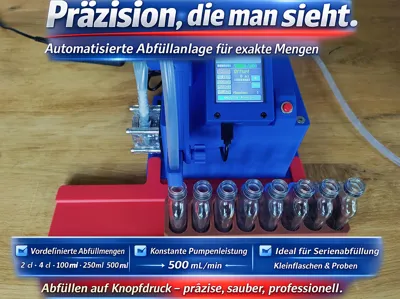
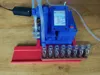
Automatic Filling System


Print Profile(1)
Description
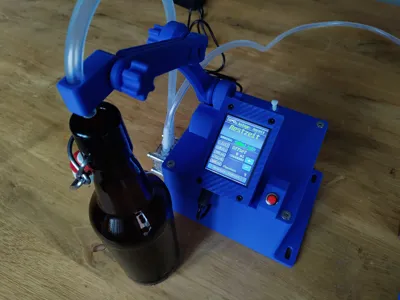
This is an automatic liquid filling system
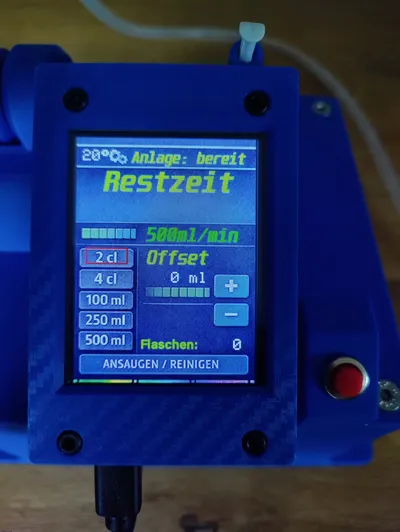
It is operated and controlled by a CYD via touch input
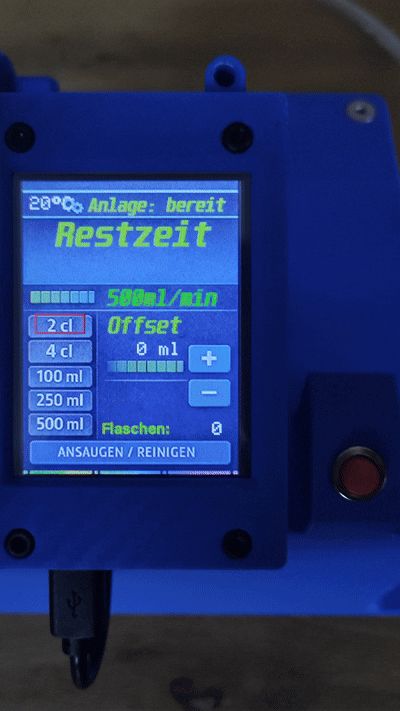
The device has preset quantities:
2cl/4cl/100ml/250ml/500ml
The quantities can be calibrated directly on the device via the offset setting, or
you can set your desired quantity, for example, if you need 700ml, select 500ml + 200ml offset
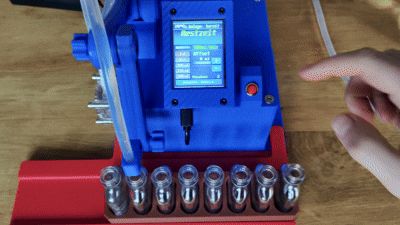
Pressing the button starts the filling process, and it ends automatically
Press the button twice while the pump is running = EMERGENCY STOP
Suction/Cleaning function: The pump runs as long as the button is pressed

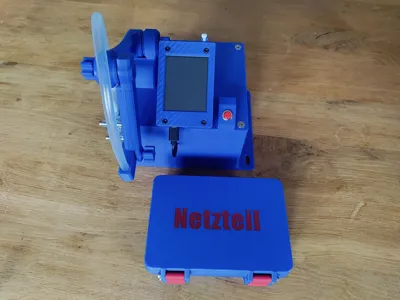
In the upper left, there is temperature monitoring of the enclosure interior. The 5V fan ensures circulation
In the lower right, there is a bottle counter for each completed filling process. To reset, power cycle the CYD
The system is designed for various bottle sizes. This can be adjusted with the Dum-E arms
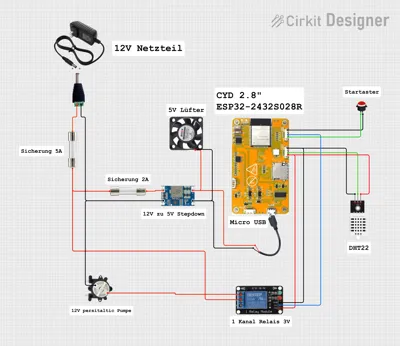
Electronic components:
- CYD ESP32-2432S028R https://www.amazon.de/dp/B0FX4TV61K?ref=ppx_yo2ov_dt_b_fed_asin_title&th=1
- 1 channel 3V relay low trigger https://www.amazon.de/dp/B0DBZQVWPM?ref=ppx_yo2ov_dt_b_fed_asin_title
- 5V step-down converter https://www.amazon.de/dp/B0F4DHMPXF?ref_=ppx_hzsearch_conn_dt_b_fed_asin_title_3
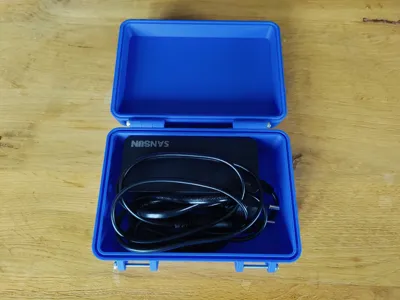
- 12V 5A power supply https://www.amazon.de/dp/B07GFFG1BQ?ref=ppx_yo2ov_dt_b_fed_asin_title&th=1
- Peristaltic pump 500ml/min https://www.amazon.de/dp/B085NMHFYW?ref=ppx_yo2ov_dt_b_fed_asin_title
- Cable 0.75mm² red/black
- JST cable with 1.25mm connector https://www.amazon.de/dp/B0BNF8949T?ref=ppx_yo2ov_dt_b_fed_asin_title&th=1
- JST 2.54mm jumper cables
- 5V fan https://www.amazon.de/dp/B07X37NXGX?ref_=ppx_hzsearch_conn_dt_b_fed_asin_title_2
- 5A/2A fuses and holders
- Temperature sensor DHT22
- micro USB cable (power only) https://www.amazon.de/dp/B0CWNTZMG2?ref_=ppx_hzsearch_conn_dt_b_fed_asin_title_6&th=1
- Push button Ø9mm
Heat-set inserts:
- M3x5.7x64.6 18x
- M4x8.1x6.3 1x
- M5x9.5x7.1 4x
Screws:
- M5
- M4
- M3
Other parts:
- Silicone hose 6x8mm https://www.amazon.de/dp/B07T22ZZ9J?ref=ppx_yo2ov_dt_b_fed_asin_title&th=1
Star nut positions:

Circuit diagram for the electronics:

In the Arduino IDE, insert the sketch code from the text file and in a new tab, insert the code from Background.h and name it accordingly

Test your pump to see how many ml/min it actually does and change it in the code. (Mine actually had 600ml/min)
// Pump control
const float mlPerMin = 500.0; // Enter pump performance here
bool pumpRunning = false;
unsigned long pumpStartTime = 0;
unsigned long pumpDuration = 0;
I have described most of the functions in the code
Used external models:
For the arms, I used and modified this model: https://makerworld.com/en/models/195554-dum-e-the-handy-desk-buddy-lamp-stand-holder#profileId-976539
After printing, all holes in the arms must be drilled through. Screws then pass through these holes, which can then be fastened with star nuts. The base of the arms is provided with 4x M4 heat-set nuts
As a box for the power supply, I used this model and added labeling: https://makerworld.com/en/models/435537-box-100x150#profileId-340597
Boost Me (for free)
if you liked it, I would be happy
Disclaimer: I am not liable for the electrical assembly. Everyone is responsible for themselves!
Documentation (2)
License
You shall not share, sub-license, sell, rent, host, transfer, or distribute in any way the digital or 3D printed versions of this object, nor any other derivative work of this object in its digital or physical format (including - but not limited to - remixes of this object, and hosting on other digital platforms). The objects may not be used without permission in any way whatsoever in which you charge money, or collect fees.
Comment & Rating (0)