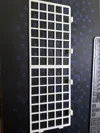
Cat-Proof Window Grille


Print Profile(3)
Description
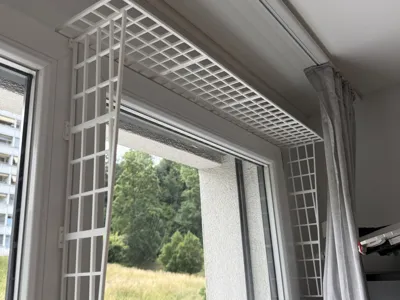
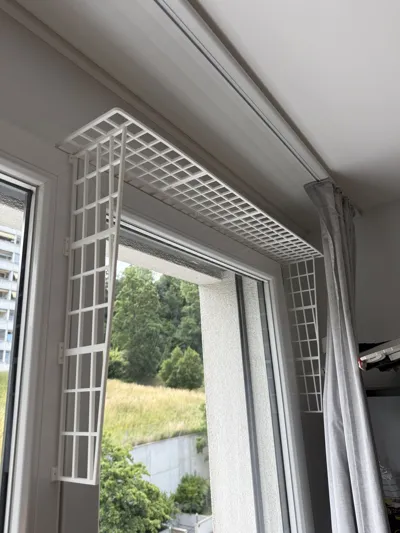
Cat Safety Grille — One File, Every Window (Parametric)
A single parametric model to secure any window opening against your cat. Enter your opening size, pick your printer, and the grille resizes and splits itself to fit. Then you print the tiles and assemble them.
🪟 One file adapts to every opening
The same model handles the two shapes you get on a tilt & turn window:
- Straight opening → rectangle. Set top width = bottom width for a plain rectangular panel (top sash, bottom rail, any straight opening). Map the long span to height; that's the axis the grille tiles along.
- Slanted side gap → trapezoid. Set top width ≠ bottom width (wide at the top, narrow at the bottom) and the grille becomes the angled side panel of a tilt & turn window. Set side = "left" or "right" to mirror it for the other side.
Same parameters and same workflow for the whole window.
🖨️ Suitable for every printer
Choose your machine from a dropdown and the grille splits into tiles sized for that plate:
- A1 mini :180 mm
- A1 / P1P / P1S / P2S / X1 / X1C : 256 mm
- H2C / A2L : 330 mm
- H2D / H2S : 350 mm
A bigger plate means fewer tiles, so less assembly and less filament. If you need a custom size, the value is just a number you can change it.
✨ Highlights
- Auto-tiling: splits itself to fit your build plate.
- Self-locking dovetail joints: tiles slot and lock together. ⚠️ Glue between every tile is required. The dovetails align and hold the parts during assembly, but the glue is what makes the final grille rigid and safe.
- Built-in 90° mounting tabs (optional M4 holes) to screw it to the frame.
- Rounded outer corners, added automatically only on the real outside edges.
- Prints flat and support-free: the panel and the perpendicular tab walls.
🖨️ Printing & Export
- part = -1 → full preview of all tiles laid out.
- part = 0, 1, 2… → export each tile one at a time (F6, then export STL).
- Suggested: 3–4 perimeters, 20–30% infill. PETG recommended for outdoor use (UV resistance).
- Assembly: glue between every tile. Slot the dovetails together, then bond each seam (superglue). The joints align the tiles; the glue holds the grille together.
⚠️ Do not install unglued tiles. Dry-fitted dovetails will pull apart under a cat's push. The grille is only cat-safe once every seam is glued and cured.
⚠️ Always check the mesh spacing against your own cat before installing. Kittens and slim cats can pass tighter gaps than you'd expect.
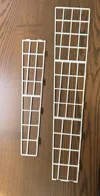
🎯 Dial in the joint fit first (included tester)
A small fit-tester file is included so you don't waste a full grille on a bad fit. It prints a row of dovetail slots, each with a different play value (the engraved number = play × 100), plus a couple of male keys.
- Print the tester in the same filament, nozzle and layer height you'll use for the grille (tolerance depends on all three).
- Slide a key into each numbered slot.
- Pick the one that goes in firmly, without wobble or forcing.
- Put that number ÷ 100 into dovetail_play in the main file. Every seam will then fit the same.
⚙️ Customizable Parameters
Everything is at the top of the .scad file. Click « Personalize », change the values, and the model updates.
🪟 Opening (rectangle or trapezoid)
- height: span to be tiled, in mm (the long dimension)
- width_bottom: width at the bottom, in mm
- width_top: width at the top, in mm (equal to bottom = rectangle; different = trapezoid)
- side: "left" or "right", mirrors the slanted edge (trapezoid only)
- thickness: panel thickness, in mm
🔲 Grid
- cell_w: max mesh width, in mm. Keep ≤ 30 for cat safety
- cell_l: max mesh length, in mm. Raise for tall slots (saves filament) (recommendation ≤ 50)
- bar: bar thickness, in mm
- frame: outer frame thickness, in mm
🖨️ Printer / Auto-tiling
- printer: your Bambu Lab plate size (dropdown: 180 / 256 / 330 / 350 mm)
- bed_margin: safety margin, in mm
- auto_split: auto-slicing on/off
- part: -1 = full preview, 0, 1, 2… = export a single tile
- preview_gap: spacing between tiles in preview mode, in mm
🔗 Dovetail Joints
- joints: enable self-locking joints
- tenon_depth: tenon protrusion, in mm (keep below frame thickness)
- tenon_width: tenon width at the base, in mm
- dovetail_angle: dovetail angle in °, controls the locking
- dovetail_count: number of dovetails per seam
- dovetail_play: mortise clearance, in mm; increase if the fit is too tight
⬜ Rounded Corners
- corner_radius: outer corner radius, in mm; 0 = sharp corners
🔩 Mounting Tabs (90°)
- tabs: add perpendicular mounting tabs
- tab_count: number of tabs per tile (min 2)
- tab_width: tab width along the edge, in mm
- tab_height: how far the tab sticks out, in mm
- tab_thickness: tab thickness, in mm
- tab_hole: screw hole diameter, in mm (M4 = 4.2; 0 = no hole)
🎚️ Quality
- $fn: curve smoothness; higher = smoother but slower
Comment & Rating (0)