Low Profile P1S/X1C/P1P Riser with Diffuser for softer LED lighting

Low Profile P1S/X1C/P1P Riser with Diffuser for softer LED lighting

Boost
839
1544
724
GIF

Print Profile(8)

All
P1S
P1P
X1
X1 Carbon
X1E
A1

Low Profile Riser 0.2mm layer
Designer
6.6 h
3 plates
4.9(475)

P1P Front Panels
P1P Front Panels
Designer
6.6 h
3 plates
4.9(22)

12mm LED strip-version. Riser with added height.
Designer
7.4 h
3 plates
5.0(9)

Gap for P1S LED USB Cable 0.2mm layer, 2 walls, 15% infill
6.5 h
3 plates
4.9(34)
Click to see more

Open in Bambu Studio
Boost
839
1544
724
153
3.2 k
5.6 k
Released

Description

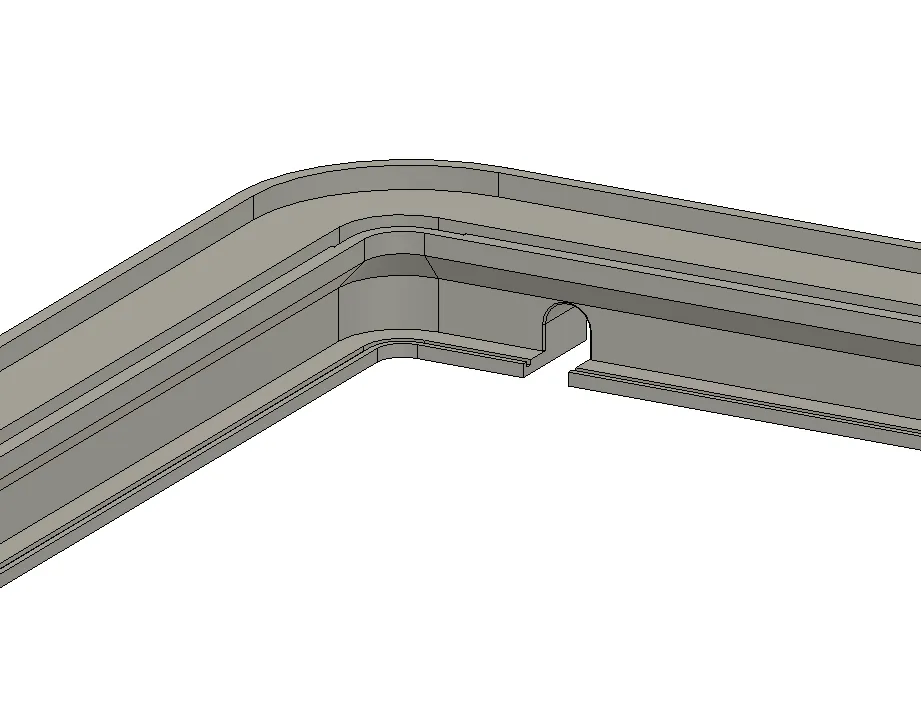
This riser adds 18.5mm to the top glass height. This does help some with the “filament pull out error” as the PTFE tubes is not bend by the glass.


This riser design allows for a LED strip to be installed with 3D printed diffusers for a softer light.


Benefits of this design:

  • Soft inner corners allows the LE strip to follow along without any sharp bends. And no soldering is needed.
  • The riser is designed so you can install 4 diffusers so the LED strip does not shine too hard.
  • The design of the riser does not need any support for printing. (no additional clean-up is needed)
  • All parts snap perfectly together and does not require screws or glue.
  • All 4 main parts are labeled with numbers to ensure an easy assembly.
  • No Support material is needed - the riser only needs assembly.


My riser are printed in:

SUNLU PLA+ Black

GEEETECH Matte PLA White


For P1S users: you can just use a regular USB LED strip with the USB port next the the screen. (inside the printer)


When installing the diffusers, make sure you assemble them in the correct orientation.

The two long cutouts on the diffusers should be on the front of the riser:

Licensing

All my designs are non-commercial and may not be sold, reproduced, or shared outside of this website.

For some designs it is possible to buy a individual license for a fixed fee. Please contact me for any details regarding this.


How to Support Me

If you like my designs, please give them a ‘like’ as this helps the model being more visible to other users.

Also please consider donating via https://www.buymeacoffee.com/make3d 
All support is highly appreciated!


UPDATE 21-12-2023:

I have changed the design of the front panels for it to fit the P1P model - I was informed the P1P was a tiny bit smaller and the original riser would not fit.

I have not tested this myself, but got the dimensions from another user.


UPDATE 24-12-2023:

I have added a hole on the back left side for wiring to external power supply. This is mostly for all X1C users.

UPDATE 26-12-2023 (Version 4):

I have changed the hole shape so you are able to wire a USB plug or power supply without having to solder any wires.

Comment & Rating (724)

Please fill in your opinion
(0/5000)

passt perfekt! besser geht es nicht!
4
Reply
Hi Clemens, welchen LED Streifen hast du genommen und welche Länge ? Grüße Gio
0
Reply
Replying to @ChicoItaliano :
ich habe die von philips hue genommen und zurechtgeschnitten. VG
0
Reply
May I ask how you fixed the model and machine together?
0
Reply
Hammer Konstruktion! Bin begeistert! Danke dafür! Awesome! It´s a really really big upgrade!
6
Reply
How did you get the built in LED bar to work alongside the led strip?
0
Reply
Hi madmak220, wie hast du die LED befestigt und welche hast du dafür verwendet? GRÜßE GIO
0
Reply
Replying to @ChicoItaliano :
Sind normale LED Stripes selbstklebend von Amazon.
0
Reply
I took myself a lot of time looking at the details of all the available led risers. And all of them have awesome features and different styles (some are really crazy designwise) but i needed something simple, easy to print, easy to add. Thanks for sharing this. I could have used the internal USB Adapter but cable management looked cleaner my way. I'm using an old Phone-USB-Charger. The LED strips remembers the last setting when powered off/on.
6
Reply
She great upgrade! Thanks for this ... Profiles are great for printing. I have added a profile: An additional hole has been added to frame 1-2, making it easier to bring the USB cable from the X-Touch inside.
The designer has replied
2
Reply
nice. may I ask how you converted the file to being able to working on it in fusion?
0
Reply
Replying to @make3D :
can you mod your design the same? that's a really nice change Also you state that the lights are controllable from bambu studio. Can you elaborate on how?
1
Reply
Hello, Cool that you've adapted this for USB ! @mario.schrank But I don't understand how your update makes it easier. I printed it out without looking at it first but the installation isn't possible for me. I have a P1S, I'm posting a photo of the installation: the cable can't go through. I see that you have an X1, perhaps the conception is different... What do you think? Maybe I need a P1S version.
(Edited)
0
Reply
Print Profile
Low Profile Riser 0.2mm layer
Overall a very good model, thoroughly impressed by how well it works. Only two things would make it even better would be angling the areas in which the LED's would sit to face towards the print bed as well as a cut out for those who will be using the USB connection located near the front of the printer on the P1S/P so as the wire isn't in the way of the diffuser, I've attached a picture showing what I mean the best I can. Other then that, a very good simple riser. Thanks!
The designer has replied
3
Reply
Thanks for the good suggestion. Isn't it possible to wire it trough the cutout on the far right front side? If not I can easily add another cutout as your photo indicates.
0
Reply
I'm not 100% where you're talking about and it's totally possible I'm completely missing where it's also able to feed through.
0
Reply
Print Profile
P1P Front Panels
Awesome upgrade! Adding the diffusers when I get some white filament! Thanks!
The designer has replied
2
Reply
looking good 👍🏼
0
Reply
where did you download the stl for those hexagonal lights?
0
Reply
lol not the first question I got about this… https://www.thingiverse.com/thing:4882908. Good luck!
(Edited)
1
Reply
Is that usb port powered whenever the printer is fired up or just when the factory light is on?
The designer has replied
2
Reply
i havent tried it, but i could imagine the usb port is on while the printer is on :)
0
Reply
i have a doubt, because in the first video you can see him pressing a botton and the leds light up🤔 having the leds always on would be a bit of a waste, especially printing at night😁
0
Reply
Replying to @Norlimbeco :
I simply cut the built-in Bambu Lab LED cable and connected it to the LED strip. It is best to use 5V LED strips.
3
Reply
Boosted
Very pleased with this model - it printed well in PETG for the frame and matte PLA for the diffuser, and fits perfectly on my P1S (upgraded from P1P). I used the LED strip that Bambu sells, and it took 5 minutes to install. Beautiful, thank you so much!
1
Reply
do you need to cut the leds, apparently they're 5 meters long. Seems like overkill.
0
Reply
Boosted
Replying to @joseandalexpaez :
Yes, I cut the LEDs. Needed much less than 5m
0
Reply
Print Profile
Low Profile Riser 0.2mm layer
Insane. Das Teil ist der Wahnsinn. Super toll von der Quallität her. Bei den LED‘s habe ich Neutralweiß gewählt. 320 Stück je Meter. Zwei Meter Rolle bei Amazon für 10,99€. Extra die gewählt wo man die LED,s nicht sieht. Alles in allem ein MUSS für jeden P1S oder P Serie. Danke für die tolle Arbeit. Thanks for work.
1
Reply
kannst du mir ggf. den Link von dem LED Strip senden? hast du den dann an dem USB Port im Drucker angeschlossen?
0
Reply
Hallo. Sorry für die späte Antwort. Ja, er ist am USB Port angeschlossen. Hier der Link. https://amzn.eu/d/30tGpmb
0
Reply
Print Profile
Low Profile Riser 0.2mm layer
The model worked great and everything fit well. the parts went together easily. I printed the main parts in PETG-CF and the diffuser lens in transparent PETG. I used the recommended light kit and it plugged right in and worked perfectly.
The designer has replied
1
Reply
looks great!
0
Reply
what was the recommended LED light kit?
(Edited)
1
Reply

License

This user content is licensed under a Standard Digital File License.

You shall not share, sub-license, sell, rent, host, transfer, or distribute in any way the digital or 3D printed versions of this object, nor any other derivative work of this object in its digital or physical format (including - but not limited to - remixes of this object, and hosting on other digital platforms). The objects may not be used without permission in any way whatsoever in which you charge money, or collect fees.