NVS Safe - No screws, No glue, No Supports


Print Profile(1)

Description
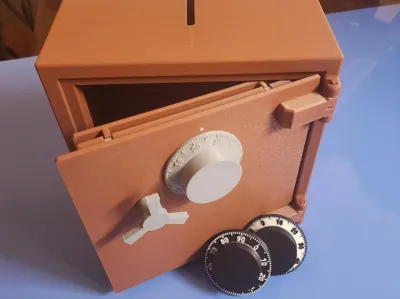
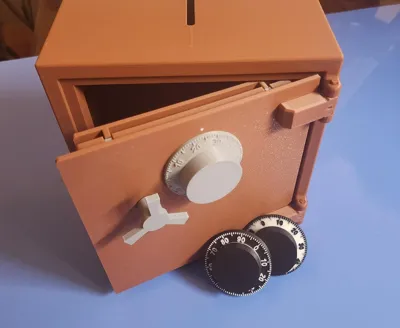
This is the NVS (Not Very Safe) Safe. (I couldn't think of a way to make a 3-D printed object safe from hammers, fire, a firm stomp by an enthusiastic foot, or countless other destructive means).
Unfortunately I used up all my filament printing in the many iterations of this, leaving me with only the horrific Bambu PLA Brown and grey filament for the attached photos and videos. When I get more filament and time, I'll try to make it more appealing.
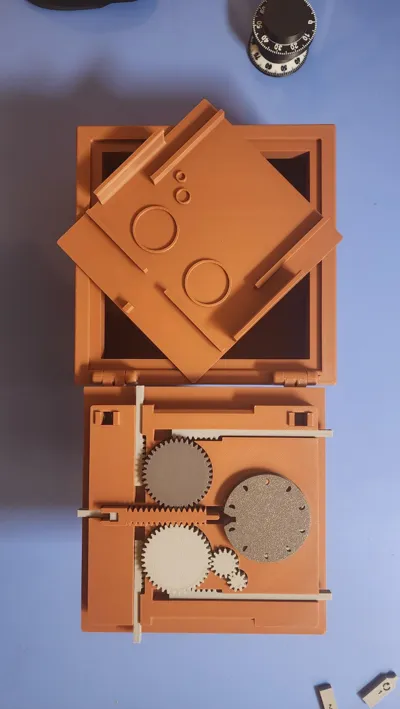
A fully functional 3-number combination safe with over 900 possible combinations. No glue, screws, or other parts are needed - everything is printed.
While it is a long print, it is nowhere near as long as the estimate or filament required because there are multiple versions of the body and combination dial but you only need to print one of each.
IMPORTANT NOTES:
- Read the attached pdf assembly instructions. Further down I will link a video - but I need to redo it as realized doing things in a different order would have been easier, but I can't non-destructively disassemble the safe, so I need to print another to make another video. And I'm out of filament :(. The order specified in the instructions is better than the current video.
- All the small parts are on a single plate. If you struggle with bed adhesion at all, I STRONGLY suggest dividing them into a few extra plates - you don't want one to break free and mess up the entire job. Also, splitting them to different plates allows for faster more creative coloring like gold plated handle and hinges etc…
- If you struggle with elephant foot issues on prints, this will be challenging as the tolerances are quite tight.
- The PDF Instructions include some coloring tips for quickly coloring the dial.
- You can also color the Dial Position Indicator triangle on the door face.
- If you are making this for a child who may pull too hard on a locked safe, you may want a dab of glue to firmly attach the handle and combination wheel to their posts - but be careful you don't get the glue on the door!
- For the extra attention to detail, You may want to control your seams in Bambu Studio - for the safe body, I'd suggest painting them on the bottom, and for the combination dial, I'd suggest painting them with a vertical constraint along the Z-axis of the '0" position of the dial.
- I STRONGLY recommend turning off the Auxiliary fan on X1C when printing - The only thing I've found its good for is ruining build adhesion on the left side of prints resulting in warped prints, especially larger prints like the safe body or plates with lots of parts. YMMV
ANTICIPATED QUESTIONS:
Can I scale it down? Probably not. There are quite a few very close tolerances. But you are welcome to try.
Why is it so big? Because of the small pins and my desire to have no glue, no supports, and no screws. So something had to be at least a certain size or they were simply too fragile
Why isn't it bigger? I know the max build size of the A1 mini is 180x180 which was my original size, but I squished it a bit to give them 10mm to work with.
Why can't I post remixes? Well, number one I did this for the vault contest. Number two, I've seen a dissapointing number of “remixes” that didn't do anything of value but just stole from the creator. I don't know - I might change my mind.
Commercial Terms? I don't know the first thing about 3d commercial terms. I'm just trying to teach myself a bit of 3d printing, 3d modelling, etc. My attempts at CAD/3D printing two weeks ago were very complicated ..drumroll please… tpu cable ties: https://makerworld.com/@user_2110854527/collections/4256391
I lost my combination - what is it? I have no idea - there are hundreds of possibilities depending on where you insert the pins. If the door isn't shut you can pull the drive gear shaft and use the three pin tools to decode it again. If the safe is locked you could, uh, print a new one?
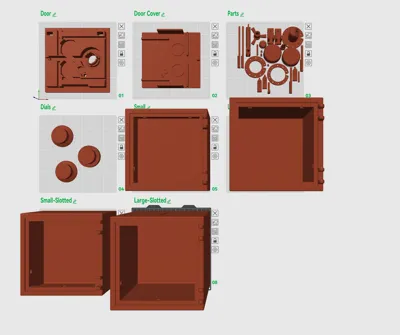
BODIES (4):
- Large: 170mmx170mmx170mm ( External Width x Height x Depth)
- Large slotted - same dimensions as above, but with a piggy bank style slot
- “Small”: this is still large, but half the depth 170mm x 170mm x 85mm ( External Width x Height x Depth)
- “Small” slotted - same as above, but with piggy bank slot
DIALS (4):
- “Fancy” Numbered - has a sloped number dial indicated - looks better, but if you print it with colored tick marks and numbers it takes twice as long to print and more wasted color change poop as the flat face due to the number of color changes required.
- “Flat” Numbered- fewer color changes and simply selected a few layers to have the numbers be a different color.
- “Fancy” with only tick marks
"Flat with only tick marks
Video instructions - the attached file has a slightly different (and better) order of operations, but watch the video first and things should be clear.
Documentation (1)
License
You shall not share, sub-license, sell, rent, host, transfer, or distribute in any way the digital or 3D printed versions of this object, nor any other derivative work of this object in its digital or physical format (including - but not limited to - remixes of this object, and hosting on other digital platforms). The objects may not be used without permission in any way whatsoever in which you charge money, or collect fees.
Comment & Rating (18)