YAFDM (Yet Another Food Dehydrator Mod) - EFD770WD


Print Profile(1)

Bill of Materials

- Elite Gourmet EFD770WD 5-Tier Food Dehydrator x 1:
- 6080 bearings (608RS units work great) x 3:
- M5x20 machine screws x 3:
- M5x30 machine screw x 1: OPTIONAL
- M5x6x7 threaded inserts x 3:
- PC4-M10 PTFE straight pneumatic fittings x 2:
Description
Dry Filament Like a Pro (or Dry Mango Slices, Your Call)
Introducing the Yet Another Food Dehydrator Mod (YAFDHM) – the ultimate Elite Gourmet EFD770WD 5-Tier Food Dehydrator upgrade for the multi-purpose maker. Need dry filament for perfect 3D prints? Want your snacks moisture-free and delicious? Now you can (almost) do both (and maybe even at the same time if you like to live dangerously?).

This clever mod transforms your dehydrator into a dual-purpose powerhouse, letting you dry filament and spool it out while keeping friction and filament bends to a minimum. Two PTFE feed direction options ensure your filament flows smoothly, so you can focus on printing instead of untangling spaghetti.
Why is this dehydrator the one to get?
The dehydrator uses digital controls and, from my testing, the temperature output is spot on! It allows for timer operation from 1 to 48 hours and up to 155°F (~70°C), so you can finely tune your filament without over-drying and making it too crispy.

🔧 Key Features:
- Dual PTFE Tube Paths: Choose your optimal filament feed direction for smooth, low-friction printing.
- Glue-Free, Tool-Free Assembly: Interlocking panels snap together, supporting the original tray design with zero mods to your dehydrator. No glue, no mess.
- Rotating Components for Smooth Flow: No single snag point!
- Spool positioning post free-spins.
- Locking plate rotates freely while staying secure on top.
- Triple 608ZZ bearings keep the top plate spinning like a dream.
- Print-Optimized Design: Built-in breakaway supports ensure rock-solid prints without permanent scaffolding.
- Multi-spool Capability: Each assembly locks into a single tray. Need more capacity? Print another complete set and mount it to another tray and then stack it on top! You can dry and spool up to four spools at once given the tray count provided with the dehydrator.
- Multi-printer Capability: Each tray allows filament to be spooled independently, so you can hook each tray up to a separate printer simultaneously. Perfect for print farms or parallel printing of moisture-sensitive filaments.
- Spool Fitment: Designed to hold spools ~65mm in width or narrower. If there's demand for a 2kg spool riser, I’m open to modifying the design – just let me know!
🧑🔬 Print Recommendations:
- Material: ABS for heat resistance – max out those drying temps!
- Use Case: Filament drying, food dehydration… just maybe not both at once.
🥊 Battle-Tested Versatility:
Unlike many other food dehydrator mods, no permanent modifications are required so you can return your dehydrator to snack duty whenever your significant other demands it back.
Assembly Instructions:
General Assembly Process:
- Build the Top Plate:
- Place the Bottom Plate on top of a dehydrator tray. It will nestle into the tray using a keyed system.
- Place the Top Plate on the Bottom Plate.
- Insert the Locking Ring through both plates. It will snap into the center ring of the tray.
- If properly assembled, you should be able to invert the tray without the assembly detaching.
- Place the tray with the rotating assembly into the dehydrator.
- Print the remaining two plates (4 blank plates and 1 with two threaded holes).
- Break off and discard the print supports.
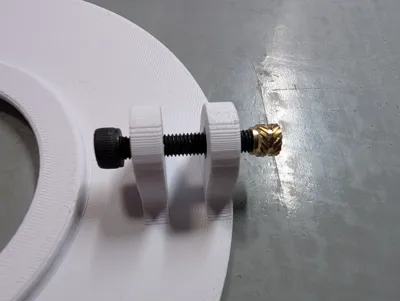
- Install the two PC4-M10 fittings into the filament pass-thru plate. Use a ratcheting wrench with a deep socket M10. Do not overtighten.
- Snap all riser components together to create the Riser Assembly. (Tight fit by design. Overextrusion may require calibration.)
- Place the Riser Assembly on top of the tray with the rotating assembly.
- Place the Spool Locater on top of the rotating assembly.
- Load your filament spool and cover it with another tray and the lid.
- Fire up the dehydrator and get drying!
Top Plate Assembly Tips:
- Install the Threaded Inserts:
- Temporarily insert an M5x30 screw into the mount from the inside, leaving 10mm exposed.
- Partially thread the insert onto the screw.
- Hold the plate vertically and apply downward pressure on the screw while heating the insert with a soldering iron.
- Press the insert flush with the mount edge but not past the inner wall.
- Remove the screw quickly once the insert is fully seated.
- Install Bearings:
- Insert a bearing spacer into the inner race.
- Slide the bearing and spacer between the bearing supports.
- Insert an M5x20 screw from the inside out and tighten without overtightening.
- Repeat the process for all three bearings.
🔥 Pro Tip: Calibrate your printer before printing to ensure the interlocking panels fit correctly. Now go forth and dry with confidence!
License
You shall not share, sub-license, sell, rent, host, transfer, or distribute in any way the digital or 3D printed versions of this object, nor any other derivative work of this object in its digital or physical format (including - but not limited to - remixes of this object, and hosting on other digital platforms). The objects may not be used without permission in any way whatsoever in which you charge money, or collect fees.
Comment & Rating (28)