First Layer calibration - perfect Flow Test!


Print Profile(2)


Description

Willkommen bei Frank druckt 3D
Welcome to Frank druckt 3D
Frank 3D Printsへようこそ
欢迎来到 Frank prints 3D
Im a hobbyist with ambitions. You can find me here and on other Platforms. My main Platform is TikTok. The time for my Website is rare so please do not expect too much updates. On TikTok you should find daily videos about 3d printing and my Journey! Please consider following me and keep asking questions, i will try to help everybody as long as i am able too!

Why This Calibration?
The initial layer is paramount. Imperfections here can propagate to subsequent layers or even damage the nozzle. Moreover, the first layer is visible, particularly crucial with effect build plates. A flawed initial layer results in unsightly artifacts and, in severe cases, even holes. While automatic flow calibration on printers like the Bambu Lab A-series is helpful, it's not always perfect, averaging across the entire print rather than focusing on individual layers. Since the first layer is always exposed, achieving optimal results is paramount!

Example:
The image (to the right on a PC, below the text on mobile) displays an A1 mini tool tray I found on Makerworld. I thought printing it on a Holo-effect build plate would be aesthetically pleasing. While it looks impressive, the layer lines and uneven edge are far from ideal.
This quality deficiency is consistently visible throughout the print. The example uses BambuLab PLA Basic.
Despite the A1 mini's automatic flow adjustment, the first layer is unsatisfactory.
How to Prevent This?
Manually adjust the first layer flow. It's straightforward and quick. The print is short, and evaluation is equally rapid and simple. For further explanation or video tutorials, please visit my TikTok account:
https://tiktok.com/@frankdruckt3D
Alternatively, find video links in my link collection on the mobile website:
IMPORTANT NOTES
This calibration only functions with the original project. Other print profiles will be incompatible. Refrain from creating alternative profiles; it's unproductive. Before printing, verify that your image matches the tutorial's. If all the tiles in the flow overview are uniformly colored, the print is failing and will yield no results!
Avoid using SuperTak or similar adhesive build plates whenever possible. We're only printing a single layer, which becomes extremely difficult to remove from SuperTak. Believe me, I have the bloody fingers to prove it laughs
ALSO IMPORTANT:
This calibration solely adjusts the material flow for your initial layer. Bed adhesion distance must still be managed by the printer, or manually for those without automatic bed leveling. This calibration does not replace Z-offset adjustment or bed leveling. If the first-layer flow adjustment option is missing, press CTRL+P or STRG+P (depending on your keyboard), or access it via Options/Settings and enable “Developer Mode.”
Boost Me (for free)
While the concept is simple, creating a detailed guide for beginners proved challenging and time-consuming. Your boost would be greatly appreciated, enabling me to create more content for you!
Instructions:
Step 1:
Download the project. No STL files—exclusively use the provided project. I don't provide STLs even in the “raw files,” only a .3mf for Bambu Studio users and a generic .3mf for others.
Step 2:
Open the file and select the correct material. In this example, I use a PLA of my own production. Then, click the “Color Scheme” dropdown menu and select “Flow” to visualize the flow at each point in the print.
This is illustrated here, with the menu marked by a red arrow:

Step 3:
Print!
Self-explanatory! Don't worry about print errors; they're intentional—this test forces the printer to produce under- and over-extrusion layers.
Step 4:
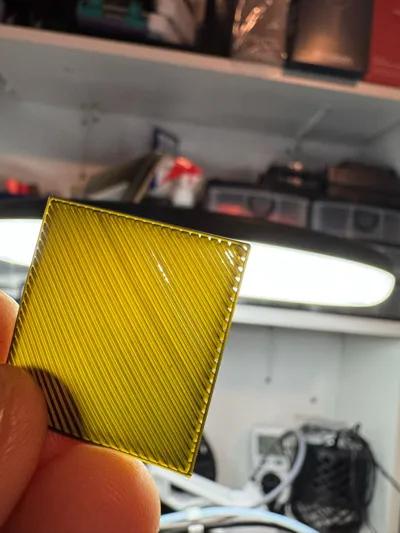
Evaluate the print. Here's an example of a completed test with three-color silk filament (black/gold):

…our task is to select the optimal tile.
Examine the central area. First, choose the tile appearing smoothest and assess the first layer. Then, hold the tile up to the light to detect any gaps between the printed lines. Here are some examples:
Significant Underextrusion:
Clear gaps between lines and at the edge…

Slight Underextrusion:
Improved, but still showing gaps

Significant Overextrusion:
Surface bubbles, excessively thick lines, and a noticeably thicker feel compared to others…

Selecting the Best Tile:
The following tile exhibits no gaps, presenting a smooth, clean, and consistent bottom layer. The use of two-toned filament makes this particularly evident…

Step 5:
Determine the correction value by identifying the selected tile. This graphic is helpful:

Note the value from the graphic!
Step 6:
Enter the correction value for the first layer in the print profile. Select the Quality tab and scroll down to “First Layer Flow Ratio” and change “1” to the determined value. In our example, it's 0.80.

Remember to save the profile! Give it a descriptive name for easy retrieval. This test must be performed individually for each filament, as material properties vary. I've observed significant differences in calibration values across materials.
NOTE
The values obtained are percentages. While further refinement is possible, my current settings suffice. Finer adjustments proved impractical. When unsure, opt for a value 0.5 higher rather than lower. Upon closer inspection of the enlarged photos, I adjusted the value due to uncertainty.
This method doesn't guarantee perfect results but minimizes errors and print issues. Alternative approaches exist, but properly setting the first layer is the foundation for subsequent calibrations. A PA test, for example, can be significantly impacted by a poor first layer. Knowing the initial layer is sound is crucial for optimal results!
For inquiries, contact me via TikTok. I'll assist where possible… a subscription would also be appreciated ;-)


If you like my work there are a lot of way how to support me!
The easiest and most direct way is to leave a boost…
Boost Me (for free)
The most easy way to support me and my work! Due to the many boosts i recieved here i was already able to safe my printers and my supply of spare parts more than one time! You keep me running and every single boost helps! Let me thank you all for your consideration!
You can also support me with a membership! They start at the lowest tier possible here on makerworld. For just 3 bucks a month you can force me to continue uploading more and new models ;-) I wouldn´t be able to leave a month without new models when there are people who support me with their hard earned money… LoL therefore im to well educated ;-)
Also you can use my Amazon links in the descriptions, when i tell which Filament i use! Links like this here:
But the most convenient way to support me, without paying anything is to follow me on TikTok, leave some likes, share some videos and spread the message that im there!
If you are a designer, you can also contact me to show your models, if you are a shop or manufacturer feel also free to reach out! Im here to show people the beauty of 3D printing and sharing my journey in this hobby. Showing off what others can do is also part of the game! Support ist kein Mord! (support is no murder, we say in germany)
License
You shall not share, sub-license, sell, rent, host, transfer, or distribute in any way the digital or 3D printed versions of this object, nor any other derivative work of this object in its digital or physical format (including - but not limited to - remixes of this object, and hosting on other digital platforms). The objects may not be used without permission in any way whatsoever in which you charge money, or collect fees.
Comment & Rating (414)