Customizable Visa-Style Card


Print Profile(1)

Description
This is a fun and fully customizable 3D model of a Visa-style card. I originally designed this for my son, who wanted his very own "credit card," and now you can personalize it to create your own unique version!
Features:
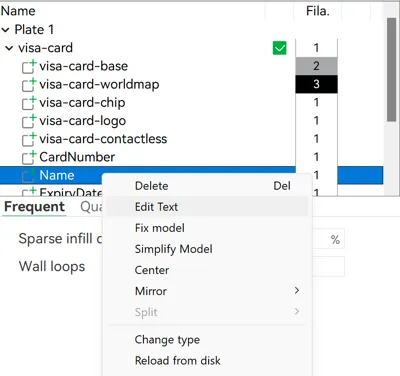
- Customizable Details: Easily edit the "Name," "CardNumber," "ExpiryDate," and "CVC" on the back of the card by right-clicking the respective parts in Bambu Studio and click “Edit Text”(as shown in the screenshots).
- Text Alignment Tip: After editing the text, you may need to use your slicer’s Move Tool to adjust its position. Only move the text along the X-axis to ensure it stays properly aligned on the surface of the card.
- Font Choice: The text uses OCR A by default—the standard font for credit cards—but you can switch to any font you prefer for a unique look.
- Multi-Material Ready: Customize your print further by assigning different colors or materials to individual parts in your slicer. Highlight the text, map, chip, and other details with vibrant or contrasting colors for an eye-catching result.
- Realistic Size: The card is designed to match the exact dimensions of a real credit card (about 86mm x 54mm), making it feel authentic in your hand.
- High Detail Printing: Due to the small size of the text, a 0.2mm nozzle is required to achieve sharp and legible results at this scale. Larger nozzles may cause the text to lose clarity or blend into the surface. But feel free to scale up the model or resize the text to adapt to a larger nozzle diameter.
How to Use:
- Load the model into your slicer.
- Right-click the part you'd like to customize (e.g., "Name," "CardNumber") and choose "Edit Text."
- Update the text, and if necessary, use the Move Tool to adjust its position along the X-axis only. This ensures the text remains perfectly aligned with the card surface.
- Stick with the default OCR A font for a realistic credit card look, or choose a different font for a unique design.
- Assign colors to individual parts for added customization—make the text pop, highlight the map, or use metallic colors for the chip!
- Print using a 0.2mm nozzle to maintain the fine details of the text and other small features or scale up and adjust if you prefer.
- Enjoy your personalized credit card design!
This model is perfect for creating playful "credit cards" for kids, unique business cards, creative props, or fun decorative items.
License
You shall not share, sub-license, sell, rent, host, transfer, or distribute in any way the digital or 3D printed versions of this object, nor any other derivative work of this object in its digital or physical format (including - but not limited to - remixes of this object, and hosting on other digital platforms). The objects may not be used without permission in any way whatsoever in which you charge money, or collect fees.
Comment & Rating (68)