Levoit Core Mini 4-Stage Activated Carbon Filter


Print Profile(1)

Description
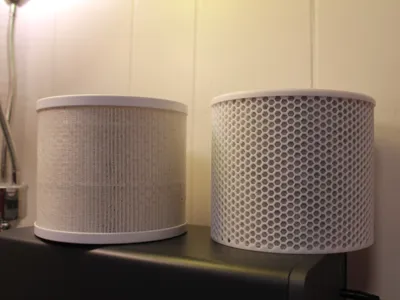
Levoit Core Mini-P Activated Carbon Filter -
This is a replacement filter unit I designed for the Levoit Core Mini-P Air Purifier. It's a nice little air purifier, but the recommended filter replacement interval is every 4-6 months, and with filters costing ~$20-30, it can easily run over $75 per year.
Features:
The exact dimensions as your old filter ( 4.8in x 5.8in x 3.7in(ID))
Optimized for High-Flow - High-Filtration
Adds additional functionality by helping to remove odors, smoke, fumes, and VOC's - which are common in 3D Printing
Low-Cost Materials (~$6-8 per filter)
Materials:
I sourced all of my materials locally, but I've added some links to help with finding things
- Activated Carbon Filter Media - $7.99
- Pre-Filter Media (Electrostatic Filter Material) - ~$15.99
- Activated Carbon Pellets - $7.99
Printing:
I designed everything to be printed at a 0.2mm Layer Height with a 0.4mm Nozzle, all settings are pre-set in my profiles
Any filament should suffice, I used Bambu Lab PLA Basic in Jade White
Boost Me (for free)
If you like my Levoit Activated Carbon Filter Mod or any of my other works, please consider leaving a boost!
Assembly:
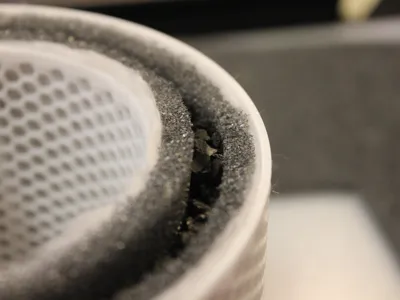
- To assemble the Activated Charcoal Filter, begin by gluing the sealing ring into the top of the Filter Cover. The Sealing Ring will seat into the foam seal located at the bottom of the Air Purifier Motor/Fan. While that dries, we can assemble the rest of the Filter.


2. Cut a ~122mm x ~420mm rectangle out of both the Pre-Filter Media and the Carbon Filter Media. Layer the Pre-Filter over the Carbon Filter like so. This will be the Outer Filter.


3. Install the Outer Layered Filter Media with the Pre-Filter facing outwards. This is what you should be left with:
TIP: Some filament clips can be used to temporarily hold the filter in place during installation. A screwdriver is also helpful to guide the Filter Media where you want it to go.


4. Next, Cut a ~122mm x ~330mm rectangle out of both the Pre-Filter Media and the Carbon Filter Media, once again layering the Pre-filter over the Carbon Filter. This will be the Inner Filter
. The sizing can be slightly larger as excess can be removed at the end - aka… cuts don't have to be perfect :)


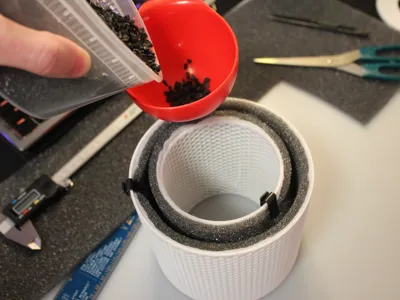
5. Next, install the Inner Layered Filter Media in a similar fashion to the Outer Layer: Its now time to add your Carbon Pellets
TIP: Again, clips come in handy here :) ]


6. Add the Activated Carbon Pellets until at the top, a funnel can make this easier


7. Now you can remove any clips you were using and install the Filter Cap. Make sure there are no leaks by giving the Filter a light shake to ensure no Activated Carbon comes out. There is no need to glue this in place as the downward pressure from the Top of the Air Purifier will hold the Filter and Filter Cap in place; It's also necessary to replace the Carbon Media and mesh filters every few months


8. Install the new Filter and you're all done! You've just successfully upgraded your Levoit Air Purifier for a fraction of the price that premium filters cost. Again, this is not a permanent filter, you'll still have to replace both the Filter Media and Carbon Pellets every few months to maintain its purification abilities.


License
You shall not share, sub-license, sell, rent, host, transfer, or distribute in any way the digital or 3D printed versions of this object, nor any other derivative work of this object in its digital or physical format (including - but not limited to - remixes of this object, and hosting on other digital platforms). The objects may not be used without permission in any way whatsoever in which you charge money, or collect fees.
Comment & Rating (8)