


Print Profile(0)
Description
Summary
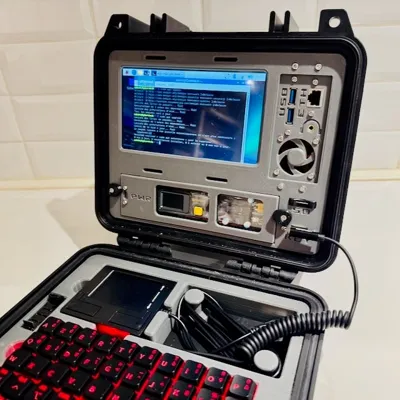
Cyberdeck is a thing I won't explain in detail. It's supposed to be a rugged, robust, minimalist computer that would endure post apocalyptic conditions. I'm not so sure mine is but it is very inspired from lots of models I saw and mostly by Jay Doscher's work .
I made this because I thought it was fun and a it seemed challenging. It was.
The parts are really easy to print, most of them do not need support. The whole project is a lot of fun, but I must warn you:
- the whole build requires a lot of work, especially because I had to shave and cut some connectors to fit inside the volume. And the keyboard I chose is really nice but needed work to suit my needs. And the cable management is painful.
- it is not cheap. I used a screen, a Raspberry 4 and a Noctua fan I scavenged from a previous project. If you add up all the required parts, you end up with quite a bill.
Main features
- front panel access to two USB 3 ports for general purpose and one USB port for the keyboard
- front panel access to one RJ 45 Ethernet port
- front panel access to USB C charge port, connected to the high capacity battery (see parts below). WARNING : as the battery will tell you, DO NOT TRY TO CHARGE THE BATTERY WHILE IT IS POWERING THE CYBERDECK!
- front panel access to SD card port. This enables you to swap the Linux distribution you wish to use, without having to reach the slot under the Pi
- soft box to hold a USB thumb drive (a small one like the one I chose below) and a few SD cards (those with the various distributions you wish to use)
- front panel access to 3.5mm audio Jack
- a heat activated fan (wiring and coding is available in a PDF file you can find in the Files section of the model)
There is no step by step but if you pay attention it's kind of intuitive, I bet you can do it. I share a lot of pictures and a doc for some coding clues. The rest is up to you :)
Guidelines
Here are some tips that may help you:
- A PDF file is available in the Files section of this model. I share some code to help you with the screen configuration, how to wire the fan and the code to make it trigger only when the temperature exceeds a certain value.
- Most parts are printed with PLA+ except for the seal, used to set the mainFrame and the keyboardFrame in place inside the Pelican case; those have to be printed with TPU. The SD and USB box is also printed with TPU.
- Brass inserts must be hot pushed inside the frame to later safely attach the screen, raspberry bridge and arches to it (pictures should help you get what I mean). You also must push one in each of the cable towers, screwed from the bottom to the keyboard frame, for proper cable management (see pictures).
- The arches are designed to make cable management easier. You will use them to keep cables away from the Pi and attach them together in a sensible way. They share brass holes with the screen and the raspberry bridge, so you will use the same M3 screws to attach multiple parts together.
- The only part that requires glue is the female audio Jack that attaches to the ports holder. I used cyanolite.
- Why would you need a touchpad when the screen is touch sensitive? Because using your finger one such a small screen can be frustrating and because there is no multitouch enabled. The touchpad makes scrolling and pinch in/pinch out features available.
- To power up the Cyberdeck, use the Sharge battery interface to activate DC ON (consider the warning on the battery screen). To power it off, use the soft "power off" routine of the distribution and then the Sharge battery interface to activate DC OFF; if you don't, the screen will continue to suck power.
Parts list
These are the parts I used (I may forget some parts but most of them are listed):
Electronics and case
- 1 Raspberry Pi 4
- 1 Noctua 40x10mm fan - optional
- 1 Waveshare 7inch Capacitive Touch Screen LCD (B), 800×480, HDMI
- 1 Shargeek 100 25 600mAh battery
- 1 1300 Pelican Case
- 1 P40 40-Key 4x10 Grid programmable keyboard
- 1 small USB touchpad; this is optional. I designed the keyboard frame so this part can sit in the top left slot, wtith the rather long cable sitting in the top right slot, with the keyboard cord. See pictures to figure out.
Cords and accessories
- 1 3.5mm audio Jack male to female extension cord to connect the Pi to the front panel
- 1 spiral USB C to USB cord for the keyboard to Cyberdeck connexion
- 1 USB C to DC 5V cord to connect the Pi to the DC-in battery port
- 1 USB C male to female panel connector to connect the DC-out battery port to the front PWR connector of the Cyberdeck
- 90 degree USB C adapters to guide some cords
- Various short flat 90 degrees cords to fit the case and mainly connect the screen to the Pi: here, here, and here
- 1 double male to female USB C panel extension cord
- 1 Ethernet RJ45 male to female panel extension cord
- 1 Micro SD memory card extension cord
- as many SD memory card as you want, to install the OS you want to use with your Cyberdeck. I have a Ubuntu and a Kali Linux on mine.
- 1 256Gb USB Flash drive to act as an external drive; you can store whatever you want on it - optional
Bits and screws
- M3 Hex nuts and bolts
- M3 Brass inserts
- zip ties for cable management
Print Settings
Printer Brand:
Prusa
Printer:
i3 MK4
Rafts:
No
Supports:
Yes
Resolution:
Try adaptative for best results.
Infill:
Low
Notes:
Supports are only necessary for the ports holder and battery cradle.
Comment & Rating (3)