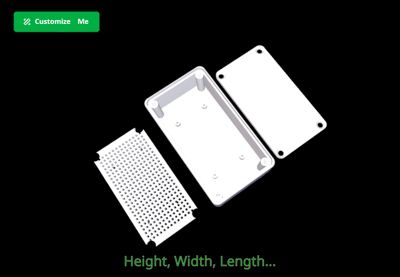
Customizable Project Enclosure Box


Print Profile(2)


Bill of Materials
- 6-32x1/2" machine screws x 4:
Description
Boost Me (for free)
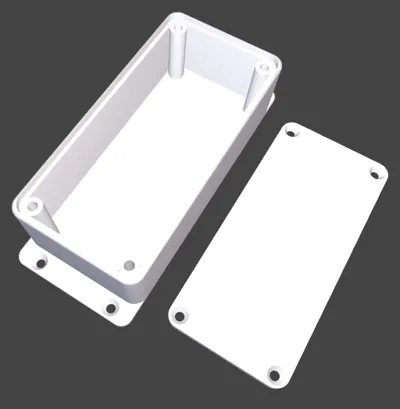
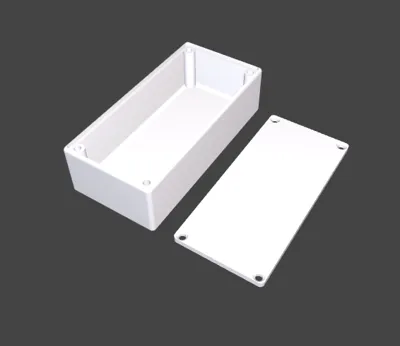
I looked forever for the perfect project enclosure box. After searching forever it seemed there were boxes created for specific things but nothing that filled my desires so I made this - an electrical engineers dream! I should have made this forever ago instead of buying so many project enclosures from hobby shops and online.
Please note that I have not uploaded any print profiles as this model is meant to be fully customized by you!
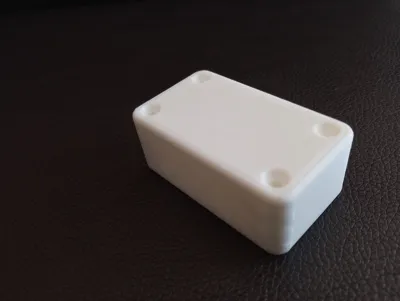
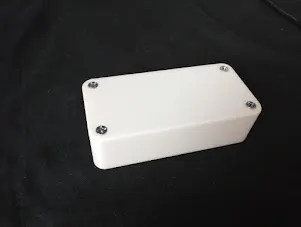
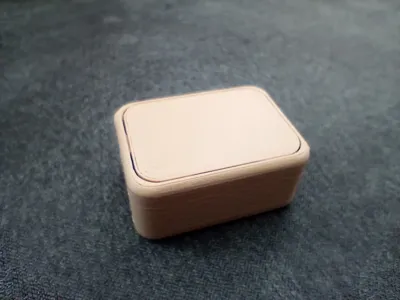
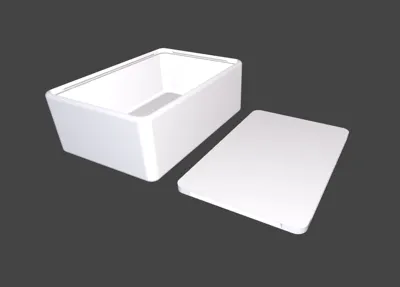
Suggested lid screws are 6-32x1/2", 8-32x1/2", M3x12mm, or M4x12mm, but you can use other screws. Snap locking lid feature is available if you don't want to use screws or glue option. With the snap lock option, please note that it might be difficult to snap the lid in place and it is not meant to be removed; removal is possible, but not easy. I have created a removable snap lock lid option that is easier to remove and only places the locks loosely on two sides.
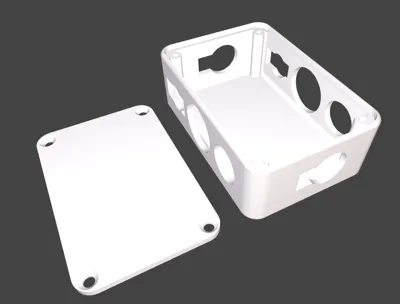
If you plan to drill many holes with a drill bit I recommend higher infill. There are many hole options though which might mitigate the need for any drilling. Vents may work for building a grid of holes instead of trying to place your own perfectly.
I know many of you have expressed that you would like to be able to adjust the outer wall thickness. It is currently set to 3mm which is pretty standard for a project enclosure. I get it that some of you also think this is overkill. I am actually working on trying to make the wall slightly adjustable but my efforts in that are a complete re-write of the ~3000 lines of code as every mathematical computation (every line) must account for that little shift. I haven't given up yet, but know it is very tedious and I am trying to make it happen!
Dimensions are inner dimensions roughly… make sure you add extra space if you round the edges and need space for your circuit board to fit beside the screw posts. ABS is probably the best material for printing (not to mention the most fire resistant). I assume no liability for electronics burning up 🙂.

I have created the ability to generate a gasket to make a waterproof box. I used stainless steel screws and 95A TPU, and it worked wonderfully. I used Screw Posts - Barely Blended settings for the screws and made my box 40x60x40. It stayed fully submerged in water for over five minutes and the paper I had inside came out dry with no signs of water in the box. If you choose to make a waterproof box I suggest you test it before placing electronics inside, and remember to do acetone smoothing of your ABS because 3D printing is porous by nature of print layers. PLA and other materials are super porous and not suitable for waterproof boxes. Again, I assume no liability for any damages, water, or otherwise 🙂.
I would love to see your projects and uses. There is nothing more satisfying to me (besides a boost) than to see pictures of your projects, so please don't hesitate to share, big or small! Please let me know if you spot an error or other issue and the details for me to reproduce. If you have an idea for improvement, please don't hesitate to share as I might be able to make it happen! If you also wouldn't mind, send me a like or even better:
Boost Me (for free)
Please consider giving me a boost if you found this model useful. (It's free and keeps me excited about adding additional features and improvements.)
Thanks! And really… thanks to my fans who have given repeat boosts. You guys are so amazing!
If the thought of all the holes and additional settings is too much for you you can use my simplified version: https://makerworld.com/en/models/1968109-simplified-customizable-project-enclosure-box
If you like this model you might like some of my other models: https://makerworld.com/en/@MrPractical/
Projects that might go well with your make using this model:
5mm LED light holder: https://makerworld.com/en/models/90914-5mm-led-lights-cap
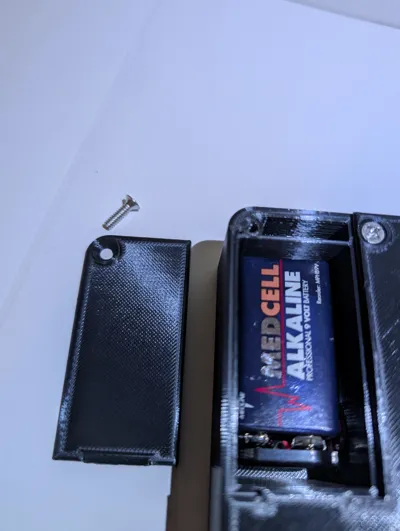
9V Battery holder clip: https://www.thingiverse.com/thing:2605589
Keystone adapter: https://makerworld.com/en/models/871119-rj45-keystone-bracket-wall-plate-insert
Guide for use:
Click the big green Customize (####) button to begin! When you click “Download” in the top right corner after you are done, just select any printer (I don't have any on their list) then choose download STL.

There are so many options and customizable parts that it is impossible for me to organize it nicely. Please play around and have fun seeing what all of the different options do! I hope to add a video tutorial soon (may take me some time) showing how to do some fun and fancy things.
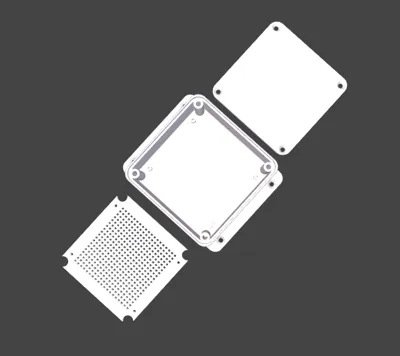
Below are depictions of lid styles:


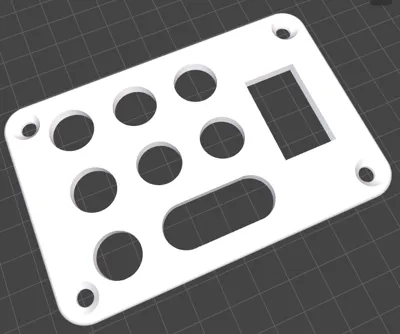
Main item tabs are marked with a star(★). Don't miss selecting your preferred lid type in “General” as there are several options for screw styles, cap or inset styled lids, and even snap lock or glue lids. See above for those styles. Screws for the lid might confuse you so let me explain that a little: Socket or Pan Head screws have a “flat bottom”. Flat Head screws (aka countersunk screws) have a tapered or “bugle” bottom. Don't miss the mounting holes or tabs found in “Base Mounting Options” if you wish to secure your box to a surface. Holes are marked with ◉ or ▣ noting the shape of the hole to be made with a number in parentheses to denote how many of that type of hole you can add for the given side. Sorry, those get kind of messy but OpenScad doesn't have a better way for me to organize them. Text can be added to the lid (and hopefully soon to sides) like “on” or “off” marked with the 𝕋 (see figures below). Vents marked with ✿ are a whole new amazing dimension… hopefully self explanatory. Backplates are used with standoffs (tiny screw posts) to attach multiple circuit boards and other components. The first (Primary Quad) of standoffs are used for the backplate. A secondary quad can be added but they will not transfer onto the backplate. Four individual standoffs are also available for placement and also will not affect the backplate. Super cool add ins that are specialized will have a § symbol. Lastly the Generate tab (➤) will really help you if you are making a box too big for a build plate. It is also key for waterproof box making. You will want to “Adjust For Gasket” to create space in the box for the gasket to sit and to add a lip on the lid to keep the gasket in place. Selecting “Generate Gasket” will not generate any other parts except the gasket, as the gasket should be made from TPU. You will also find the option to disable red error messages in the Generate tab.


To avoid confusion in hole generation I recommend not rotating the box from the default rotation. In the default box generation the left side is the “Length side” with the right side as the “Opposite Length side”. Width side is closest to you and Width Opposite side is farthest from you. Bottom would be inside the box base, and top would be the lid. If you offset a hole and it goes the opposite direction than you thought it should just add a negative (-) in front of your offset number.

Side Edge Rounding is best described with a picture:

I have implemented some bounds checking for adding holes to the lid and side to help guide you so you don't clip the hole or lose it altogether. The bounds checking isn't perfect but will hopefully be helpful! If a hole you wish to generate is noted with minimal bounds check it will still try to relocate the hole to avoid clipping but it will not generate the red text error message. (I could spend a lifetime improving all sorts of bounds checking.)
If you get this error:

you most likely have too many small holes or crazy details for the server to render. Try generating only one part at a time or lessen the detail by making less holes etc.
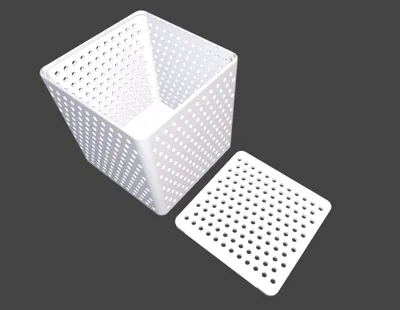
Check out this cool lid I made by combining the “Vent” option (which helps evenly space holes) with adding rectangle holes to the lid:


This is just a small example of things you can do by playing around and exploring the powerful features.
I, like many of you, wish there were a way to save variable files so you can come back without having to rebuild from scratch. The best thing I can tell you right now until MakerWorld releases new features with ability to save or include my own files etc. is to keep your browser open with data points you use, or write down the variables you change. Facepalm, old school I know. Sorry, it's annoying for me too!
Comment & Rating (482)