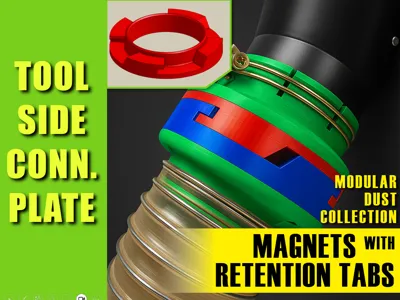
Tool Side Connector | Modular Dust Collection


Print Profile(2)


Description
Boost Me (for free)
If you found this design helpful or inspiring, please leave me a Boost! It’s a great way to show support and helps me keep creating more designs like this. Thank you so much!

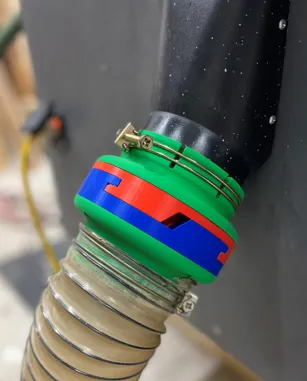
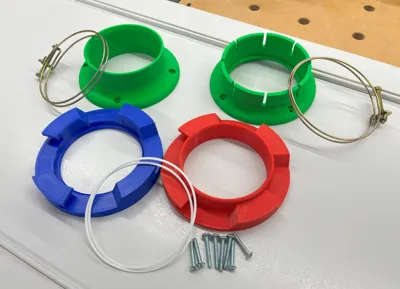
This is a new take on Shop Dust Collection Fitting Connectors:
Enjoy Convenience of magnets, Retention security of interlocking tabs, and Modularity capability to adapt to any interface
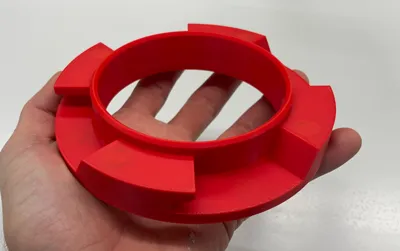
This file is for the Tool Side Connector Plate, from the Complete Collection here » Modular Cust Collection [MDC]
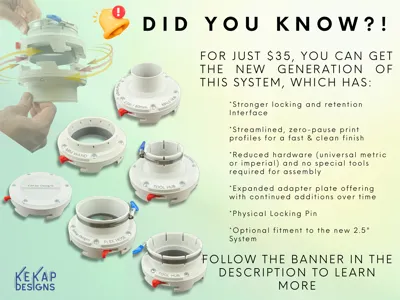
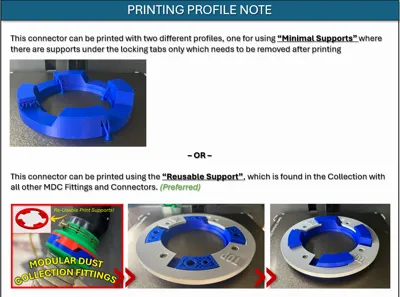
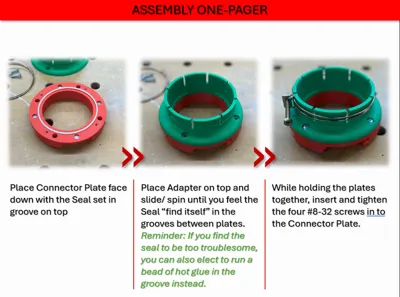
*09JAN24 update: The connector can now be printed using re-usable supports! This eliminates the need for any post-processing, which comes in handy when you are printing several of these. The same support can also be used for both Connector Plates. Just print and assemble the support here: Reusable Support, and select the Reusable Support print profile. In addition, I have added a Printing and Assembly One-Pager instructional to the images of this Connector Plate. Enjoy!
Full details below:
Boost Me (for free)
Please consider giving me a Boost if you find this design useful to support me. Thank you!
These were developed to have a more robust connection when latched, single-handed smooth operation, and a new modular approach compared to any others I have seen.
I have spent countless hours perfecting and testing this design. After having used it extensively in my own shop for over 2 years now, I'm confident it will be the best Dust Collection Connector System you will ever use.
Connector Plate Features:

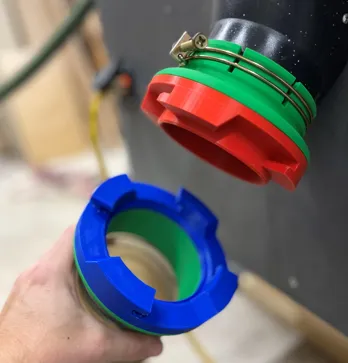
- Connector plates are standardized across connections - ‘Vac Side’ and ‘Tool side’ Connector Plates
- Allows for complete versatility when adapting to various tools
- Reduces wasted filament in the event a Connector Plate or Adapter ever needs to be reprinted
- Allows for batch printing and keeping extras on-hand… for future tool purchases!
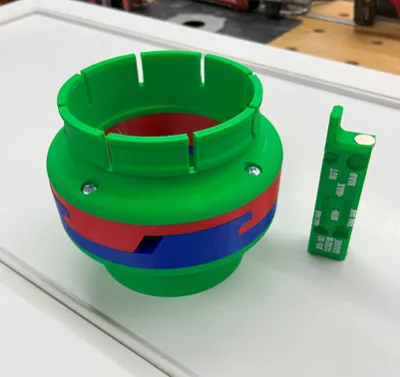
- Magnets in Connectors are imbedded behind the plastic for retention and easy cleaning if any metal debris is picked up
- Pause points are integrated in the G-code at 2 layers to embed magnets prior to continuing to print - with an easy Printing Jig available to ensure correct magnet orientation every time!
- The ‘Vac Side’ Plate is the open lug design to easily remove from the tool and use to vacuum any flat surface quickly. This design avoids unintentional flat suction to surfaces which can get bothersome with some other designs. Instead you can just push this one around.
- The 'Vac Side' Plate also has an inside diameter between the lugs to perfectly fit over a typical 4 in. tool port for the occasions when you may not have a ‘Tool Side’ Connector mounted on rarely-used tools
- The 4 locking lugs physically retain the connection to ensure no connector is accidentally disconnected
- If you desire, there is a printable ‘Lock Tool’ to physically prevent disconnection as well
- Tapered profile on backside of lugs serves to aid in disconnection when twisting in the unlock direction for a very natural, one-handed operation
- Lead-in profiles added to aid in easily connecting, and embedded magnets serve to provide a self-locking snap in place solution
- Tight tolerancing between the connectors reduces the amount of suction loss and also does not require any special TPU or rubber O-Rings to function effectively
- “Goof Holes” have been added to allow easy removal of magnets in the event it ever breaks or needs to be pre-printed
- Extremely minimal post-processing required - only supports are under the 4 lugs and are easy to remove.
- A few extra design considerations to note:


Combined Printing and Hardware Jig Features:

- This Jig serves to aid in both mounting of the magnets during the printing of the Connector Plates, and ensure your hardware is the correct sizes before getting stuck in the middle of a print.
One end labelled " ‹ First ‹ ” is what you will use to install the magnets at the first pause of the print, regardless of whether it is a ‘Vac Side’ or ‘Tool Side’ Connector Plate.

The other end is labelled “ » Second » ” and is used to install the magnets at the second pause of the print, again regardless of whether it is a ‘Vac Side’ or ‘Tool Side’ Connector Plate. This side also has an extension on it which will physically prevent you from using it on the first side as a goof-proof design element.

- The top face of the Jig has 3 primary purposes, all related to ensuring you have the correct hardware on hand.
- #8-32 screw length gauge: This differs when you are connecting to either the ‘Vac Side’ or ‘Tool Side’ Connector, so this gives you a Min and Max measurement to go by prior to assembly. (I tend to have a lot of #8-32 screws leftover from either electrical work or cabinet hardware, and I will just cut them down with my wire cutters. Many wire cutters off a clean-cut feature for #8 screws with just the pinch of the pliers - mine are the Milwaukee wire cutters for reference.)
- #8-32 nut size: This is the same print profile used in the connectors, so before you begin make sure your nuts fit neatly here! This is a standard industry size so expect there should be no issues here.
- 12mm x 3mm magnet size: As with the nut, this is the same print profile used in the connectors, so before you begin make sure your magnet fits neatly here! They should fit snug if you are using a hardened steel nozzle of the nozzle may pick them up when printing over them. This is not an issue for brass or stainless nozzles. If you find your magnets aren't quite snug enough you may consider a drop of super glue to hold them in as you place them. I have the link to the magnets I used specifically below, or I'm sure many others will also work.
Hardware needed:
- 4x #8-32 Machine screws and Nuts per connector
- Note: If you are going to purchase these, purchase in ¾" length to work with both sides of connectors without cutting
8x 12mm x 3mm Neodymium Disc Magnets per connector. Link to the ones I purchase: https://www.amazon.com/gp/product/B09XVBL8SK/ref=ppx_yo_dt_b_asin_title_o01_s00?ie=UTF8
If you find this useful please consider boosting me to support more creations and to get the word out!
If you like what you see here, come and check out some of my larger projects in MakerWorld!
Click the banners to learn more!


Membership
If you are interested in selling this design, please be sure to join my membership program!
License
You shall not share, sub-license, sell, rent, host, transfer, or distribute in any way the digital or 3D printed versions of this object, nor any other derivative work of this object in its digital or physical format (including - but not limited to - remixes of this object, and hosting on other digital platforms). The objects may not be used without permission in any way whatsoever in which you charge money, or collect fees.
Comment & Rating (71)