V6 Clone Silicone Socket Mold 20mmx16mmx12mm


Print Profile(1)

Description
A precisely fitting silicone sock for the hotend significantly reduces cleaning effort during nozzle changes and ensures more consistent nozzle temperatures when the part cooling fan activates
While several molds already exist for the original E3D Heatblock, a solution is now available for "clone versions":
Your heatblock measures: LxWxH 20mm x 16mm x 12mm
As mentioned, a silicone sock enhances your hotend and simplifies nozzle changes
From now on, you can inexpensively cast your own silicone socks and are no longer reliant on overpriced socks from various vendors
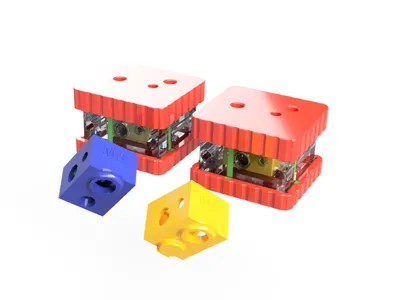
For assembly, you need 3 M3*40 screws, nuts, and washers Alternatively, a small clamping device can be used that presses the top and bottom together
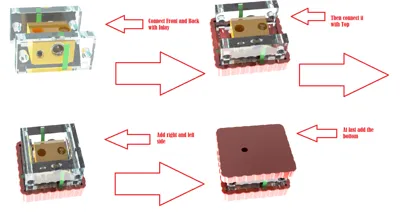
Small markings (green dashes in the photos) are incorporated into the individual components, which must align with each other This shows which part belongs where and simplifies assembly
The molding silicone can be ordered at: https://www.amazon.de/TFC-Kautschuk-Dubliersilikon-mittelhart-hitzebest%C3%A4ndig/dp/B005D6WN3S?th=1
or from the manufacturer's website, also in smaller quantities:
The mold should be thinly coated with petroleum jelly beforehand to prevent adhesion
For filling, I recommend commercially available 10ml disposable syringes without needles:
https://www.amazon.de/MedixX-Spritzen-Set-stumpfer-verschiedene-Heimwerk/dp/B0B5FN4CLY/ref=sr_1_1_sspa?crid=2686T38GM9HA6&keywords=10ml+spritze&qid=1685713331&sprefix=10ml+%2Caps%2C94&sr=8-1-spons&sp_csd=d2lkZ2V0TmFtZT1zcF9hdGY&psc=1
The mold is filled via the separate, central opening
The download contains two versions:
- The classic version, where the screw clamping the heating cartridge is not covered and thus remains accessible
- A version where the clamping screw for the heating cartridge is also covered by the silicone sock For this version, the files "Bottom closed" and "Inlay Closed" must be used instead of "Bottom" and "Inlay"
Finally, two cuts must be made from the top to the recess for the heating cartridge and the thermistor However, if the silicone sock is attached during assembly, this step is omitted in the classic version
Numerous YouTube videos demonstrate the precise casting process
The parts for the mold are extremely precise This means that corresponding printing accuracy is assumed The tolerances are tight to ensure that the mold is airtight If an elephant's foot or unclean edges occur during printing, these must be briefly removed with sandpaper (really minimal effort, like deburring)
3D Printing Settings
Material: PLA
Nozzle: 04mm
no supports necessary (supports can be used for the version with a closed heating cartridge screw)
Layer height: 012mm
First Layer: 02mm
Infill: 10%
Wall thickness: min 3 walls
Bottom/Top: 12mm
License
You shall not share, sub-license, sell, rent, host, transfer, or distribute in any way the digital or 3D printed versions of this object, nor any other derivative work of this object in its digital or physical format (including - but not limited to - remixes of this object, and hosting on other digital platforms). The objects may not be used without permission in any way whatsoever in which you charge money, or collect fees.
Comment & Rating (0)