Dual Locking Vault - Configurable & Customizable!


Print Profile(2)


Description
Boost Me (for free)
Boost me to support the creation of even more awesome models!
INTRODUCTION
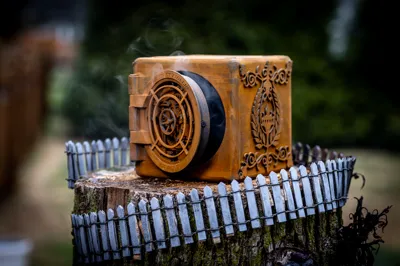
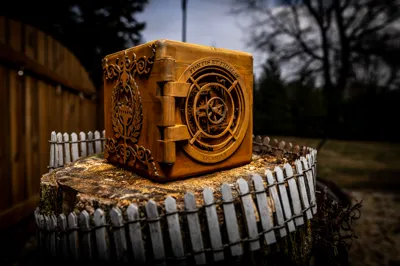
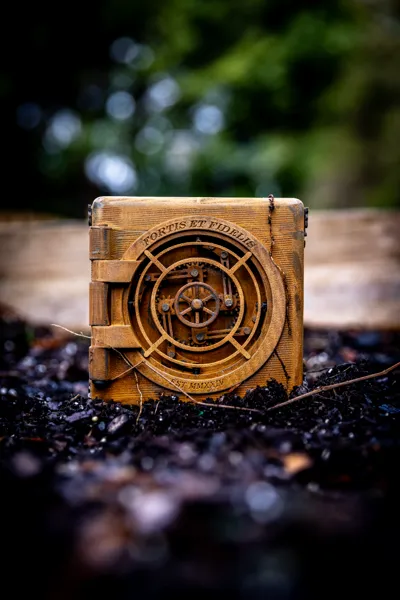
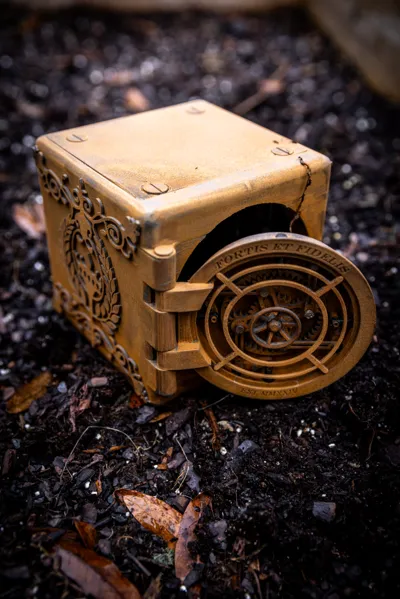
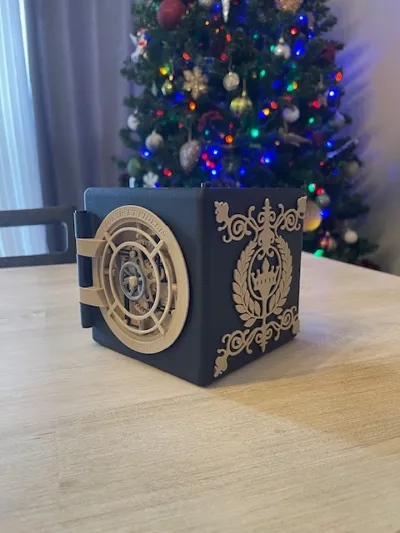
“Fortis Et Fidels” (the Strong and Faithful) Vault is here! Mechanical gear lock mechanism with a secondary, User Configurable, Tumble lock set to fully secure your coin stash! This is a 5" x 5" x 5" fully functional desktop vault model!
I saw a “Vault” contest pop up while I was home from work for a few extra days during the Christmas week and decided to give my own vault design a try. After countless hours designing and redesigning in solidworks, and even more iterations of test prints, I am finally happy with the results!
Also provided is a simplified upper cover lid without the tumble lock mechanism for those who want a cleaner look.
Print in any combination of colors to fully customize the look! I even fully printed mine in a Iron PLA and rusted the entire vault for an awesome vintage appearance!

Please Note** This is fully functional mechanical locking mechanism, and due to some printer/filament variations/tolerance some added parts prep may be required to ensure proper function. Please follow along in the provided assembly/tips guide to ensure proper function. If you have any questions, please free to ask! If there is an addition you want to your vault, please drop me a comment! I am already working on a secondary front door design that will be 100% backwards compatible with this version, as well as a few different side piece designs for even more customization!
ASSEMBLY

Please be sure to test fit each of the moving pieces together before fully assembling the Vault. Over the last 5 test prints I have found that small variations (including temperature and humidity) can cause some of the tolerances to close up a bit much. Nothing that a quick hit of some 400 grit sand paper, or just manually turning the parts until they self-clearance, couldn't fix! I have 4 fully functional models put together, including one in full 10inch by 10inch size!
Follow along in the provided instruction document and let me know if you have any questions! Some glue may be required for the instances where a good press-fit wasn't achieved on certain parts. I am working to provide a quick video overview of the assembly process shortly.

DISCLAIMER
The rusted vault seen in the photo gallery requires special filament and post processing*
You will need a metal-filled PLA material to print the parts in (I used a Protopasta Iron filled PLA).
After the print is completed, you will need to use some 400 grit sand paper to lightly scuff all of the visible surfaced you wanted rusted to explose the metal flake.
After this is done, you will need to dissolve some salt into Hydrogen Peroxide and soak the parts (or occasionally spray on the mixtures every 20-30 minutes) for about 1-2 hours to allow the rusting process to take place.
Remove and let air dry for the full rusted effect.
I used just slightly over a 500g roll to print the vault seen in the images (there were a couple of re-prints so maybe it is possible to fit within 1 roll)*
Thank you for visiting my page and taking the time to print my models. Your support is truly appreciated. I never expected to have so many people following me and fueling my passion for creating the models that I create!
Documentation (1)
License
You shall not share, sub-license, sell, rent, host, transfer, or distribute in any way the digital or 3D printed versions of this object, nor any other derivative work of this object in its digital or physical format (including - but not limited to - remixes of this object, and hosting on other digital platforms). The objects may not be used without permission in any way whatsoever in which you charge money, or collect fees.
Comment & Rating (26)